
- 1用AI给照片换脸和换背景,就是这么简单,stable-diffusion教程_stablediffusion换脸
- 2Excel/WPS《超级处理器》功能介绍与安装下载
- 310家互联网大厂的中秋礼盒,你最钟意哪一家?,揭秘ARouter路由机制
- 4【SpringBlade-权限缺陷】API鉴权逻辑缺陷漏洞
- 5spark中的cache和checkpoint_spark cache checkpoint
- 6java case 枚举_Java枚举类型在switch语句中的正确用法
- 7微信小程序实战项目开发(天气预报项目实战):内涵开发说明文档、需求文档 && 手把手分步骤教你写出自己的小程序项目 && 天气预报小程序 && 时实请求获取天气 && 自定义功能 && 完整的源代码_查看天气预报微信小程序开发实例
- 8点云检测算法之PointPillar深度解读
- 9Sql Function 返回表_sql server function
- 10迷宫问题的递归回溯算法c语言,递归回溯算法解决迷宫问题
SpringBoot的三种缓存技术(Spring Cache、Layering Cache 框架、Alibaba JetCache 框架)_springboot可用的缓存技术
赞
踩
Spring Cache
Spring Cache 是 Spring 自带的缓存方案,使用简单,既可以使用本地缓存,也可以使用 Redis
导包:
<dependency>
          <groupId>org.springframework.boot</groupId>
          <artifactId>spring-boot-starter-data-redis</artifactId>
          <version>3.2.5</version>
      </dependency>
      <dependency>
          <groupId>org.springframework.boot</groupId>
          <artifactId>spring-boot-starter-cache</artifactId>
          <version>3.1.1</version>
      </dependency>
      <-- 当然也可以用redisson -->
<!--        <dependency>-->
<!--            <groupId>org.redisson</groupId>-->
<!--            <artifactId>redisson</artifactId>-->
<!--            <version>3.30.0</version>-->
<!--        </dependency>

- 1
- 2
- 3
- 4
- 5
- 6
- 7
- 8
- 9
- 10
- 11
- 12
- 13
- 14
- 15
- 16
可以在自己编写的配置类或者启动类上加上注解@EnableCaching

二选一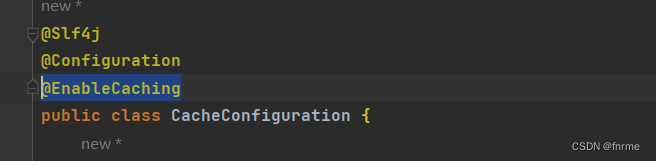
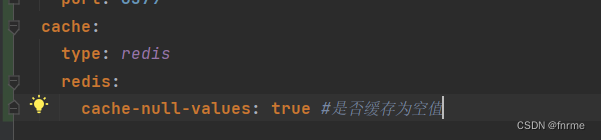
同时也可以补充相关的配置:
后面就可以在方法上使用了,例如:

触发将数据保存到缓存的操作:
@Cacheable: Triggerscache population.:cxche eviction.:触发将数据从缓存删除的操作
@CacheEvict: Triggers
@CachePut: Updates the cache without interfering with the method execution.:不影响方法执行更新缓存
@Caching: Regroups multiple cache operations to be applied on a method.:组合以上多个操作@Cacheconfig:Shares some common cache-related settings at class-level.:在类级别共享存的相同配置
Layering Cache 框架
导入依赖:
<dependency>
  <groupId>com.github.xiaolyuh</groupId>
  <artifactId>layering-cache-starter</artifactId>
  <version>版本号</version>
</dependency>
- 1
- 2
- 3
- 4
- 5
配置文件不需要做什么修改。启动类依然加上 @EnableCaching 注解。
然后使用 layering 包中的 @Cacheable @CachePut @CatchEvict 三个注解来替换 Spring Cache 的默认注解,例如:
@Cacheable(value = "user", key = "#userId",firstCache = @FirstCache(expireTime = 5, timeUnit = TimeUnit.MINUTES),
 secondaryCache = @SecondaryCache(expireTime = 10, preloadTime = 3, forceRefresh = true, isAllowNullValue = true, timeUnit = TimeUnit.MINUTES))
- 1
- 2
Alibaba JetCache 框架
阿里的这个缓存框架相比于Spring的自带缓存来说是更加方便,功能更加的完善,提供两级缓存和异步cacheAPI操作,以及其他的TTL等。使用起来可以说是让开发者如鱼得水,接下来简单地说一说它的使用及可能出现的问题。
首先还是需要引进jetcache的包,必不可少的流程走一走:
<!--jetcache缓存-->
	<dependency>
		<groupId>com.alicp.jetcache</groupId>
		<artifactId>jetcache-starter-redis</artifactId>
		<version>2.5.11</version>
	</dependency>
<!-- 如果出现版本包问题,则需要引入-->
	<dependency>
		<groupId>redis.clients</groupId>
		<artifactId>jedis</artifactId>
		<version>2.9.1</version>
	</dependency>
- 1
- 2
- 3
- 4
- 5
- 6
- 7
- 8
- 9
- 10
- 11
- 12
启动类开启缓存
// 开启在方法上使用缓存注解
@EnableMethodcache(basePackages =“**.***.***")
// 开启使用注解方式创建cache
@EnableCreatecacheAnnotation
- 1
- 2
- 3
- 4
使用相关yml配置:
jetcache:
  statIntervalMinutes: 15 # 统计间隔,默认0:表示不统计
  areaInCacheName: false  # areaName是否作为缓存key前缀,默认True
  local:
    default: # 默认default,可以配置更多的area
      type: linkedhashmap # 已支持可选:linkedhashmap、caffeine
      keyConvertor: fastjson # key转换器
  remote:
    default:
      type: redis
      keyConvertor: fastjson
      valueEncoder: java # 序列化器,只有remote需要
      valueDecoder: java # 序列化器,只有remote需要
      poolConfig:
        minIdle: 5
        maxIdle: 20
        maxTotal: 50
      host: 127.0.0.1
      port: 6379
- 1
- 2
- 3
- 4
- 5
- 6
- 7
- 8
- 9
- 10
- 11
- 12
- 13
- 14
- 15
- 16
- 17
- 18
- 19
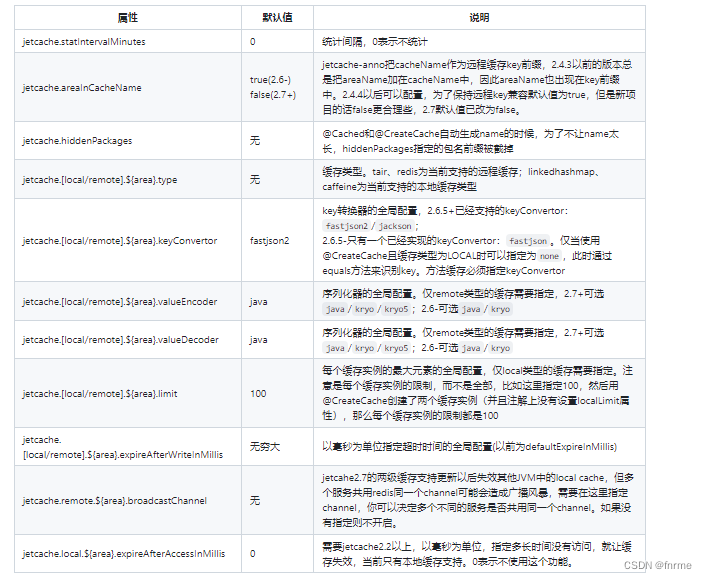
配置说明
之后就可以在方法,或者接口上面使用了,例如
@Cached( name = "category:", key = "#categoryId", expire = 100, cacheType = CacheType.REMOTE, keyConvertor = KeyConvertor.FASTJSON, serialPolicy = SerialPolicy.JAVA)
- 1

