编辑这个页面须要登录或更高权限!
- 您刚才的请求只有这个用户组的用户才能使用:自动确认用户
- 如果您还没有登录请登录后重试。编程那点事是一个开放式网站,修改本站大部分内容仅须要花10秒钟时间创建一个账户。 如果您已经登录,本页面可能是受保护的内容。如果您认为有修改的必要,请联系本站管理人员。
- 该页面已被锁定以防止编辑。
Spring Boot缓存
Spring框架透明地在Spring应用程序中提供缓存。在Spring中,缓存抽象是一种机制,它允许在不影响代码的情况下一致使用各种缓存方法。
缓存抽象
缓存抽象机制适用于 Java 方法。使用缓存抽象的主要目的是根据缓存中存在的信息减少执行次数。它适用于昂贵的方法,例如 CPU 或 IO绑定。
每次调用方法时,抽象都会将缓存行为应用于该方法。它检查该方法是否已经针对给定参数执行。
如果是,则不执行实际方法就返回缓存的结果。如果否,则首先执行该方法,并将结果缓存并返回给用户。
开发人员在处理缓存抽象时会注意两件事。
缓存声明: 它标识需要缓存的方法。 缓存配置: 用于存储和读取数据的后备缓存。
缓存
缓存是临时内存的一部分( RAM )。它位于应用程序和持久性数据库之间。它存储最近使用的数据,从而尽可能减少数据库命中次数。换句话说,缓存是为了存储数据以供将来参考。
为什么要使用缓存?
使用缓存的主要原因是为了进行数据访问更快,更便宜。当多次请求高度请求的资源时,对于开发人员来说,缓存资源通常是有益的,这样它可以快速给出响应。在应用程序中使用缓存可以增强应用程序的性能。与从数据库中获取数据相比,从内存进行数据访问总是更快。它降低了货币成本和机会成本。
应缓存哪些数据?
不经常更改的数据。经常使用的读取查询,其查询结果在每个调用中至少一段时间没有变化。
缓存类型
有四种缓存类型如下:
内存中缓存数据库缓存 Web服务器缓存 CDN缓存
内存缓存
内存缓存可提高应用程序的性能。这是经常使用的区域。 Memcached 和 Redis 是内存中缓存的示例。它在应用程序和数据库之间存储键值。 Redis是一种内存中,分布式高级缓存工具,可用于备份和还原功能。我们还可以管理分布式集群中的缓存。
数据库缓存
数据库缓存是一种通过获取数据按需(动态)生成网页的机制。从数据库中。它在涉及客户端,Web应用程序服务器和数据库的多层环境中使用。通过分配查询工作负载,它提高了可扩展性和性能。最受欢迎的数据库缓存是 Hibernate 的一级缓存。
Web服务器缓存
Web服务器缓存是一种存储数据以便重用的机制。例如,由Web服务器提供的网页的副本。用户首次访问该页面时将对其进行缓存。如果用户下次再次请求相同的内容,则缓存将提供页面的副本。这样可以避免服务器表单过载。 Web服务器缓存可提高页面交付速度,并减少后端服务器要做的工作。
CDN缓存
CDN 代表内容交付网络。它是现代Web应用程序中使用的组件。通过复制常用文件(例如 HTML 页面,样式表),它可以改善内容的传递。 , JavaScript ,图像,视频等)分布在一组全球分布的缓存服务器上。
这是CDN越来越受欢迎的原因。 CDN减轻了应用程序源的负担,并改善了用户体验。它从附近的缓存边缘(更靠近最终用户的缓存服务器)或存在点(PoP)提供内容的本地副本。
缓存与缓冲区
| 缓存 | 缓冲区 |
| 缓存基于最近最少使用。 | 缓冲区基于先进先出 |
| 它是页面缓存的大小。 | 它是内存中的原始块I/O缓冲区。 |
| 它生存了很长时期。 | 它生存了短时期。 |
| 我们从缓存中读取。 | 我们写入到缓冲区。 |
| 它存储实际文件数据。 | 它存储文件元数据。 |
| 它提高了 read 性能。 | 它提高了写入性能。 |
Spring Boot缓存注解
@EnableCaching
这是一个类级别的注解。我们可以通过使用 @EnableCaching注解在Spring Boot应用程序中启用缓存。它在 org.springframework.cache.annotation 包中定义。它与 @Configuration 类一起使用。
如果没有已定义的CacheManager实例,自动配置将启用缓存并设置 CacheManager 。它会扫描特定的提供程序,如果找不到,则会使用并发的 HashMap创建内存中缓存。
示例
在以下示例中, @EnableCaching 注解启用了缓存机制。
@SpringBootApplication
@EnableCaching
public class SpringBootCachingApplication
{
public static void main(String[] args)
{
SpringApplication.run(SpringBootCachingApplication.class, args);
}
}
@CacheConfig
这是一个类级别的注解,提供了与缓存有关的通用设置。它告诉Spring将类的缓存存储在何处。当我们使用注解为类添加注解时,它为该类中定义的任何缓存操作提供了一组默认设置。使用注解,我们不需要多次声明。
示例
在下面的示例中,员工是缓存的名称。
@CacheConfig(cacheNames={"employee"})
public class UserService
{
//some code
}
@Caching
当我们同时需要两个注解 @CachePut 或 @CacheEvict 时使用同样的方法。换句话说,当我们要使用相同类型的多个注解时使用。
但是 Java不允许为给定声明相同类型的多个注解方法。为避免此问题,我们使用 @Caching 注解。
示例
在下面的示例中,我们使用了注解 @Caching 并将所有 @CacheEvict 注解分组。
@Caching(evict = {@CacheEvict("phone_number"), @CacheEvict(value="directory", key="#student.id") })public String getAddress(Student student)
{
//some code
}
@Cacheable
它是方法级别的注解。它为方法的返回值定义了一个缓存。 Spring框架管理方法对注解属性中指定的缓存的请求和响应。 @Cacheable批注包含更多选项。例如,我们可以使用 value 或 cacheNames 属性提供缓存名称。
我们还可以指定注解的 key 属性,用于唯一标识缓存中的每个条目。如果未指定密钥,Spring将使用默认机制来创建密钥。
示例
在以下示例中,我们缓存了< cacheStudentInfo,和 id 中方法 studentInfo()的strong>返回值是唯一键,用于标识缓存。
@Cacheable(value="cacheStudentInfo", key="#id")public List studentInfo()
{
//some code
return studentDetails;
}我们还可以通过使用condition属性在注解中应用条件。当我们在注解中应用条件时,它称为条件缓存。
例如,如果参数名称的长度短于20,则将缓存以下方法。
@Cacheable(value="student", condition="#name.length<20")public Student findStudent(String name)
{
//some code
}
@CacheEvict
它是方法级别的注解。当我们想要从缓存中删除陈旧或未使用的数据时,将使用它。它需要一个或多个受操作影响的缓存。我们还可以在其中指定键或条件。如果我们想要广泛的缓存驱逐,则@CacheEvict批注提供一个名为 allEntries 的参数。它会驱逐所有条目,而不是根据密钥驱逐一个条目。
关于@CacheEvict批注的重要一点是它可以与void方法一起使用,因为该方法充当触发器。它避免了返回值。另一方面,@Cacheable批注需要一个返回值,该值用于添加/更新缓存中的数据。我们可以通过以下方式使用@CacheEvict批注:
逐出整个缓存:
@CacheEvict(allEntries=true)
通过密钥逐出条目:
@CacheEvict(key="#student.stud_name")
示例
以下带注解的方法从缓存 student_data 中清除所有数据。
@CacheEvict(value="student_data", allEntries=true) //removing all entries from the cache
public String getNames(Student student)
{
//some code
}
@CachePut
它是方法级别的注解。当我们想要更新缓存而不干扰方法执行时,使用它。这意味着该方法将始终执行,并将其结果放入缓存中。它支持@Cacheable批注的属性。
需要注意的是,由于@Cacheable和@CachePut批注的行为不同,因此它们是不相同的。 @Cacheable和@CachePut批注之间存在细微差别,就是@ Cacheable 批注跳过方法执行,而 @CachePut 批注运行该方法,然后将结果放入缓存。
示例
以下方法将更新缓存本身。
@CachePut(cacheNames="employee", key="#id")  //updating cachepublic Employee updateEmp(ID id, EmployeeData data)
{
//some code
}
Spring Boot缓存依赖项
如果要在Spring Boot应用程序中启用缓存机制,则需要在pom.xml文件中添加缓存依赖项。它启用缓存并配置CacheManager。
<dependency>
<groupId>org.springframework.boot</groupId>
<artifactId>spring-boot-starter-cache</artifactId>
</dependency>
Spring Boot缓存示例
我们创建一个Spring Boot应用程序并在其中实现缓存机制。
步骤1: 打开Spring Initializr http://start.spring.io 。
步骤2: 选择Spring Boot版本 2.3.0.M1。
步骤2: 提供群组名称。我们提供了 com.nhooo。
步骤3: 提供工件 ID。我们提供了 spring-boot-cache-example。
步骤5: 添加依赖项 Spring Web 和 Spring Cache抽象。
步骤6: 单击 Generate (生成)按钮。当我们单击"生成"按钮时,它将规格包装在 Jar 文件中,并将其下载到本地系统。
步骤7: 提取 Jar文件并将其粘贴到STS工作区中。
步骤8: 导入 STS中的项目文件夹。
文件->导入->现有Maven项目->浏览->选择文件夹spring-boot-cache-example->完成
导入需要一些时间。
让我们打开 pom.xml 文件,看看我们已经向其中添加了哪些依赖项。
pom.xml
<?xml version="1.0" encoding="UTF-8"?>
<project xmlns="http://maven.apache.org/POM/4.0.0" xmlns:xsi="http://www.w3.org/2001/XMLSchema-instance"
  xsi:schemaLocation="http://maven.apache.org/POM/4.0.0 https://maven.apache.org/xsd/maven-4.0.0.xsd">
  <modelVersion>4.0.0</modelVersion>
  <parent>
    <groupId>org.springframework.boot</groupId>
    <artifactId>spring-boot-starter-parent</artifactId>
    <version>2.3.0.M1</version>
    <relativePath/> <!-- lookup parent from repository -->
  </parent>
  <groupId>com.nhooo</groupId>
  <artifactId>spring-boot-cache-example</artifactId>
  <version>0.0.1-SNAPSHOT</version>
  <name>spring-boot-cache-example</name>
  <description>Demo project for Spring Boot</description>
  <properties>
    <java.version>1.8</java.version>
  </properties>
  <dependencies>
    <dependency>
      <groupId>org.springframework.boot</groupId>
      <artifactId>spring-boot-starter-cache</artifactId>
    </dependency>
    <dependency>
      <groupId>org.springframework.boot</groupId>
      <artifactId>spring-boot-starter-web</artifactId>
    </dependency>
    <dependency>
      <groupId>org.springframework.boot</groupId>
      <artifactId>spring-boot-starter-test</artifactId>
      <scope>test</scope>
      <exclusions>
        <exclusion>
          <groupId>org.junit.vintage</groupId>
          <artifactId>junit-vintage-engine</artifactId>
        </exclusion>
      </exclusions>
    </dependency>
  </dependencies>
  <build>
    <plugins>
      <plugin>
        <groupId>org.springframework.boot</groupId>
        <artifactId>spring-boot-maven-plugin</artifactId>
      </plugin>
    </plugins>
  </build>
  <repositories>
    <repository>
      <id>spring-milestones</id>
      <name>Spring Milestones</name>
      <url>https://repo.spring.io/milestone</url>
    </repository>
  </repositories>
  <pluginRepositories>
    <pluginRepository>
      <id>spring-milestones</id>
      <name>Spring Milestones</name>
      <url>https://repo.spring.io/milestone</url>
    </pluginRepository>
  </pluginRepositories>
</project>
步骤9: 打开 SpringBootCacheExampleApplication.java 文件,并通过添加注解 @EnableCaching启用缓存。
SpringBootCacheExampleApplication.java
package com.nhooo;
import org.springframework.boot.SpringApplication;
import org.springframework.boot.autoconfigure.SpringBootApplication;
import org.springframework.cache.annotation.EnableCaching;
@SpringBootApplication
//enabling caching
@EnableCaching
public class SpringBootCacheExampleApplication
{
public static void main(String[] args)
{
SpringApplication.run(SpringBootCacheExampleApplication.class, args);
}
}
步骤10: 在名为 com.nhooo.model的文件夹 src/main/java 中创建一个包。
步骤11: 在模型包中,创建一个名称为 Customer 的类并定义以下内容:
定义三个accountno, customername, acounttype和balance。使用Constructor生成构造器 。
右键单击文件->源->使用字段生成构造器->全选->生成生成Getters and Setters。
右键单击文件->源->生成Getter和设置器->全选->生成
Customer.java
package com.nhooo.model;
public class Customer
{
    private int accountno;
    private String customername;
    private String accounttype;
    private double balance;
    public Customer(int accountno, String customername, String accounttype, double balance)
    {
        this.accountno = accountno;
        this.customername = customername;
        this.accounttype = accounttype;
        this.balance = balance;
    }
    public int getAccountno()
    {
        return accountno;
    }
    public void setAccountno(int accountno)
    {
        this.accountno = accountno;
    }
    public String getCustomername()
    {
        return customername;
    }
    public void setCustomername(String customername)
    {
        this.customername = customername;
    }
    public String getAccounttype()
    {
        return accounttype;
    }
    public void setAccounttype(String accounttype)
    {
        this.accounttype = accounttype;
    }
    public double getBalance()
    {
        return balance;
    }
    public void setBalance(double balance)
    {
        this.balance = balance;
    }
}
步骤11: 在文件夹 src/main/java 中创建一个名称为 com.nhooo.controller的包。
步骤12: 在Controller程序包中,创建一个名称为 CustomerController 的控制器类,然后执行以下操作:
使用注解 @RestController将类标记为 Controller 。 使用注解 @RequestMapping为控制器定义映射。我们已经定义了映射/customerinfo 。创建缓存以使用注解 @Cacheable获取数据。 我们已经通过使用注解的 value 属性定义了缓存名称。我们在中添加了两个客户详细信息
CustomerController.java
package com.nhooo.controller;
import java.util.Arrays;
import java.util.List;
import org.springframework.cache.annotation.Cacheable;
import org.springframework.web.bind.annotation.RequestMapping;
import org.springframework.web.bind.annotation.RestController;
import com.nhooo.model.Customer;
@RestController
public class CustomerController
{
    @RequestMapping("/customerinfo")
    //defines a cache for method's return value
    @Cacheable(value="customerInfo")
    public List customerInformation()
    {
        System.out.println("customer information from cache");
        //adding customer detail in the List
          List detail=Arrays.asList(new Customer(5126890,"Charlie Puth","Current A/c", 450000.00),
                        new Customer(7620015,"Andrew Flintoff","Saving A/c", 210089.00)
                       );
        return detail;
    }
}
现在运行该应用程序。
步骤13: 打开 SpringBootCacheExampleApplication.java 文件并将其作为Java应用程序运行。
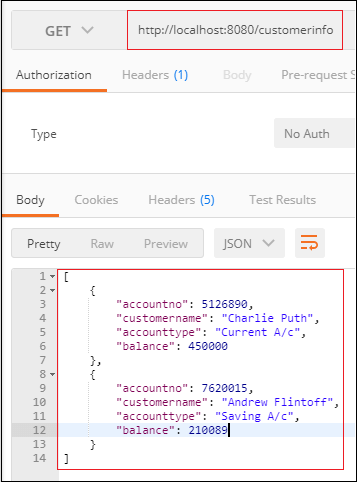
步骤14: 打开Postman,并发送带有URL http: //locahost: 8080/custmerinfo的 GET 请求。它返回客户详细信息,如下所示。

- Copyright © 2003-2013 菜鸟教程。
- 版权与免责声明

SpringBoot 教程
- SpringBoot 教程
- SpringBoot 介绍
- Springboot Initializr
- Springboot 下载安装
- SpringBoot 项目创建
- SpringBoot 注解
- SpringBoot 依赖管理
- SpringBoot 应用程序属性
- SpringBoot Starters
- SpringBoot DevTools
- SpringBoot 多模块项目
- SpringBoot 打包
- SpringBoot 自动装配
- SpringBoot Tomcat部署
- SpringBoot AOP
- Spring Boot JPA
- SpringBoot Thymeleaf
- Spring Boot缓存
- SpringBoot 程序运行
- SpringBoot 更改端口
- SpringBoot REST示例