编辑这个页面须要登录或更高权限!
- 您刚才的请求只有这个用户组的用户才能使用:自动确认用户
- 如果您还没有登录请登录后重试。编程那点事是一个开放式网站,修改本站大部分内容仅须要花10秒钟时间创建一个账户。 如果您已经登录,本页面可能是受保护的内容。如果您认为有修改的必要,请联系本站管理人员。
- 该页面已被锁定以防止编辑。
SpringBoot 程序运行
在本节中,我们将创建并运行一个简单的Spring Boot应用程序。
创建一个Spring Boot应用程序
步骤1: 打开Spring Initializr https://start.spring.io/。
步骤2: 选择 Spring Boot版本 2.2.2.BUILD-SNAPSHOT。
步骤3: 提供 组名称。我们提供了组名 com.nhooo。
步骤4: 提供 工件。我们已经提供了工件 spring-boot-application-run。
步骤5: 添加 Spring Web 依赖项。
步骤6: 单击 Generate 按钮。当我们单击"生成"按钮时,它将与应用程序相关的所有规范包装到一个 Jar 文件中,并将其下载到本地系统。
步骤7: 提取 jar文件。
步骤8: 复制文件夹并将其粘贴到STS工作区中。
步骤9: 导入该项目。
文件->导入->现有Maven项目->下一步->浏览->选择文件夹spring- spring -boot-application-run->选择文件夹->完成
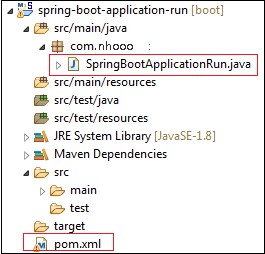
导入项目需要时间。成功导入项目后,我们可以在IDE的 Package Explorer 部分中看到它。
我们看到自动创建了两个文件,一个是 pom.xml ,另一个是 Application.java 文件。

pom.xml 文件包含所有 依赖项, 应用程序名称,Spring引导版本,组名,工件,和其他 插件。
pom.xml
<?xml version="1.0" encoding="UTF-8"?>
<project xmlns="http://maven.apache.org/POM/4.0.0" xmlns:xsi="http://www.w3.org/2001/XMLSchema-instance"
	xsi:schemaLocation="http://maven.apache.org/POM/4.0.0 https://maven.apache.org/xsd/maven-4.0.0.xsd">
	<modelVersion>4.0.0</modelVersion>
	<parent>
		<groupId>org.springframework.boot</groupId>
		<artifactId>spring-boot-starter-parent</artifactId>
		<version>2.2.2.BUILD-SNAPSHOT</version>
		<relativePath/> <!-- lookup parent from repository -->
	</parent>
	<groupId>com.nhooo</groupId>
	<artifactId>spring-boot-application-run</artifactId>
	<version>0.0.1-SNAPSHOT</version>
	<name>spring-boot-application-run</name>
	<description>Demo project for Spring Boot</description>
	<properties>
		<java.version>1.8</java.version>
	</properties>
	<dependencies>
		<dependency>
			<groupId>org.springframework.boot</groupId>
			<artifactId>spring-boot-starter</artifactId>
	</dependency>

		  <dependency>
 <groupId>org.springframework.boot</groupId>
<artifactId>spring-boot-starter-parent</artifactId>
<version>2.2.1.RELEASE</version>
<type>pom</type>
</dependency>
<dependency>
<groupId>org.springframework.boot</groupId>
<artifactId>spring-boot-starter-web</artifactId>
</dependency>
		<dependency>
			<groupId>org.springframework.boot</groupId>
			<artifactId>spring-boot-starter-test</artifactId>
			<scope>test</scope>
			<exclusions>
				<exclusion>
					<groupId>org.junit.vintage</groupId>
					<artifactId>junit-vintage-engine</artifactId>
				</exclusion>
			</exclusions>
		</dependency>
	</dependencies>
	<build>
		<plugins>
			<plugin>
				<groupId>org.springframework.boot</groupId>
				<artifactId>spring-boot-maven-plugin</artifactId>
			</plugin>
		</plugins>
	</build>
	<repositories>
		<repository>
			<id>spring-milestones</id>
			<name>Spring Milestones</name>
			<url>https://repo.spring.io/milestone</url>
		</repository>
		<repository>
			<id>spring-snapshots</id>
			<name>Spring Snapshots</name>
			<url>https://repo.spring.io/snapshot</url>
			<snapshots>
				<enabled>true</enabled>
			</snapshots>
		</repository>
	</repositories>
	<pluginRepositories>
		<pluginRepository>
			<id>spring-milestones</id>
			<name>Spring Milestones</name>
			<url>https://repo.spring.io/milestone</url>
		</pluginRepository>
		<pluginRepository>
			<id>spring-snapshots</id>
			<name>Spring Snapshots</name>
			<url>https://repo.spring.io/snapshot</url>
			<snapshots>
				<enabled>true</enabled>
			</snapshots>
		</pluginRepository>
	</pluginRepositories>
</project>
main 类是一个包含main()方法的类。它启动Spring ApplicationContext。这是我们为执行应用程序而运行的类。
SpringBootApplicationRun.java
package com.nhooo;
import org.springframework.boot.SpringApplication;
import org.springframework.boot.autoconfigure.SpringBootApplication;
@SpringBootApplication
public class SpringBootApplicationRun
{
    public static void main(String[] args)
    {
        SpringApplication.run(SpringBootApplicationRun.class, args);
    }
}
步骤10: 创建一个控制器。我们创建了一个名称为 HelloWorldController 的控制器。
HelloWorldController.java
package com.nhooo;
import org.springframework.web.bind.annotation.RequestMapping;
import org.springframework.web.bind.annotation.RestController;
@RestController
public class HelloWorldController
{
    @RequestMapping("/")
    public String hello()
    {
        return "Hello User";
    }
}
现在,我们已经创建了与 Spring Boot 应用程序相关的所有必需文件。
运行Spring Boot应用程序
用于运行 Spring Boot应用程序 ,打开主应用程序文件,然后以 Java Application的身份运行它。

当应用程序成功运行时,它会在控制台中显示该消息,如下所示。

现在,打开浏览器并调用URL http://localhost:8080。它显示了我们已返回控制器的消息。
- Copyright © 2003-2013 菜鸟教程。
- 版权与免责声明

SpringBoot 教程
- SpringBoot 教程
- SpringBoot 介绍
- Springboot Initializr
- Springboot 下载安装
- SpringBoot 项目创建
- SpringBoot 注解
- SpringBoot 依赖管理
- SpringBoot 应用程序属性
- SpringBoot Starters
- SpringBoot DevTools
- SpringBoot 多模块项目
- SpringBoot 打包
- SpringBoot 自动装配
- SpringBoot Tomcat部署
- SpringBoot AOP
- Spring Boot JPA
- SpringBoot Thymeleaf
- Spring Boot缓存
- SpringBoot 程序运行
- SpringBoot 更改端口
- SpringBoot REST示例