
- 1android多个app跨进程通信(IPC)实现(一)_安卓java应用间交互
- 2Unity Shader入门精要 第八章——透明效果_unity 半透明shader
- 3基于Android的过程监控的学生成绩管理系统(Android studio毕业设计,Android课程设计)_as学生成绩管理
- 4java使用elasticsearchClient调用es7.17-生成连接、查询系统参数、索引相关操作_java 8 使用elasticsearchclient调用es
- 5pve虚拟机无法连接到服务器,许迎果 第190期 PVE创建虚拟机的注意事项 上篇
- 6http代理的静态ip如何实现YouTube运营?有何优势?
- 710、App启动过程分析与UIApplication自定义举例_- (bool)application:(uiapplication *)application c
- 8Java案例——实现验证码登陆_java 验证码登录
- 9Unity如何与Webview进行交互_游戏内嵌入web怎么和客户端交互
- 10EC修炼之道—代码架构_如果要学习写ec的程序
python tkinter模块创建对话框总结_tkinter dialog
赞
踩
参考网站:
https://blog.csdn.net/nilvya/article/details/106221666
https://docs.python.org/zh-cn/dev/library/dialog.html
https://www.jb51.net/article/241488.htm
一、messagebox消息对话框
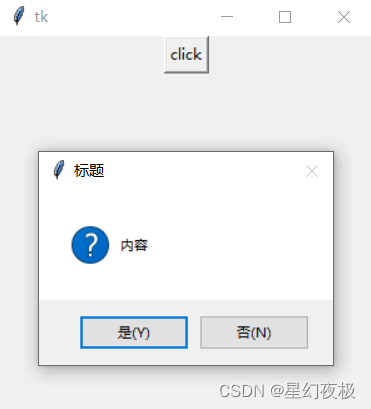
1、askokcancel
import tkinter
# 导入消息对话框子模块
import tkinter.messagebox

# 创建主窗口
root = tkinter.Tk()
# 设置窗口大小
root.minsize(300,300)

# 声明函数
def test():
    # 弹出对话框
    result = tkinter.messagebox.askokcancel(title = '标题',message='内容')
    # 返回值为True或者False
    print(result)

# 添加按钮
btn1 = tkinter.Button(root,text = 'click',command = test)
btn1.pack()

# 加入消息循环
root.mainloop()
- 1
- 2
- 3
- 4
- 5
- 6
- 7
- 8
- 9
- 10
- 11
- 12
- 13
- 14
- 15
- 16
- 17
- 18
- 19
- 20
- 21
- 22
运行结果:

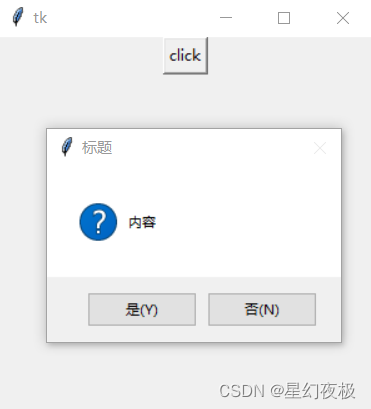
2、askquestion
import tkinter
# 导入消息对话框子模块
import tkinter.messagebox

# 创建主窗口
root = tkinter.Tk()
# 设置窗口大小
root.minsize(300,300)

# 声明函数
def test():
    # 弹出对话框
    result = tkinter.messagebox.askquestion(title = '标题',message = '内容')
    # 返回值为yes或者no
    print(result)

# 添加按钮
btn1 = tkinter.Button(root,text = 'click',command = test)
btn1.pack()

# 加入消息循环
root.mainloop()
- 1
- 2
- 3
- 4
- 5
- 6
- 7
- 8
- 9
- 10
- 11
- 12
- 13
- 14
- 15
- 16
- 17
- 18
- 19
- 20
- 21
- 22
运行结果:
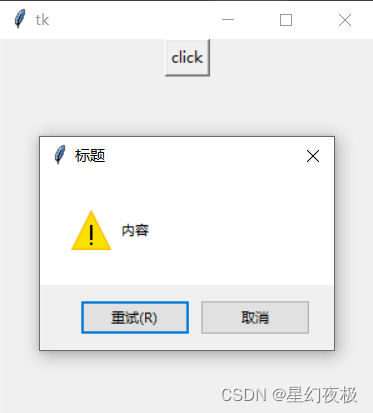
3、askretrycancel
import tkinter
# 导入消息对话框子模块
import tkinter.messagebox

# 创建主窗口
root = tkinter.Tk()
# 设置窗口大小
root.minsize(300,300)

# 声明函数
def test():
    # 弹出对话框
    result = tkinter.messagebox.askretrycancel(title = '标题',message='内容')
    # 返回值为True或者False
    print(result)

# 添加按钮
btn1 = tkinter.Button(root,text = 'click',command = test)
btn1.pack()

# 加入消息循环
root.mainloop()
- 1
- 2
- 3
- 4
- 5
- 6
- 7
- 8
- 9
- 10
- 11
- 12
- 13
- 14
- 15
- 16
- 17
- 18
- 19
- 20
- 21
- 22
运行结果:
4、askyesno
import tkinter
# 导入消息对话框子模块
import tkinter.messagebox

# 创建主窗口
root = tkinter.Tk()
# 设置窗口大小
root.minsize(300,300)

# 声明函数
def test():
    # 弹出对话框
    result = tkinter.messagebox.askyesno(title = '标题',message='内容')
    # 返回值为True或者False
    print(result)

# 添加按钮
btn1 = tkinter.Button(root,text = 'click',command = test)
btn1.pack()

# 加入消息循环
root.mainloop()
- 1
- 2
- 3
- 4
- 5
- 6
- 7
- 8
- 9
- 10
- 11
- 12
- 13
- 14
- 15
- 16
- 17
- 18
- 19
- 20
- 21
- 22
运行结果:
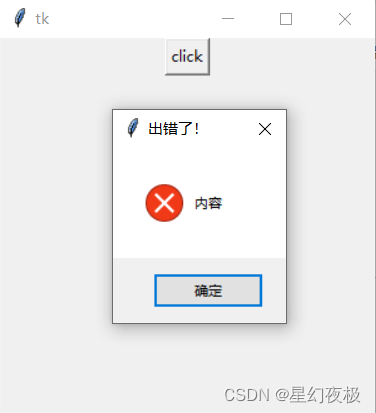
5、showerror
import tkinter
# 导入消息对话框子模块
import tkinter.messagebox

# 创建主窗口
root = tkinter.Tk()
# 设置窗口大小
root.minsize(300,300)

# 声明函数
def test():
    # 弹出对话框
    result = tkinter.messagebox.showerror(title = '出错了!',message='内容')
    # 返回值为ok
    print(result)

# 添加按钮
btn1 = tkinter.Button(root,text = 'click',command = test)
btn1.pack()

# 加入消息循环
root.mainloop()
- 1
- 2
- 3
- 4
- 5
- 6
- 7
- 8
- 9
- 10
- 11
- 12
- 13
- 14
- 15
- 16
- 17
- 18
- 19
- 20
- 21
- 22
运行结果:
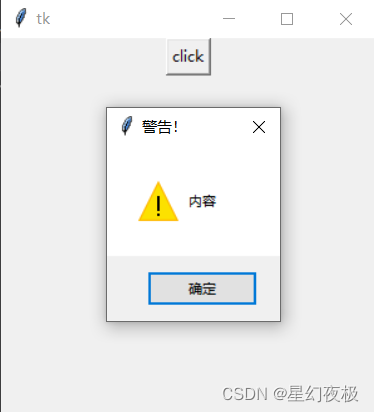
6、showwarning
import tkinter
# 导入消息对话框子模块
import tkinter.messagebox

# 创建主窗口
root = tkinter.Tk()
# 设置窗口大小
root.minsize(300,300)

# 声明函数
def test():
    # 弹出对话框
    result = tkinter.messagebox.showwarning(title = '警告!',message='内容')
    # 返回值为ok
    print(result)

# 添加按钮
btn1 = tkinter.Button(root,text = 'click',command = test)
btn1.pack()

# 加入消息循环
root.mainloop()
- 1
- 2
- 3
- 4
- 5
- 6
- 7
- 8
- 9
- 10
- 11
- 12
- 13
- 14
- 15
- 16
- 17
- 18
- 19
- 20
- 21
- 22
运行结果:
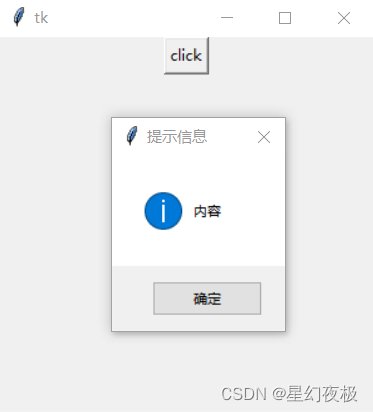
7、showinto
import tkinter
# 导入消息对话框子模块
import tkinter.messagebox

# 创建主窗口
root = tkinter.Tk()
# 设置窗口大小
root.minsize(300,300)

# 声明函数
def test():
    # 弹出对话框
    result = tkinter.messagebox.showinfo(title = '提示信息',message='内容')
    # 返回值为ok
    print(result)

# 添加按钮
btn1 = tkinter.Button(root,text = 'click',command = test)
btn1.pack()

# 加入消息循环
root.mainloop()
- 1
- 2
- 3
- 4
- 5
- 6
- 7
- 8
- 9
- 10
- 11
- 12
- 13
- 14
- 15
- 16
- 17
- 18
- 19
- 20
- 21
- 22
运行结果:
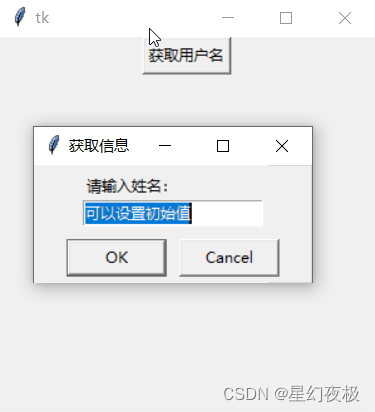
二、simpledialog 简单对话框
1、asksting
import tkinter
# 导入子模块
import tkinter.simpledialog

# 创建主窗口
root = tkinter.Tk()
# 设置窗口大小
root.minsize(300,300)

# 创建函数
def askname():
    # 获取字符串(标题,提示,初始值)
    result = tkinter.simpledialog.askstring(title = '获取信息',prompt='请输入姓名:',initialvalue = '可以设置初始值')
    # 取消返回None,确定返回输入值
    print(result)
# 添加按钮
btn = tkinter.Button(root,text = '获取用户名',command = askname)
btn.pack()

# 加入消息循环
root.mainloop()
- 1
- 2
- 3
- 4
- 5
- 6
- 7
- 8
- 9
- 10
- 11
- 12
- 13
- 14
- 15
- 16
- 17
- 18
- 19
- 20
- 21
运行结果:
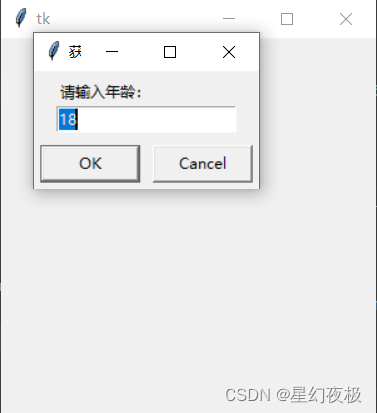
2、askinteger
import tkinter
# 导入消息对话框子模块
import tkinter.simpledialog

# 创建主窗口
root = tkinter.Tk()
# 设置窗口大小
root.minsize(300,300)

# 创建函数
def askage():
    # 获取整型(标题,提示,初始值)
    result = tkinter.simpledialog.askinteger(title = '获取信息',prompt='请输入年龄:',initialvalue = '18')
    # 取消返回None,确定返回输入值
    print(result)
# 添加按钮
btn = tkinter.Button(root,text = '获取年龄',command = askage)
btn.pack()

# 加入消息循环
root.mainloop()
- 1
- 2
- 3
- 4
- 5
- 6
- 7
- 8
- 9
- 10
- 11
- 12
- 13
- 14
- 15
- 16
- 17
- 18
- 19
- 20
- 21
运行结果:
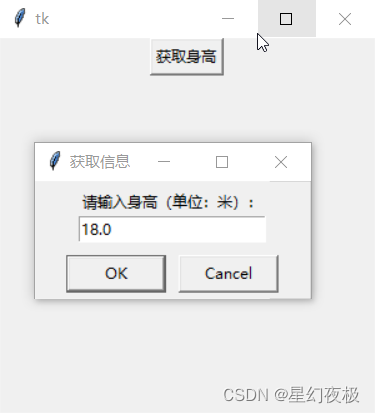
3、askfloat
import tkinter
# 导入消息对话框子模块
import tkinter.simpledialog

# 创建主窗口
root = tkinter.Tk()
# 设置窗口大小
root.minsize(300,300)

# 创建函数
def askheight():
    # 获取浮点型数据(标题,提示,初始值)
    result = tkinter.simpledialog.askfloat(title = '获取信息',prompt='请输入身高(单位:米):',initialvalue = '18.0')
    # 取消返回None,确定返回输入值
    print(result)
# 添加按钮
btn = tkinter.Button(root,text = '获取身高',command = askheight)
btn.pack()

# 加入消息循环
root.mainloop()
- 1
- 2
- 3
- 4
- 5
- 6
- 7
- 8
- 9
- 10
- 11
- 12
- 13
- 14
- 15
- 16
- 17
- 18
- 19
- 20
- 21
运行结果:
三、filedialog 文件选择对话框
| 函数 | 用途 |
|---|---|
| asksaveasfilename() | 选择以什么文件名保存,返回文件名 |
| asksaveasfile() | 选择以什么文件保存,创建文件并返回文件流对象 |
| askopenfilename() | 选择打开什么文件,返回文件名 |
| askopenfile() | 选择打开什么文件,返回IO流对象 |
| askopenfiles() | 选择打开多个文件,以列表形式返回多个IO流对象 |
| askdirectory() | 选择目录,返回目录名 |
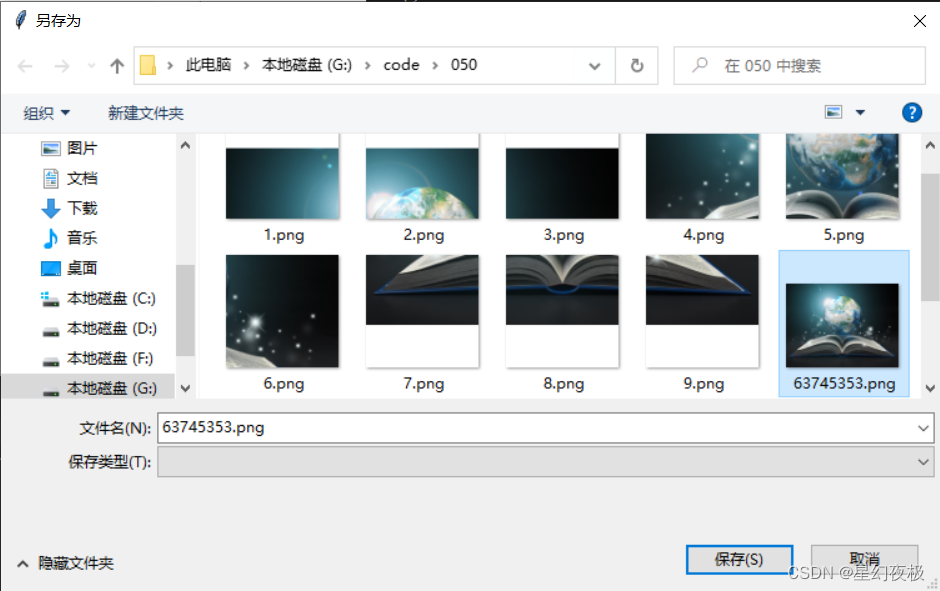
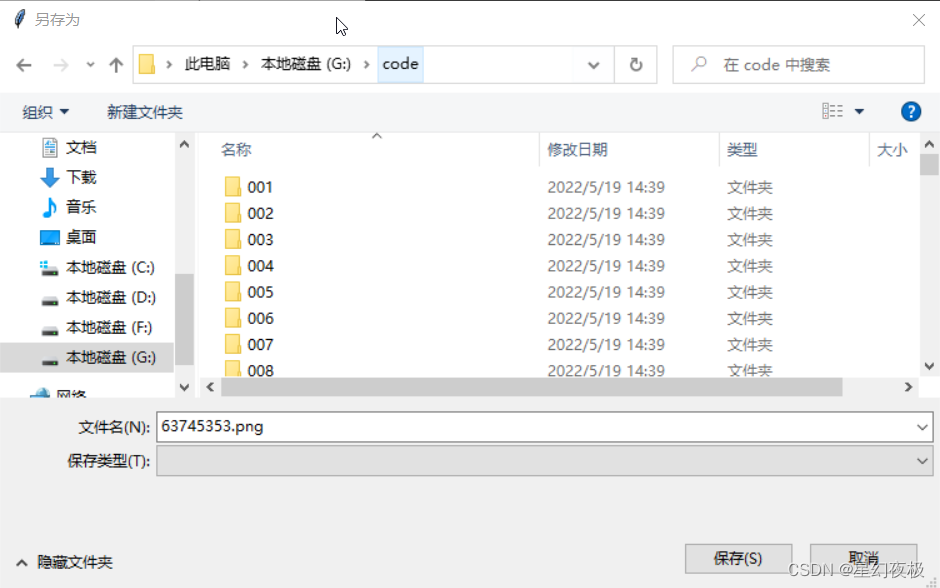
1、asksaveasfilename
import tkinter.filedialog
from tkinter import *
def test():
    a = tkinter.filedialog.asksaveasfilename()#返回文件名
    print(a)

root=Tk()
root.minsize(300,300)
btn1 = Button(root,text="click",command=test)
btn1.pack()
root.mainloop()
- 1
- 2
- 3
- 4
- 5
- 6
- 7
- 8
- 9
- 10
- 11
- 12
运行结果:要将该图片保存至上一级目录,则返回G:/code/63745353.png
2、asksaveasfile
import tkinter.filedialog
from tkinter import *
def test():
    a = tkinter.filedialog.asksaveasfile() #创建文件
    print(a)

root=Tk()
root.minsize(300,300)
btn1 = Button(root,text="click",command=test)
btn1.pack()
root.mainloop()
- 1
- 2
- 3
- 4
- 5
- 6
- 7
- 8
- 9
- 10
- 11
- 12
运行结果:返回<_io.TextIOWrapper name=‘G:/code/63745353.png’ mode=‘w’ encoding=‘cp936’>
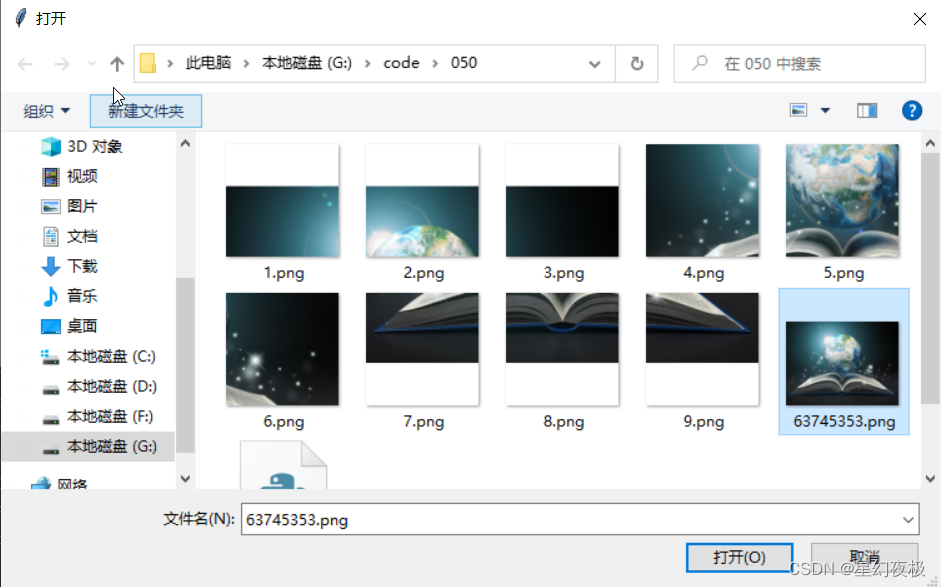
3、askopenfilename
import tkinter.filedialog
from tkinter import *
def test():
    a =tkinter.filedialog.askopenfilename() #返回文件名
    print(a)

root=Tk()
root.minsize(300,300)
btn1 = Button(root,text="click",command=test)
btn1.pack()
root.mainloop()
- 1
- 2
- 3
- 4
- 5
- 6
- 7
- 8
- 9
- 10
- 11
运行结果:返回G:/code/050/63745353.png

4、askopenfile
import tkinter.filedialog
from tkinter import *
def test():
    a = tkinter.filedialog.askopenfile() #返回文件流对象
    print(a)

root=Tk()
root.minsize(300,300)
btn1 = Button(root,text="click",command=test)
btn1.pack()
root.mainloop()
- 1
- 2
- 3
- 4
- 5
- 6
- 7
- 8
- 9
- 10
- 11
- 12
运行结果:返回<_io.TextIOWrapper name=‘G:/code/050/63745353.png’ mode=‘r’ encoding=‘cp936’>
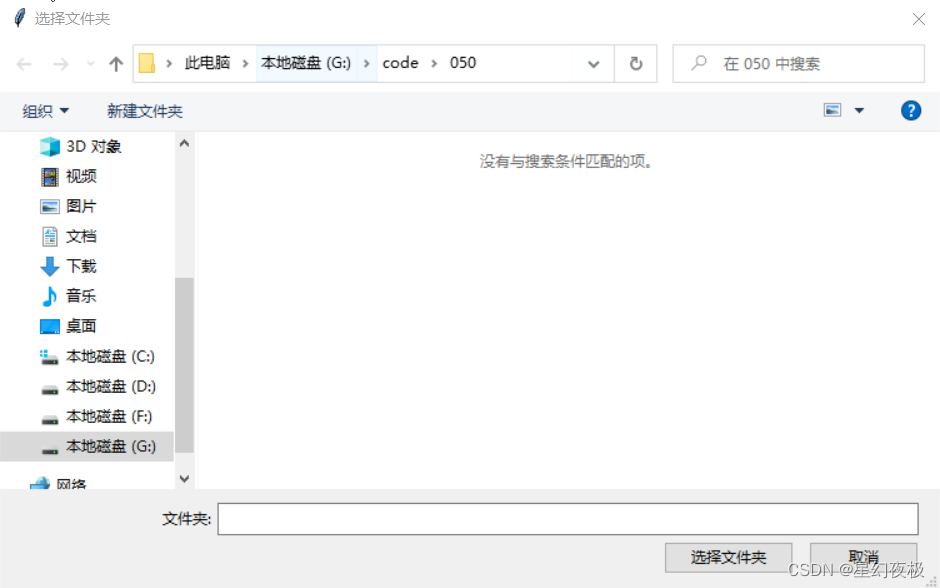
5、askdirectory
import tkinter.filedialog
from tkinter import *
def test():
    a = tkinter.filedialog.askdirectory() #返回目录名
    print(a)

root=Tk()
root.minsize(300,300)
btn1 = Button(root,text="click",command=test)
btn1.pack()
root.mainloop()
- 1
- 2
- 3
- 4
- 5
- 6
- 7
- 8
- 9
- 10
- 11
运行结果:返回G:/code/050
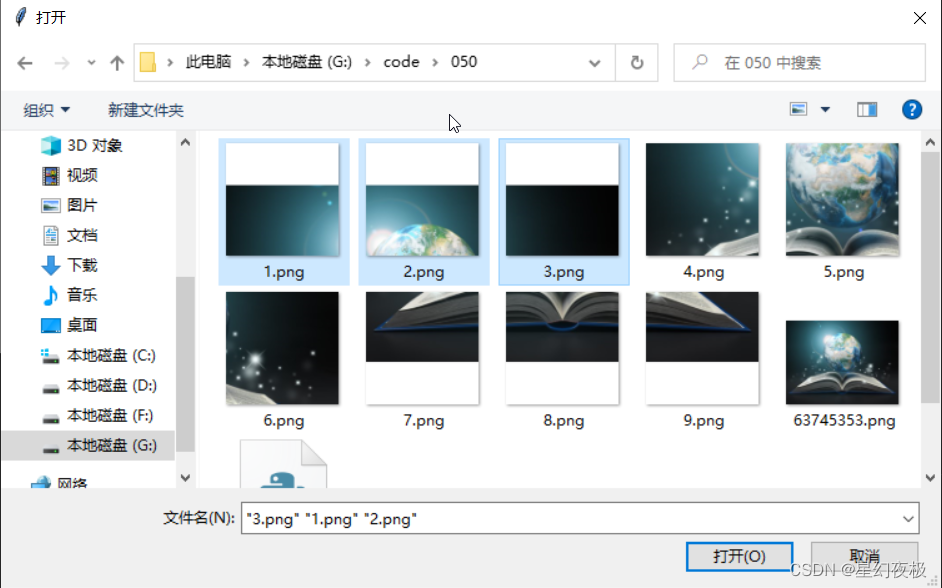
6、askopenfiles
import tkinter.filedialog
from tkinter import *
def test():
    a = tkinter.filedialog.askopenfiles() #多个文件流对象
    print(a)

root=Tk()
root.minsize(300,300)
btn1 = Button(root,text="click",command=test)
btn1.pack()
root.mainloop()
- 1
- 2
- 3
- 4
- 5
- 6
- 7
- 8
- 9
- 10
- 11
- 12
运行结果:返回[<_io.TextIOWrapper name=‘G:/code/050/1.png’ mode=‘r’ encoding=‘cp936’>, <_io.TextIOWrapper name=‘G:/code/050/2.png’ mode=‘r’ encoding=‘cp936’>, <_io.TextIOWrapper name=‘G:/code/050/3.png’ mode=‘r’ encoding=‘cp936’>]
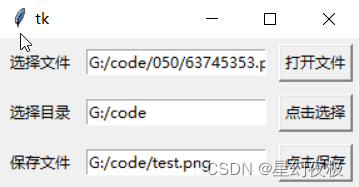
运用实例
import tkinter as tk
from tkinter.filedialog import *
from PIL import Image
def selectFile():
global img
filepath = askopenfilename() # 选择打开什么文件,返回文件名
filename.set(filepath) # 设置变量filename的值
img = Image.open(filename.get()) # 打开图片
def outputFile():
outputFilePath = askdirectory() # 选择目录,返回目录名
outputpath.set(outputFilePath) # 设置变量outputpath的值
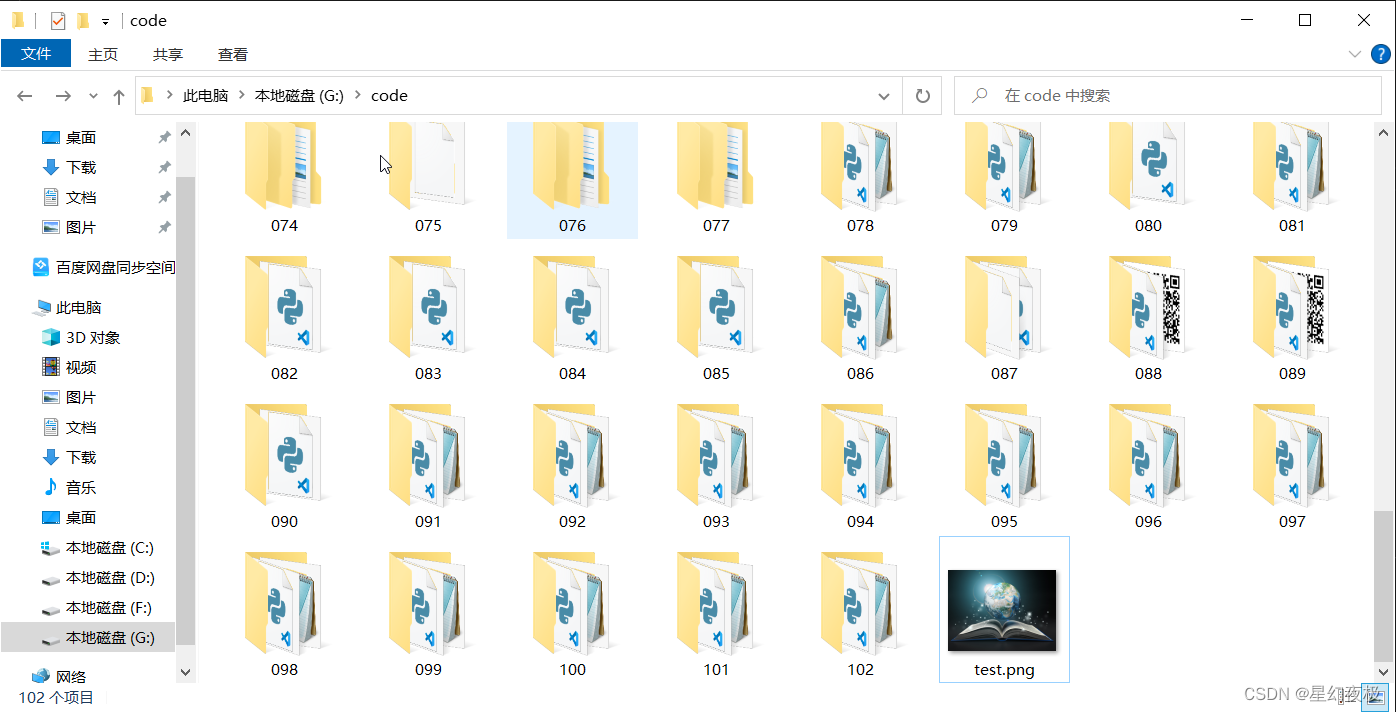
def fileSave():
filenewpath = asksaveasfilename(defaultextension='.png') # 设置保存文件,并返回文件名,指定文件名后缀为.png
filenewname.set(filenewpath) # 设置变量filenewname的值
img.save(str(filenewname.get())) # 设置保存图片
root = tk.Tk()
filename = tk.StringVar()
outputpath = tk.StringVar()
filenewname = tk.StringVar()
# 构建“选择文件”这一行的标签、输入框以及启动按钮,同时我们希望当用户选择图片之后能够显示原图的基本信息
tk.Label(root, text='选择文件').grid(row=1, column=0, padx=5, pady=5)
tk.Entry(root, textvariable=filename).grid(row=1, column=1, padx=5, pady=5)
tk.Button(root, text='打开文件', command=selectFile).grid(row=1, column=2, padx=5, pady=5)
# 构建“选择目录”这一行的标签、输入框以及启动按钮
tk.Label(root, text='选择目录').grid(row=2, column=0, padx=5, pady=5)
tk.Entry(root, textvariable=outputpath).grid(row=2, column=1, padx=5, pady=5)
tk.Button(root, text='点击选择', command=outputFile).grid(row=2, column=2, padx=5, pady=5)
# 构建“保存文件”这一行的标签、输入框以及启动按钮
tk.Label(root, text='保存文件').grid(row=3, column=0, padx=5, pady=5)
tk.Entry(root, textvariable=filenewname).grid(row=3, column=1, padx=5, pady=5)
tk.Button(root, text='点击保存', command=fileSave).grid(row=3, column=2, padx=5, pady=5)
root.mainloop()
- 1
- 2
- 3
- 4
- 5
- 6
- 7
- 8
- 9
- 10
- 11
- 12
- 13
- 14
- 15
- 16
- 17
- 18
- 19
- 20
- 21
- 22
- 23
- 24
- 25
- 26
- 27
- 28
- 29
- 30
- 31
- 32
- 33
- 34
- 35
- 36
- 37
- 38
- 39
- 40
- 41
- 42
运行结果:
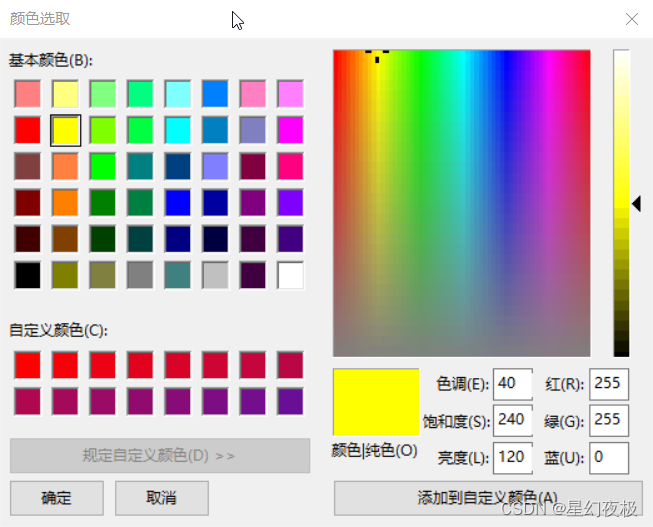
四、colorchooser颜色选择对话框
import tkinter
# 导入消息对话框子模块
from tkinter.colorchooser import askcolor

# 创建主窗口
root = tkinter.Tk()
# 设置窗口大小
root.minsize(300,300)

# 声明函数
def test():
    choose = askcolor(color='yellow', title='颜色选取')
    #取消输出值:(None, None)
    #选择红色输出值:((255, 0, 0), '#ff0000')
    print(choose)

# 添加按钮
btn1 = tkinter.Button(root,text = 'click',command = test)
btn1.pack()

# 加入消息循环
root.mainloop()
- 1
- 2
- 3
- 4
- 5
- 6
- 7
- 8
- 9
- 10
- 11
- 12
- 13
- 14
- 15
- 16
- 17
- 18
- 19
- 20
- 21
- 22
运行结果:
参考网站
https://blog.csdn.net/nilvya/article/details/106221666
https://docs.python.org/zh-cn/dev/library/dialog.html
https://www.jb51.net/article/241488.htm

