- 1python中print输出浮点数保留几位小数_print('%.2f'%x)
- 2bootstrap dialog对话框,完成操作提示框
- 3细说数字化转型之:为什么要数字化?
- 4Django问题:cannot import name ‘url‘ from ‘django.conf.urls‘解决方法_cannot import name 'url' from 'django.conf.urls
- 5CV笔记——(第八讲)深度学习中的优化策略详解(含dropout与迁移学习讲解)_深度学习 z字型
- 6Python安装教程(2023最新)_pathon 安装指南
- 7阿里云centos7安装Nginx_阿里云安装nginx
- 8Qt Designer 最新中文手册文档(Qt6)_pyqt6 designer 详解
- 9Cloud Computing 云计算基础_云计算基础(云计算基本概念,虚拟化、容器化、分 布式计算、分布式存储等)
- 10RC522(RFID射频模块)读卡ID的简单应用_typea 寻卡 0x52 0x26
使用ElementUI从零开始搭建后台管理系统教程_自定义配置elementui 页面
赞
踩
vue + ElementUI 搭建后台管理系统记录
本文档记录了该系统从零配置的完整过程
项目源码请访问:https://gitee.com/szxio/vue2Admin,如果感觉对你有帮助,请点一个小星星,O(∩_∩)O
新建项目
vue create vueadmin
- 1
安装 less-loader
安装
这里是一个小坑,安装 less-loader 时推荐安装指定版本,如果安装默认高版本会导致项目出错
cnpm i less-loader@6.0.0 -D
- 1
使用
<style lang="less" scoped>
div{
  b{
    span{
      color: red;
    }
  }
}
</style>
- 1
- 2
- 3
- 4
- 5
- 6
- 7
- 8
- 9
引入 ElementUI
安装
cnpm i element-ui -S
- 1
配置
import Vue from 'vue'
import ElementUI from 'element-ui';
import 'element-ui/lib/theme-chalk/index.css';
import App from './App.vue'

Vue.use(ElementUI);

Vue.config.productionTip = false

new Vue({
  render: h => h(App)
}).$mount('#app')
- 1
- 2
- 3
- 4
- 5
- 6
- 7
- 8
- 9
- 10
- 11
- 12
使用
<template>
  <div>
    <el-row>
      <el-button>默认按钮</el-button>
      <el-button type="primary">主要按钮</el-button>
      <el-button type="success">成功按钮</el-button>
      <el-button type="info">信息按钮</el-button>
      <el-button type="warning">警告按钮</el-button>
      <el-button type="danger">危险按钮</el-button>
    </el-row>
  </div>
</template>
- 1
- 2
- 3
- 4
- 5
- 6
- 7
- 8
- 9
- 10
- 11
- 12
配置 VueRouter
npm安装
- 安装
npm install vue-router
- 1
- 新建
scr/router/index.js,并添加如下代码
import Vue from "vue";
import VueRouter from "vue-router";

Vue.use(VueRouter);

const routes = [
  {
    path: "/",
    name: "首页",
    component: () => import("../views/Home.vue"),
  },
  {
    path: "/about",
    name: "About",
    component: () => import("../views/About.vue"),
  },
];

const router = new VueRouter({
  mode: "history",
  base: process.env.BASE_URL,
  routes,
});

// 前置路由拦截器
router.beforeEach((to, from, next) => {
  // 设置当前页签名称
  document.title = to.name;
  next();
});

export default router;
- 1
- 2
- 3
- 4
- 5
- 6
- 7
- 8
- 9
- 10
- 11
- 12
- 13
- 14
- 15
- 16
- 17
- 18
- 19
- 20
- 21
- 22
- 23
- 24
- 25
- 26
- 27
- 28
- 29
- 30
- 31
- 32
配置前置路由拦截器动态设置每个页面的浏览器页签名称
- 修改
main.js
import Vue from 'vue'
import VueRouter from 'vue-router'
import router from './router'

new Vue({
  router,
  render: h => h(App)
}).$mount('#app')
- 1
- 2
- 3
- 4
- 5
- 6
- 7
- 8
- 修改
App.vue
<template>
  <div id="app">
    <router-view />
  </div>
</template>
- 1
- 2
- 3
- 4
- 5
- 重启项目,分别访问如下地址可以查看页面效果
- http://localhost:8080/
- http://localhost:8080/about
VueCli安装
如果项目是使用vue-cli创建的,则可以使用下面的命令直接生成上述代码及两个示例路由。它也会覆盖你的 App.vue,因此请确保在项目中运行以下命令之前备份这个文件
vue add router
- 1
动态生成左侧菜单
添加layout组件
- 修改路由文件
首先我们要创建好 router 路由,修改 src\router\index.js 文件
import Vue from "vue";
import VueRouter from "vue-router";
import Layouts from "../layouts";

Vue.use(VueRouter);

const routes = [
  {
    path: "",
    redirect: "home",
    component: Layouts,
    children: [
      {
        path: "/home",
        meta: { title: "首页", icon: "el-icon-s-home" },
        component: () => import("../views/home"),
      },
      {
        path: "system",
        meta: { title: "系统管理", icon: "el-icon-s-home" },
        component: Layouts,
        children: [
          {
            path: "item1",
            meta: { title: "用户管理", icon: "el-icon-s-home" },
            component: () => import("../views/system/item1"),
          },
          {
            path: "item2",
            meta: { title: "产品管理", icon: "el-icon-s-home" },
            component: () => import("../views/system/item2"),
          },
        ],
      },
    ],
  },
];

const router = new VueRouter({
  mode: "history",
  base: process.env.BASE_URL,
  routes,
});

// 前置路由拦截器
router.beforeEach((to, from, next) => {
  // 设置当前页签名称
  document.title = to.meta.title;
  next();
});

export default router;
- 1
- 2
- 3
- 4
- 5
- 6
- 7
- 8
- 9
- 10
- 11
- 12
- 13
- 14
- 15
- 16
- 17
- 18
- 19
- 20
- 21
- 22
- 23
- 24
- 25
- 26
- 27
- 28
- 29
- 30
- 31
- 32
- 33
- 34
- 35
- 36
- 37
- 38
- 39
- 40
- 41
- 42
- 43
- 44
- 45
- 46
- 47
- 48
- 49
- 50
- 51
- 52
代码说明:
- path:路由地址
- redirect:重定向到指定路由
- component:页面对应的组件
- children:设置子路由,二级菜单
- meta:页面的补充,用来声明页面的名称和图标等
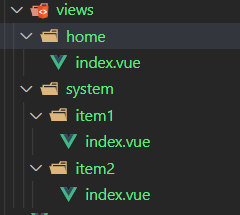
我们将所有的页面都放在根路由的 children 下面,如果下面的菜单没有配置 children 属性,则表示该菜单是一级菜单,如果设置了则表示二级菜单,可以多级嵌套。上面的路由对应的修改views 文件夹下的文件结构:
- 新建
src\layouts\index.vue
这个文件用来配置项目页面的外壳,左侧的菜单和顶部的面包屑都会在该文件夹中
页面结构分成三大部分:
- 左侧菜单
- 顶部面包屑
- 内容展示区域
对应成代码结构如下
<template>
  <div>
    <div>左侧菜单</div>
    <div>
      <div>头部面包屑</div>
      <div>内容展示区</div>
    </div>
  </div>
</template>
- 1
- 2
- 3
- 4
- 5
- 6
- 7
- 8
- 9
我们既然要将页面在内容展示区显示,所以我们对应的创建专门用来展示页面的组件。
所以接下来新建 src\layouts\components\AppContent.vue 组件。组件代码如下
<template>
    <div>
        <router-view/>
    </div>
</template>
- 1
- 2
- 3
- 4
- 5
没有看错,很简单,只要放置一个 router-view 标签即可。然后将 AppContent 组件注册到 layouts\index.vue 中
<template>
  <div>
    <div>左侧菜单</div>
    <div>
      <div>头部面包屑</div>
      <div>
        <AppContent />
      </div>
    </div>
  </div>
</template>

<script>
import AppContent from "./components/AppContent.vue";
export default {
  components: {
    AppContent,
  },
};
</script>
- 1
- 2
- 3
- 4
- 5
- 6
- 7
- 8
- 9
- 10
- 11
- 12
- 13
- 14
- 15
- 16
- 17
- 18
- 19
- 20
- 修改
App.vue
只保留 router-view
<template>
  <div>
    <router-view/>
  </div>
</template>
- 1
- 2
- 3
- 4
- 5
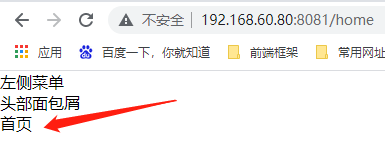
现在我们打开页面看到如下效果
修改页面样式
我们首页虽然已经展示到了 appcontent 组件中,但是样式并不是我们想要的效果。现在去修改src\layouts\index.vue文件,添加如下代码
<template>
    <div class="app-wrapper">
      <div class="sidebar-container">
          左侧菜单
      </div>
      <div class="main-container">
          <div class="header-main">头部面包屑</div>
          <AppContent class="app-main" />
      </div>
    </div>
</template>

<script>
import AppContent from "./components/AppContent.vue";
export default {
  components: {
    AppContent,
  }
}
</script>

<style lang="less" scoped>
.app-wrapper {
  position: relative;
  height: 100%;
  width: 100%;
  .sidebar-container {
    -webkit-transition: width 0.28s;
    transition: width 0.28s;
    width: 200px !important;
    background-color: #304156;
    height: 100%;
    position: fixed;
    font-size: 0px;
    top: 0;
    bottom: 0;
    left: 0;
    z-index: 1001;
    overflow: hidden;
    -webkit-box-shadow: 2px 0 6px rgb(0 21 41 / 35%);
    box-shadow: 2px 0 6px rgb(0 21 41 / 35%);
    & > div {
      width: 211px !important;
    }
  }
  .main-container {
    min-height: 100%;
    -webkit-transition: margin-left 0.28s;
    transition: margin-left 0.28s;
    margin-left: 200px;
    position: relative;
  }
  .main-container {
    -webkit-transition: margin-left 0.28s;
    transition: margin-left 0.28s;
    position: fixed;
    width: calc(100vw - 210px);
    top: 50px;
    right: 0;
    bottom: 0;
    left: 0;
    .header-main {
      position: fixed;
      height: 50px;
      width: calc(100% - 200px);
      right: 0;
      top: 0;
      display: flex;
      align-items: center;
      border-bottom: 1px solid #ddd;
      padding-left: 15px;
      box-sizing: border-box;
    }
    .app-main {
      min-height: 100%;
      width: 100%;
      position: relative;
      overflow: hidden;
    }
  }
}
</style>
- 1
- 2
- 3
- 4
- 5
- 6
- 7
- 8
- 9
- 10
- 11
- 12
- 13
- 14
- 15
- 16
- 17
- 18
- 19
- 20
- 21
- 22
- 23
- 24
- 25
- 26
- 27
- 28
- 29
- 30
- 31
- 32
- 33
- 34
- 35
- 36
- 37
- 38
- 39
- 40
- 41
- 42
- 43
- 44
- 45
- 46
- 47
- 48
- 49
- 50
- 51
- 52
- 53
- 54
- 55
- 56
- 57
- 58
- 59
- 60
- 61
- 62
- 63
- 64
- 65
- 66
- 67
- 68
- 69
- 70
- 71
- 72
- 73
- 74
- 75
- 76
- 77
- 78
- 79
- 80
- 81
- 82
- 83
效果展示

引入左侧菜单
- 新建
src\layouts\components\ElMenu\index.vue组件,初始化代码
<template>
  <div>
    <el-menu
      default-active="2"
      class="el-menu-vertical-demo"
      background-color="#545c64"
      text-color="#fff"
      active-text-color="#ffd04b"
    >
      <!-- 可展开菜单 -->
      <el-submenu index="1">
        <template slot="title">
          <i class="el-icon-location"></i>
          <span>导航一</span>
        </template>
        <el-menu-item index="3">
          <i class="el-icon-document"></i>
          <span slot="title">导航三</span>
        </el-menu-item>
      </el-submenu>
      <!-- 点击菜单 -->
      <el-menu-item index="2">
        <i class="el-icon-menu"></i>
        <span slot="title">导航二</span>
      </el-menu-item>
    </el-menu>
  </div>
</template>
- 1
- 2
- 3
- 4
- 5
- 6
- 7
- 8
- 9
- 10
- 11
- 12
- 13
- 14
- 15
- 16
- 17
- 18
- 19
- 20
- 21
- 22
- 23
- 24
- 25
- 26
- 27
- 28
- 注册
ElMenu组件添加到src\layouts\index.vue中
<template>
  <div class="app-wrapper">
    <!-- 左侧菜单 -->
    <ElMenu class="sidebar-container"/>
    <!-- 右侧操作区域 -->
    <div class="main-container">
      <!-- 头部面包屑 -->
      <div class="header-main">头部面包屑</div>
      <!-- 内容展示区 -->
      <AppContent class="app-main" />
    </div>
  </div>
</template>

<script>
import AppContent from "./components/AppContent.vue";
import ElMenu from "./components/ElMenu/index.vue";
export default {
  components: {
    AppContent,
    ElMenu,
  },
};
</script>

<style lang="less" scoped>
...和上面一样,这里省略
</style>
- 1
- 2
- 3
- 4
- 5
- 6
- 7
- 8
- 9
- 10
- 11
- 12
- 13
- 14
- 15
- 16
- 17
- 18
- 19
- 20
- 21
- 22
- 23
- 24
- 25
- 26
- 27
- 28
- 此时打开页面可以看到左侧菜单

递归菜单组件
目前我们看到的只是一个写死的菜单,我们想要的是根据 router 文件自动生成对应的菜单,那么应该怎么做呢?
首先左侧菜单的每一项都可以当做一个组件,然后获取到 router 中的所有菜单,循环展示每一项菜单即可,那么就开始做吧!
新建 src\layouts\components\ElMenu\MenuItem.vue 组件,用来展示每一项的菜单名称
修改 src\layouts\components\ElMenu\index.vue 页面,引入 router.js 获取定义的路由数据,并且引入 MenuItem 组件去循环展示每一项菜单
<template>
  <div>
    <el-menu
      :default-active="$route.path"
      class="el-menu-vertical-demo"
      background-color="#545c64"
      text-color="#fff"
      active-text-color="#ffd04b"
    >
      <MenuItem
        v-for="(route, index) in routersList"
        :key="index"
        :item="route"
        :fatherPath="route.path"
      ></MenuItem>
    </el-menu>
  </div>
</template>

<script>
import routers from "../../../router";
import MenuItem from "./MenuItem.vue";
export default {
  components: {
    MenuItem,
  },
  data() {
    return {
      routersList: [],
    };
  },
  mounted() {
    // 获取所有定义的一级菜单和多级菜单
    this.routersList = routers.options.routes[0].children;
  }
};
</script>
- 1
- 2
- 3
- 4
- 5
- 6
- 7
- 8
- 9
- 10
- 11
- 12
- 13
- 14
- 15
- 16
- 17
- 18
- 19
- 20
- 21
- 22
- 23
- 24
- 25
- 26
- 27
- 28
- 29
- 30
- 31
- 32
- 33
- 34
- 35
- 36
- 37
- 38
代码说明:
在el-menu 标签中我们定义了 :default-active="$route.path" ,这个含义表示默认选中当前路由菜单,如果是子级菜单会自动展开并选中,这是因为下面的代码中我们会将每一个页面的 path 作为菜单的 index 。
另外代码中我们遍历 MenuItem 组件时传递了每个菜单的对象 item 和每个菜单的路径 fatherPaht ,现在我们要到 MenuItem 组件去根据这个两个属性做递归展示根菜单和多级菜单结构。来到 MenuItem 组件中,编写如下代码
<template>
  <div>
    <!-- 根菜单 -->
    <router-link tag="span" :to="resolvePath()" v-if="!item.children">
      <el-menu-item :index="resolvePath()">
        <i :class="item.meta.icon"></i>
        <span slot="title">{{ item.meta.title }}</span>
      </el-menu-item>
    </router-link>

    <!-- 可展开菜单 -->
    <el-submenu :index="resolvePath()" v-else>
      <template slot="title">
        <i :class="item.meta.icon"></i>
        <span slot="title">{{ item.meta.title }}</span>
      </template>
      <!-- 这里递归去展示多级菜单 -->
      <menu-item
        v-for="(route, index) in item.children"
        :key="index"
        :item="route"
        :fatherPath="resolvePath(route.path)"
      >
      </menu-item>
    </el-submenu>
  </div>
</template>

<script>
// 引入path用来处理路径
import path from "path";

export default {
  // 做组件递归时必须定义一个name。然后递归时的组件名就是这里的name值
  name: "MenuItem",
  props: {
    // 上一级的路由信息
    item: {
      type: Object,
      default: null,
    },
    // 上一级的路径
    fatherPath: {
      type: String,
      default: "",
    },
  },
  data() {
    return {};
  },
  methods: {
    resolvePath(routePath = "") {
      return path.resolve(this.fatherPath, routePath);
    },
  },
};
</script>
- 1
- 2
- 3
- 4
- 5
- 6
- 7
- 8
- 9
- 10
- 11
- 12
- 13
- 14
- 15
- 16
- 17
- 18
- 19
- 20
- 21
- 22
- 23
- 24
- 25
- 26
- 27
- 28
- 29
- 30
- 31
- 32
- 33
- 34
- 35
- 36
- 37
- 38
- 39
- 40
- 41
- 42
- 43
- 44
- 45
- 46
- 47
- 48
- 49
- 50
- 51
- 52
- 53
- 54
- 55
- 56
- 57
代码说明
- 在做组件递归时,必须要在递归组件内声明
name属性,属性值就是当前组件的名称,这样才能实现多级嵌套循环效果。
另外在ElementUI 中的菜单分成两种类型,分别如下
<el-menu-item index="4">
    <i class="el-icon-setting"></i>
    <span slot="title">导航四</span>
</el-menu-item>
- 1
- 2
- 3
- 4
- 这种的表示根菜单
<el-submenu index="1">
    <template slot="title">
        <i class="el-icon-location"></i>
        <span>导航一</span>
    </template>
    <el-menu-item index="4">
        <i class="el-icon-setting"></i>
        <span slot="title">导航四</span>
    </el-menu-item>
</el-submenu>
- 1
- 2
- 3
- 4
- 5
- 6
- 7
- 8
- 9
- 10
- 这种的表示一个可展开的菜单,我们根据路由有没有
children来判断这个菜单是否有子菜单
在根菜单外层添加了一个 router-link 实现了点击菜单跳转到不同页面
现在我们来查看效果
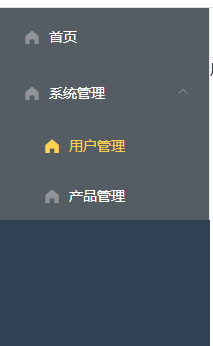
菜单上出现了一个根菜单和一个二级菜单
添加路由自动完成菜单嵌套
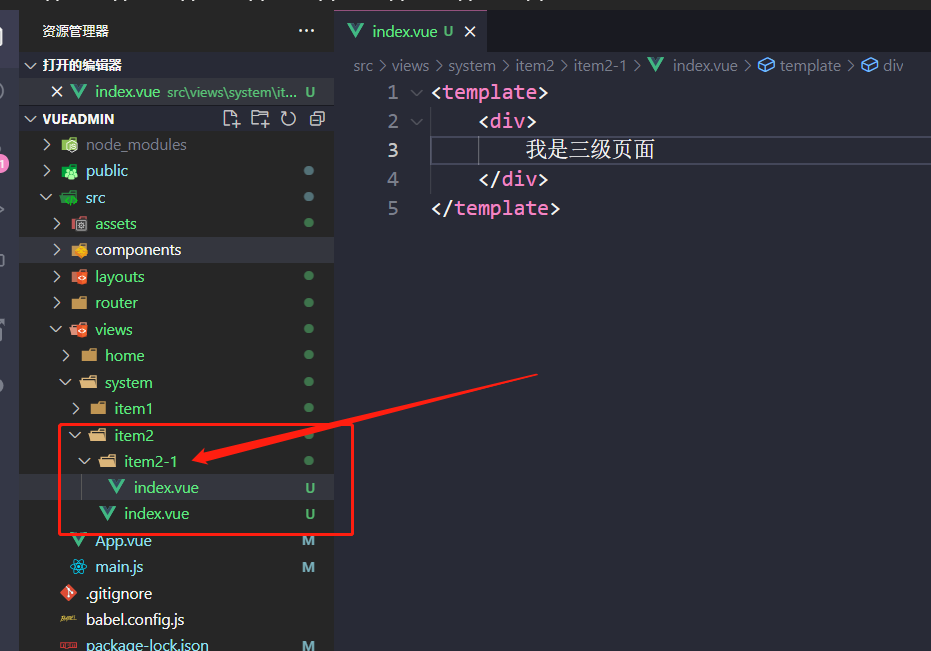
现在我们已经完成了一个二级菜单的展示,那么我们添加一个三级路由会不会自动出现三级菜单呢?
首先新建一个测试页面,在文件夹 item2 下面新建一个 item2-1,并且在里面添加一个 index.vue 文件,如下图:
然后去 src\router\index.js 添加这个页面的路由
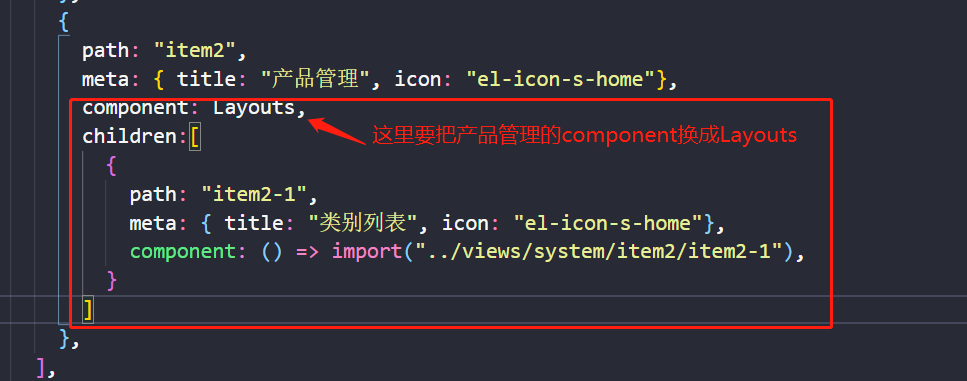
添加完成后可以发现产品管理菜单自动变成了一个可展开的菜单,展开后里面有一个类别列表菜单

添加头部面包屑
基础用法
我们想要在头部添加一个如下的效果,可以很清晰的知道当前浏览的是哪个页面

- 在
layouts文件夹添加HeaderNav组件,组件地址:src\layouts\components\HeaderNav.vue,添加如下初始代码
<template>
  <div>
    <el-breadcrumb separator="/">
      <el-breadcrumb-item :to="{ path: '/' }">首页</el-breadcrumb-item>
      <el-breadcrumb-item><a href="/">活动管理</a></el-breadcrumb-item>
      <el-breadcrumb-item>活动列表</el-breadcrumb-item>
      <el-breadcrumb-item>活动详情</el-breadcrumb-item>
    </el-breadcrumb>
  </div>
</template>
- 1
- 2
- 3
- 4
- 5
- 6
- 7
- 8
- 9
- 10
- 然后再
src\layouts\index.vue文件中引入HeaderNav组件
<template>
  <div>
    <div class="app-wrapper">
      <!-- 左侧菜单 -->
      <ElMenu class="sidebar-container" />
      <!-- 右侧操作区域 -->
      <div class="main-container">
        <!-- 头部面包屑 -->
        <HeaderNav class="header-main" />
        <!-- 内容展示区 -->
        <AppContent class="app-main" />
      </div>
    </div>
  </div>
</template>

<script>
import AppContent from "./components/AppContent.vue";
import ElMenu from "./components/ElMenu/index.vue";
import HeaderNav from "./components/HeaderNav.vue";
export default {
  components: {
    AppContent,
    ElMenu,
    HeaderNav,
  }
};
</script>

<style lang="less" scoped>
样式省略。。。
</style>
- 1
- 2
- 3
- 4
- 5
- 6
- 7
- 8
- 9
- 10
- 11
- 12
- 13
- 14
- 15
- 16
- 17
- 18
- 19
- 20
- 21
- 22
- 23
- 24
- 25
- 26
- 27
- 28
- 29
- 30
- 31
- 32
- 此时我们的页面效果是这样的
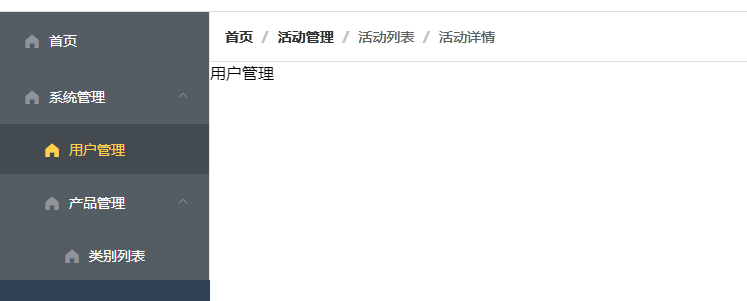
是不是有点感觉了呢
- 接下只需要监听页面的变化去实时获取最新的路由信息即可,然后循环遍历显示
实现代码:
<template>
  <div>
    <el-breadcrumb separator-class="el-icon-arrow-right">
      <el-breadcrumb-item
        v-for="(route, index) in breadcrumbItems"
        :key="index"
      >
        <i :class="route.icon"></i>
        <span>{{ route.title }}</span>
      </el-breadcrumb-item>
    </el-breadcrumb>
  </div>
</template>

<script>
export default {
  data() {
    return {
      breadcrumbItems: [],
    };
  },
  mounted() {
    this.geBreadcrumbItems(this.$route);
  },
  methods: {
    geBreadcrumbItems(route) {
      // 获取当前页面的路由组
      this.breadcrumbItems = route.matched;
      // 从下标为1的位置开始获取路由,去除了最外层定义的根路由信息,并且获取到的数组里面只有meta数据,方便我们取值
      this.breadcrumbItems = this.breadcrumbItems
        .map((item) => item.meta)
        .splice(1);
    },
  },
  watch: {
    $route: function (newVal) {
      this.geBreadcrumbItems(newVal);
    },
  },
};
</script>
- 1
- 2
- 3
- 4
- 5
- 6
- 7
- 8
- 9
- 10
- 11
- 12
- 13
- 14
- 15
- 16
- 17
- 18
- 19
- 20
- 21
- 22
- 23
- 24
- 25
- 26
- 27
- 28
- 29
- 30
- 31
- 32
- 33
- 34
- 35
- 36
- 37
- 38
- 39
- 40
- 41
效果展示

添加首页快速入口
我们已经实现了基本效果,但是我们还想在面包屑的首位添加首页的连接,点击首页文字快速跳转到到首页
修改 src\layouts\components\HeaderNav.vue 代码为如下
<template>
  <div>
    <el-breadcrumb separator-class="el-icon-arrow-right">
      <el-breadcrumb-item
        v-for="(route, index) in breadcrumbItems"
        :key="index"
      >
        <!-- 判断面包屑是否有path属性,如果有则显示router-link标签 -->
        <router-link v-if="route.path" :to="route.path">
          <i :class="route.icon"></i>
          <span>{{ route.title }}</span>
        </router-link>
        <!-- 如果没有path属性则不跳转 -->
        <template v-else>
          <i :class="route.icon"></i>
          <span>{{ route.title }}</span>
        </template>
      </el-breadcrumb-item>
    </el-breadcrumb>
  </div>
</template>

<script>
export default {
  data() {
    return {
      breadcrumbItems: [],
    };
  },
  mounted() {
    this.geBreadcrumbItems(this.$route);
  },
  methods: {
    geBreadcrumbItems(route) {
      // 获取当前页面的路由组
      this.breadcrumbItems = route.matched;
      // 从下标为1的位置开始获取路由,去除了最外层定义的根路由信息,并且获取到的数组里面只有meta数据,方便我们取值
      this.breadcrumbItems = this.breadcrumbItems
        .map((item) => item.meta)
        .splice(1);

      // 判断当前页面是否已经是首页
      let nowPath = route.path;
      // 如果当前页面不是首页,则在面包屑的首位置添加一个首页链接
      if (nowPath !== "/home") {
        this.breadcrumbItems.unshift({
          title: "首页",
          icon: "el-icon-s-home",
          path: "/home",
        });
      }
    },
  },
  watch: {
    $route: function (newVal) {
      this.geBreadcrumbItems(newVal);
    },
  },
};
</script>
- 1
- 2
- 3
- 4
- 5
- 6
- 7
- 8
- 9
- 10
- 11
- 12
- 13
- 14
- 15
- 16
- 17
- 18
- 19
- 20
- 21
- 22
- 23
- 24
- 25
- 26
- 27
- 28
- 29
- 30
- 31
- 32
- 33
- 34
- 35
- 36
- 37
- 38
- 39
- 40
- 41
- 42
- 43
- 44
- 45
- 46
- 47
- 48
- 49
- 50
- 51
- 52
- 53
- 54
- 55
- 56
- 57
- 58
- 59
- 60
修改之后页面效果是当我们进入非首页页面时,面包屑前面会有一个首页的快速入口,当进入首页时不会展示首页连接
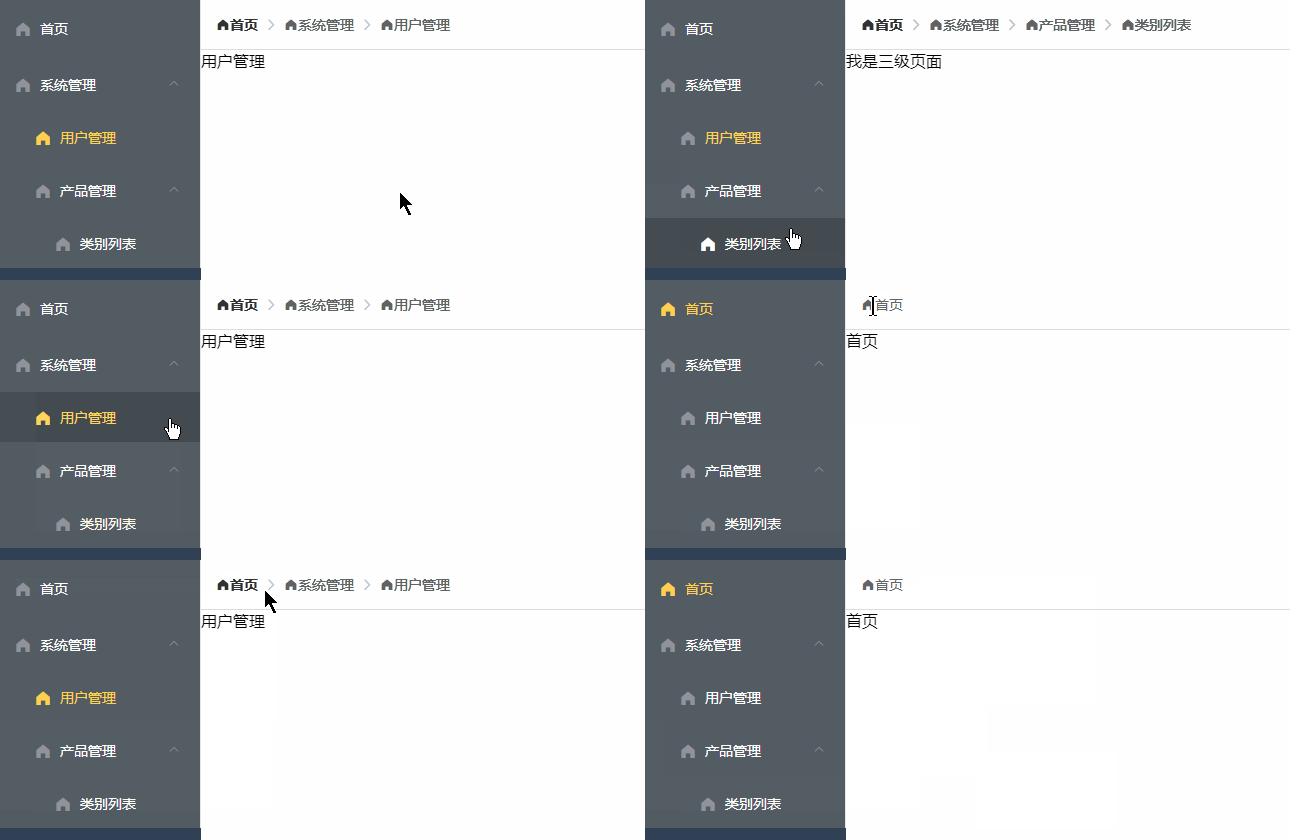
个性化菜单配置
配置独立页面
现在我们看到的页面都嵌套在左侧菜单和面包屑下面,但是有些页面时不能在这个嵌套页面的,例如登录页面。那么我们怎么通过配置路由来实现这样的效果呢?
首先添加登录页面,新建 src\views\login\index.vue,编写如下代码
<template>
    <div>
        登录页面
    </div>
</template>
- 1
- 2
- 3
- 4
- 5
添加完登录页面后前往 src\router\index.js 文件添加路由信息,如下图
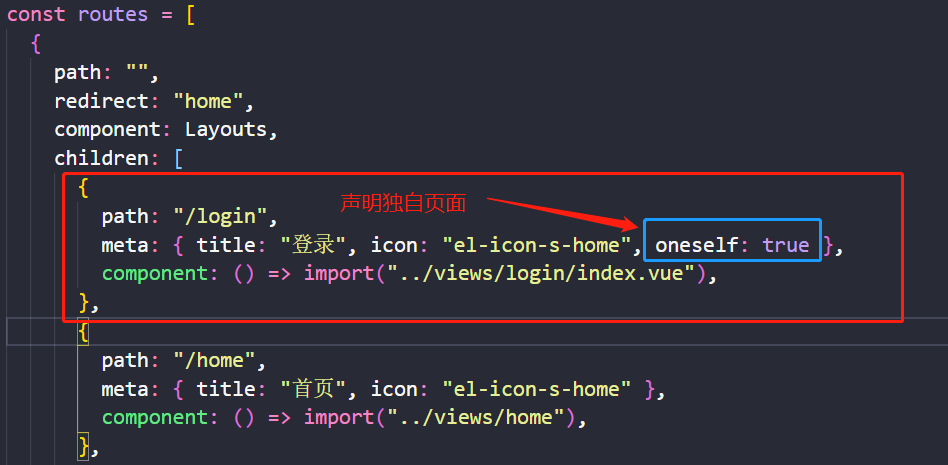
我们在登录页面的路由信息中的增加一个 oneself:true 的标识,用来标识这个页面时独自打开的,不需要嵌套在菜单下
添加完路由后找到 src\layouts\index.vue 页面修改为如下代码
<template>
  <div>
    <!-- 判断是否在空白页打开 -->
    <template v-if="!isOneself">
      <div class="app-wrapper">
        <div class="sidebar-container">
          <ElMenu />
        </div>
        <div class="main-container">
          <HeaderNav class="header-main" />
          <AppContent class="app-main" />
        </div>
      </div>
    </template>
    <!-- 如果在空白页打开则不显示框架 -->
    <template v-else>
      <AppContent />
    </template>
  </div>
</template>

<script>
import AppContent from "./components/AppContent.vue";
import ElMenu from "./components/ElMenu/index.vue";
import HeaderNav from "./components/HeaderNav.vue";
export default {
  components: {
    AppContent,
    ElMenu,
    HeaderNav,
  },
  data() {
    return {
      isOneself: false,
    };
  },
  mounted() {
    // 获取当前路由是否是独自打开的
    this.isOneself = this.$route.meta.oneself;
  },
  watch: {
    // 监听路由变化,实时获取路由信息
    $route: function (newVal) {
      this.isOneself = newVal.meta.oneself;
    },
  },
};
</script>

<style lang="less" scoped>
css省略。。。
</style>
- 1
- 2
- 3
- 4
- 5
- 6
- 7
- 8
- 9
- 10
- 11
- 12
- 13
- 14
- 15
- 16
- 17
- 18
- 19
- 20
- 21
- 22
- 23
- 24
- 25
- 26
- 27
- 28
- 29
- 30
- 31
- 32
- 33
- 34
- 35
- 36
- 37
- 38
- 39
- 40
- 41
- 42
- 43
- 44
- 45
- 46
- 47
- 48
- 49
- 50
- 51
- 52
修改完成后查看页面效果

效果很明显,点击了登录后左侧的菜单和面包屑都没有了,浏览器只会展示登录页面信息。
到这里我们会发现登录页面作为了一个菜单项显示到了左侧菜单中,这个问题怎么解决呢?
配置隐藏菜单
找到 src\router\index.js 文件,为登录页面添加一个 hide:true ,如下图,这个属性用来表示这个页面不在左侧菜单中显示

添加完成后找到 src\layouts\components\ElMenu\MenuItem.vue 文件,在根标签上添加一个 v-if 判断,用来判断当前菜单是否需要被渲染

由于这个功能所添加的代码极少,所以就不贴代码了。修改完之后查看页面
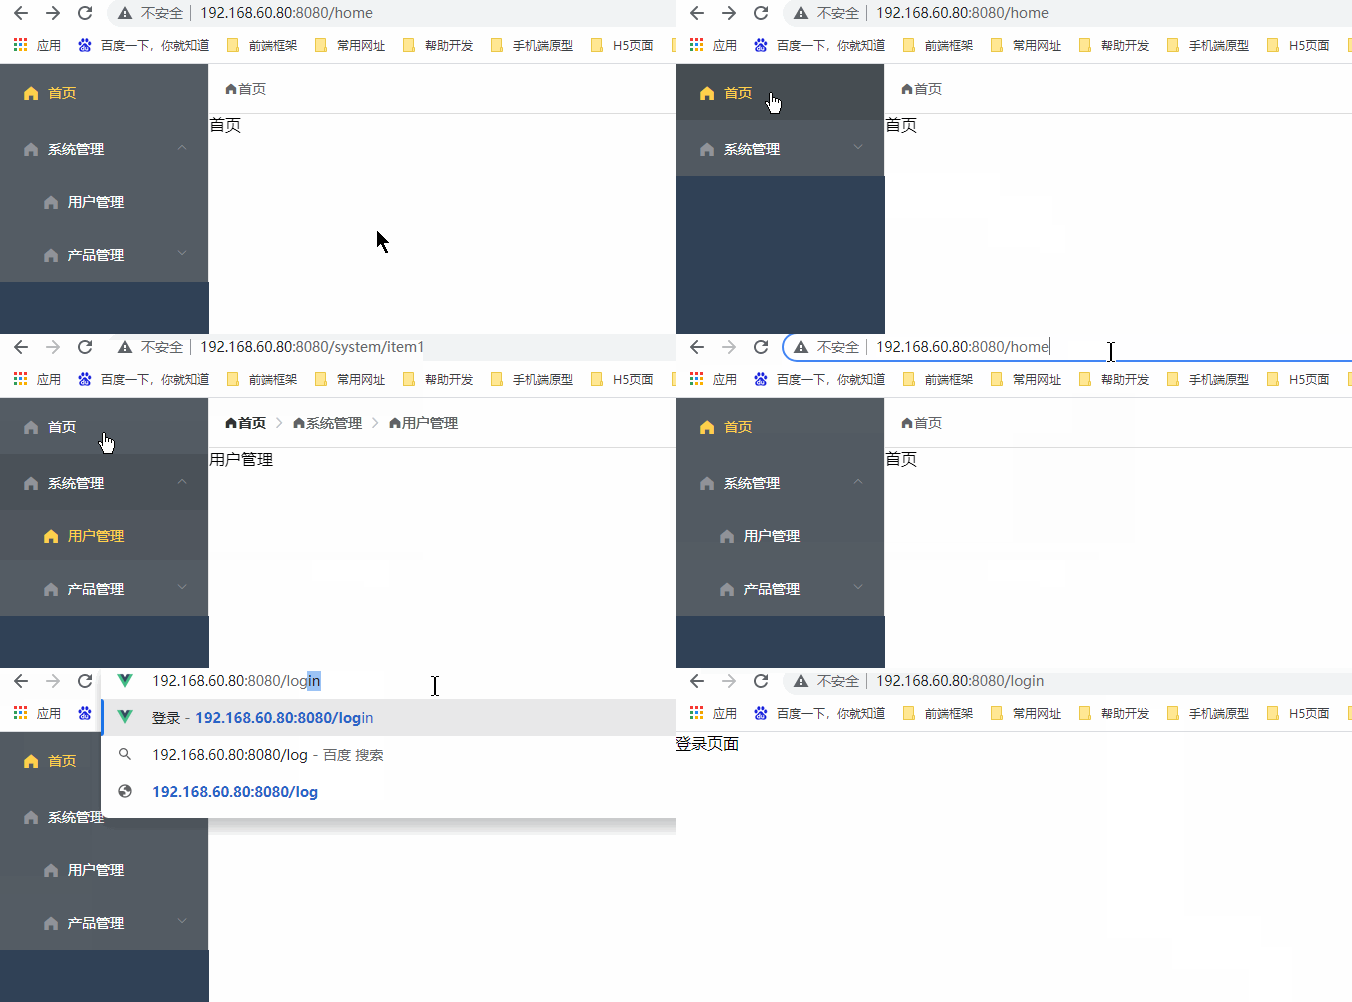
通过动画可以看到登录页面已经不在菜单中展示,修改页面地址也会正常的在新页面中打开。
配置外部连接
现在我们配置的地址只能配置我们项目中的地址,那么我需要点击菜单直接打开百度怎么做呢?
首先添加路由信息如下

此时我们点击菜单并不能正常的打开百度

这是因为我们并没有判断页面的 path 类型。
接下来新建 src\layouts\components\ElMenu\MenuLink.vue,编写如下代码
下面代码的含义是定义了一个动态组件,根据父组件传递过来的路径类型显示不同的组件
<template>
  <component :is="type" v-bind="linkProps(to)">
    <slot />
  </component>
</template>

<script>
export default {
  props: {
    // 接收从父组件传递过来的页面地址
    to: {
      type: String,
      required: true,
    },
  },
  computed: {
    isExternal() {
      return /^(https?:|mailto:|tel:)/.test(this.to);
    },
    type() {
      // 根据路径判断组件类型,如果是外部连接则用a标签
      if (this.isExternal) {
        return "a";
      }
      // 如果不是外部连接则用router-link组件包裹
      return "router-link";
    },
  },
  methods: {
    // 绑定组件属性
    linkProps(to) {
      // 如果是外部连接则设置a标签的href地址为传递过来的地址,并且设置在新标签打开
      if (this.isExternal) {
        return {
          href: to,
          target: "_blank",
          style: {
            "text-decoration": "none",
          },
        };
      }
      // 如果是内部地址则设置router-link的to属性值,以及tag属性值为span
      return {
        to: to,
        tag: "span",
      };
    },
  },
};
</script>
- 1
- 2
- 3
- 4
- 5
- 6
- 7
- 8
- 9
- 10
- 11
- 12
- 13
- 14
- 15
- 16
- 17
- 18
- 19
- 20
- 21
- 22
- 23
- 24
- 25
- 26
- 27
- 28
- 29
- 30
- 31
- 32
- 33
- 34
- 35
- 36
- 37
- 38
- 39
- 40
- 41
- 42
- 43
- 44
- 45
- 46
- 47
- 48
- 49
- 50
然后找到 src\layouts\components\ElMenu\MenuItem.vue 文件,引入刚刚新建 MenuLink 组件
修改代码如下
<template>
  <!-- 判断当前页面是否显示,如果hide为true,则不渲染该菜单 -->
  <div v-if="!item.meta.hide">
    <!-- 根菜单 -->
    <MenuLink :to="resolvePath()" v-if="!item.children">
      <el-menu-item :index="resolvePath()">
        <i :class="item.meta.icon"></i>
        <span slot="title">{{ item.meta.title }}</span>
      </el-menu-item>
    </MenuLink>

    <!-- 可展开菜单 -->
    <el-submenu :index="resolvePath()" v-else>
      <template slot="title">
        <i :class="item.meta.icon"></i>
        <span slot="title">{{ item.meta.title }}</span>
      </template>
      <!-- 这里递归去展示多级菜单 -->
      <menu-item
        v-for="(route, index) in item.children"
        :key="index"
        :item="route"
        :fatherPath="resolvePath(route.path)"
      >
      </menu-item>
    </el-submenu>
  </div>
</template>

<script>
// 引入path用来处理路径
import path from "path";
import MenuLink from "./MenuLink.vue";

export default {
  // 做组件递归时必须定义一个name。然后递归时的组件名就是这里的name值
  name: "MenuItem",
  components: {
    MenuLink,
  },
  props: {
    // 上一级的路由信息
    item: {
      type: Object,
      default: null,
    },
    // 上一级的路径
    fatherPath: {
      type: String,
      default: "",
    },
  },
  data() {
    return {};
  },
  methods: {
    // 判断路径是否是外部地址
    isExternal(path) {
      return /^(https?:|mailto:|tel:)/.test(path);
    },
    // 解析页面地址
    resolvePath(routePath = "") {
      // 判断当前页面地址是否为外部地址
      if (this.isExternal(routePath)) {
        return routePath;
      }
      // 判断从父组件传递过来的地址是否为外部地址
      if (this.isExternal(this.fatherPath)) {
        return this.fatherPath;
      }
      // 格式化页面地址
      return path.resolve(this.fatherPath, routePath);
    },
  },
};
</script>
- 1
- 2
- 3
- 4
- 5
- 6
- 7
- 8
- 9
- 10
- 11
- 12
- 13
- 14
- 15
- 16
- 17
- 18
- 19
- 20
- 21
- 22
- 23
- 24
- 25
- 26
- 27
- 28
- 29
- 30
- 31
- 32
- 33
- 34
- 35
- 36
- 37
- 38
- 39
- 40
- 41
- 42
- 43
- 44
- 45
- 46
- 47
- 48
- 49
- 50
- 51
- 52
- 53
- 54
- 55
- 56
- 57
- 58
- 59
- 60
- 61
- 62
- 63
- 64
- 65
- 66
- 67
- 68
- 69
- 70
- 71
- 72
- 73
- 74
- 75
- 76
图片说明修改点
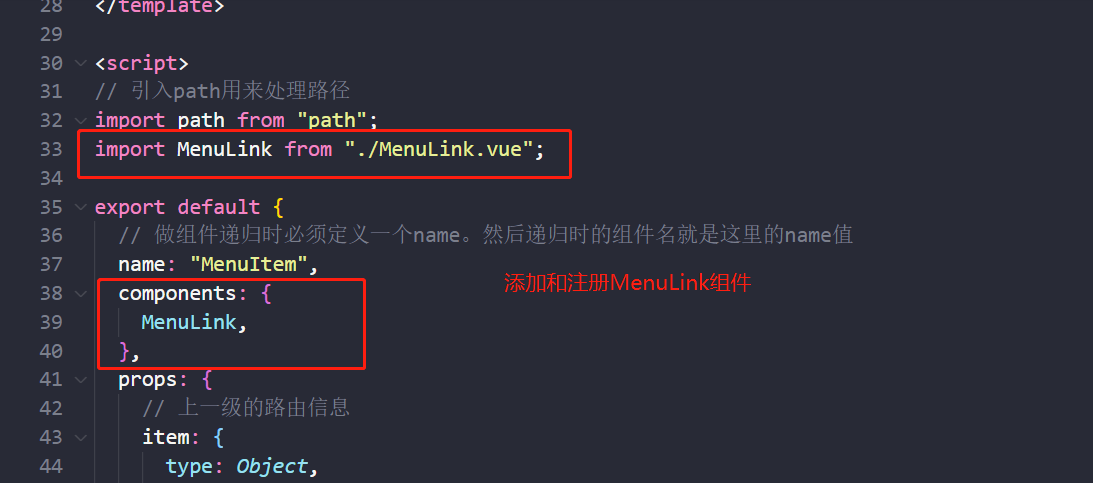

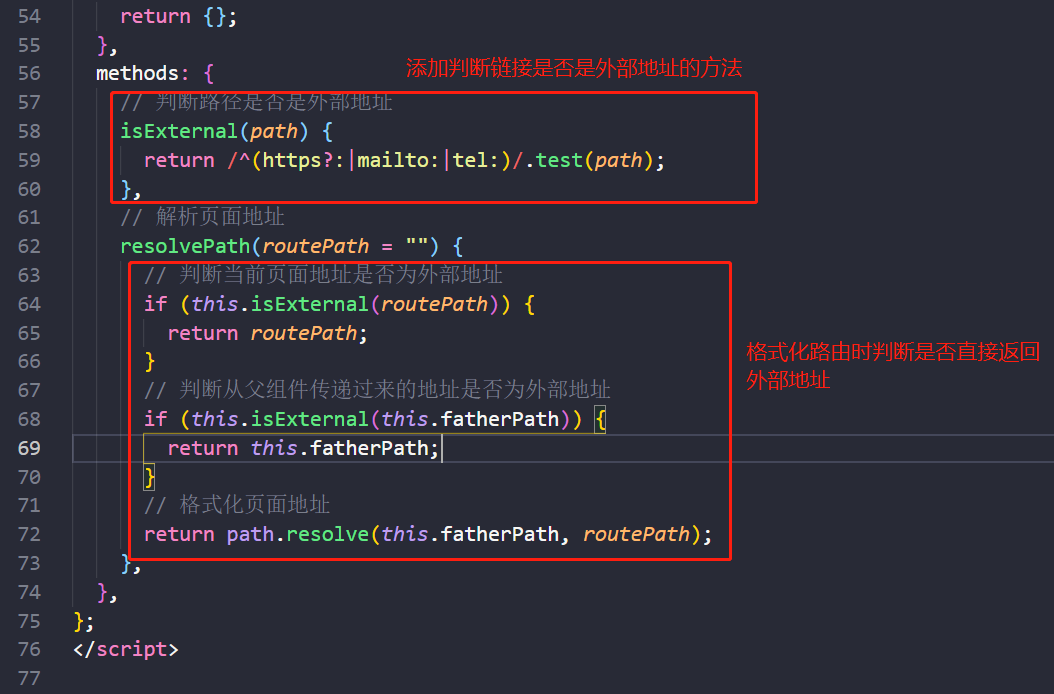
修改完成后查看页面效果
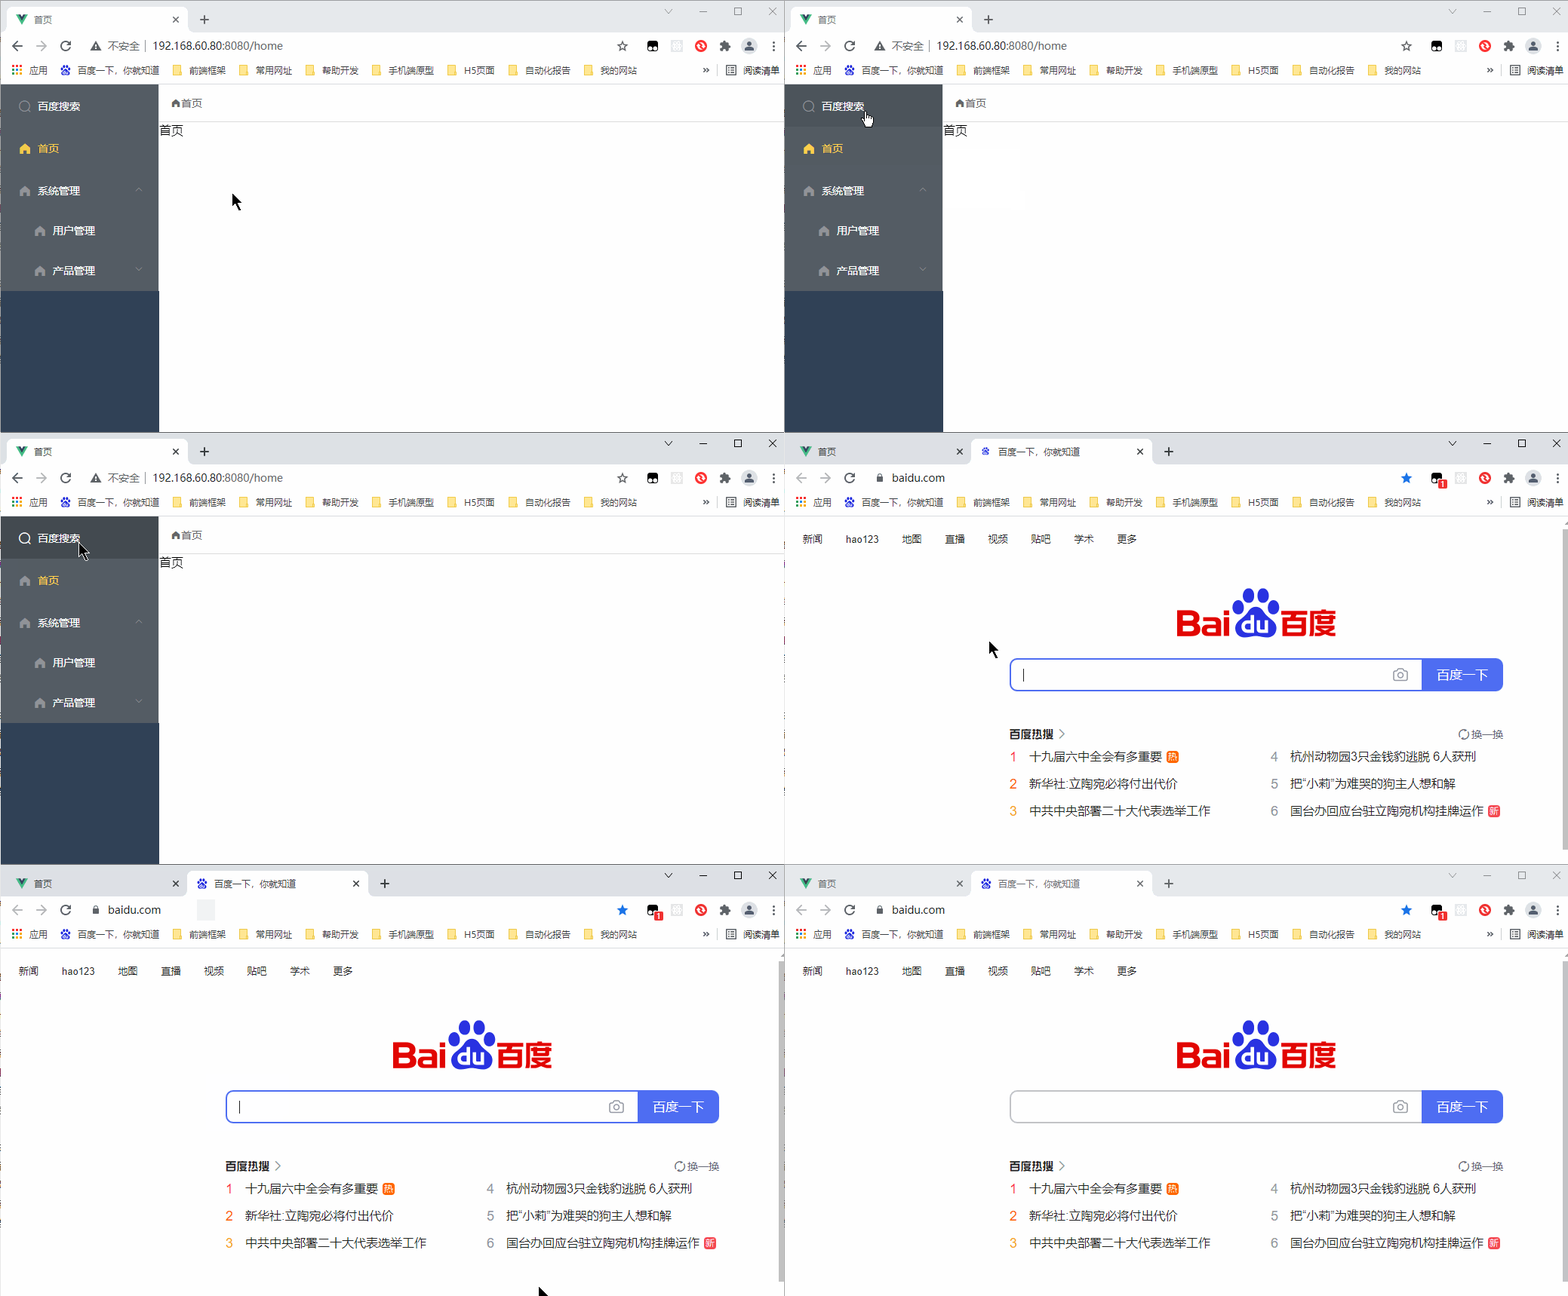
现在可以看到点击百度搜索菜单后在新页签打开了百度。
配置多环境地址
首先安装 cross-env
npm i --save-dev cross-env
- 1
然后修改 package.json 文件中的 scripts 对象
{
  ......省略其他

  "scripts": {
    "serve": "cross-env VUE_APP_ENV=dev vue-cli-service serve",
    "build": "cross-env VUE_APP_ENV=production vue-cli-service build",
    "lint": "vue-cli-service lint"
  },

  ......省略其他
}
- 1
- 2
- 3
- 4
- 5
- 6
- 7
- 8
- 9
- 10
- 11
我们在启动命令和打包命令前添加 cross-env 关键字,然后使用键值对的方式对一个变量赋值 VUE_APP_ENV=dev
然后新建src\utils\baseurl.js 文件,编写如下代码
// 封装公共的请求api
const apiConfig = {
    // 开发环境
    dev: {
        fayongApi: "https://192.168.199.100"
    },
    // 生产环境
    production: {
        fayongApi: "https://appsh.yikongenomics.com"
    },
};

// 根据全局全局变量自动切换请求地址前缀
export default apiConfig[process.env.VUE_APP_ENV];
- 1
- 2
- 3
- 4
- 5
- 6
- 7
- 8
- 9
- 10
- 11
- 12
- 13
- 14
关键代码:process.env.VUE_APP_ENV 通过这个可以获取到输入不同命令式设置的不同值。
最后我们在页面中引入 baseurl 来查看当前获取的环境地址
<template>
    <div>
        首页
    </div>
</template>

<script>
import env from "../../utils/baseurl"
export default {
    data() {
      return{

      }
    },
    mounted(){
        console.log(env.fayongApi);  //=> https://192.168.199.100
    }
}
</script>
- 1
- 2
- 3
- 4
- 5
- 6
- 7
- 8
- 9
- 10
- 11
- 12
- 13
- 14
- 15
- 16
- 17
- 18
- 19
此时获取到的就是本地的一个地址,当我们打包后,这里就会自动变成线上地址,从而实现了多套环境的搭建和根据打包命令自动切换的功能。
配置代理和publicPath
在项目根目录新建 vue.config.js。配置代码如下
module.exports = {
    publicPath: "./",
    devServer: {
        disableHostCheck: true, //禁用主机检查
        proxy: {
            "/fayong": { // 设置以什么前缀开头的请求用来代理
                target: "http://w79f7c.natappfree.cc/index", //要访问的跨域的域名
                secure: false, // 使用的是http协议则设置为false,https协议则设置为true
                changOrigin: true, //开启代理
                pathRewrite: {
                    "^/fayong": "",
                },
            }
        },
    },
};
- 1
- 2
- 3
- 4
- 5
- 6
- 7
- 8
- 9
- 10
- 11
- 12
- 13
- 14
- 15
- 16
然后重启项目生效
简单封装一下 axios
首先安装 axios
npm i axios --save
- 1
然后新建 src\utils\http.js,编写如下代码
// 引入axiox
import axios from 'axios'
// 创建axios实例
const service = axios.create()

// 请求拦截器
axios.interceptors.request.use(function (config) {
    // 在这里可以添加请求头,请求token等信息
    return config;
}, function (error) {
    // 对请求错误做些什么
    return Promise.reject(error);
});

// 响应拦截器
service.interceptors.response.use(function (result) {
    // 判断成功
    const { status, data } = result
    // 判断接口返回状态
    if (status === 200) {
        // 如果接口正常则返回接口给的数据
        return data
    } else {
        // 如果不正常则返回一个错误信息
        return Promise.reject('系统未知错误,请反馈给管理员')
    }
}, function (error) {
    // 返回错误信息
    return Promise.reject(error)
})

export default service
- 1
- 2
- 3
- 4
- 5
- 6
- 7
- 8
- 9
- 10
- 11
- 12
- 13
- 14
- 15
- 16
- 17
- 18
- 19
- 20
- 21
- 22
- 23
- 24
- 25
- 26
- 27
- 28
- 29
- 30
- 31
- 32
最后来使用一下
import http from '../../utils/http'

export default {
  data() {
    return {}
  },
  methods: {
    test() {
      http
        .get(`node/search/users?q=songzx`)
        .then((res) => {
          console.log(res)
        })
        .catch((err) => {
          console.log(err)
        })
    },
  },
}
- 1
- 2
- 3
- 4
- 5
- 6
- 7
- 8
- 9
- 10
- 11
- 12
- 13
- 14
- 15
- 16
- 17
- 18
- 19
查看控制台拿到的数据就是接口直接返回的数据

封装全局Loading方法
在 main.js 中添加如下方法
/**
 * 配置全局loading提示框
 * 显示loading this.showLoading()
 * 关闭loading this.hideLoading()
 */
Vue.prototype.loading = null
Vue.prototype.showLoading = function (msg = 'Loading') {
  Vue.prototype.loading = this.$loading({
    lock: true,
    text: msg,
    spinner: 'el-icon-loading',
    background: 'rgba(0, 0, 0, 0.7)'
  });
}
Vue.prototype.hideLoading = function(){
  Vue.prototype.loading.close();
}
- 1
- 2
- 3
- 4
- 5
- 6
- 7
- 8
- 9
- 10
- 11
- 12
- 13
- 14
- 15
- 16
- 17


