- 1算法二刷day4
- 2Python爬虫基础—安装第三方模块及使用_pycharm爬虫需要安装什么模块
- 3学校教职工用计算机台数指标,陕西省义务教育学校办学基本标准的主要指标
- 4弹性地基梁matlab有限元编程 | 双排桩支护结构 | Matlab源码 | 理论文本
- 5NAND的行列地址_nand row 3地址
- 6用python实现使用ES检索PDF或Word等格式文件方案
- 7微信开发者工具报错: app.json: 在项目根目录未找到 app.json (env: Windows,mp,1.06.2303220; lib: 2.30.4)_[ app.json 文件内容错误] app.json: 在项目根目录未找到 app.json (e
- 8整人VBS\BAT代码 ② 整蛊系列→可参考_整蛊代码
- 9应对恶意IP攻击的有效方法
- 10Django教程(为什么选择Django框架)_djongo前台框架
以太坊区块链网络部署及验证实验_ethereum 公链部署
赞
踩
以太坊区块链网络部署及验证实验
文章目录
国科大2023秋季学期计算机网络实验,简单记录一下实验流程
1 Go1.19安装
在 Ubuntu 上安装 Go 1.19 版本可以通过以下步骤进行:
1.1 下载 Go 1.19
首先,打开终端。从 Go 语言的官方网站下载最新版本。使用 wget 或 curl 命令下载 Go 1.19 的 tarball。
wget https://dl.google.com/go/go1.19.linux-amd64.tar.gz
- 1
确保下载链接是最新的,可以在 Go 语言官方下载页面 上找到正确的链接。
1.2 解压文件
下载完成后,解压文件到 /usr/local 目录。这个目录通常用于存放用户级的软件安装。使用以下命令:
sudo tar -C /usr/local -xzf go1.19.linux-amd64.tar.gz
- 1
这将在 /usr/local 中创建一个 go 目录。
1.3 设置环境变量
要使用 Go,需要将 Go 的 bin 目录添加到你的 PATH 环境变量中。在 .profile 或 .bashrc 文件中设置这个变量。以下是在 .profile 文件中设置的示例命令:
echo "export PATH=\$PATH:/usr/local/go/bin" >> ~/.profile
- 1
然后,使更改生效:
source ~/.profile
- 1
或者,如果使用的是 bash shell,修改 .bashrc 文件:
echo "export PATH=\$PATH:/usr/local/go/bin" >> ~/.bashrc
source ~/.bashrc
- 1
- 2
1.4 验证安装
安装完成后,重新启动终端或使用 source 命令更新当前会话。然后,使用以下命令来验证 Go 是否正确安装:
go version
- 1
如果一切正常,这将显示 Go 的版本信息,类似于 go version go1.19 linux/amd64。
注意事项:
- 如果之前安装了旧版本的 Go,可能需要先卸载旧版本或确保新版本的路径已正确添加到你的 PATH 中。
- 确保下载的 Go 版本与你的系统架构(如 amd64, arm64 等)相匹配。
安装完成后:
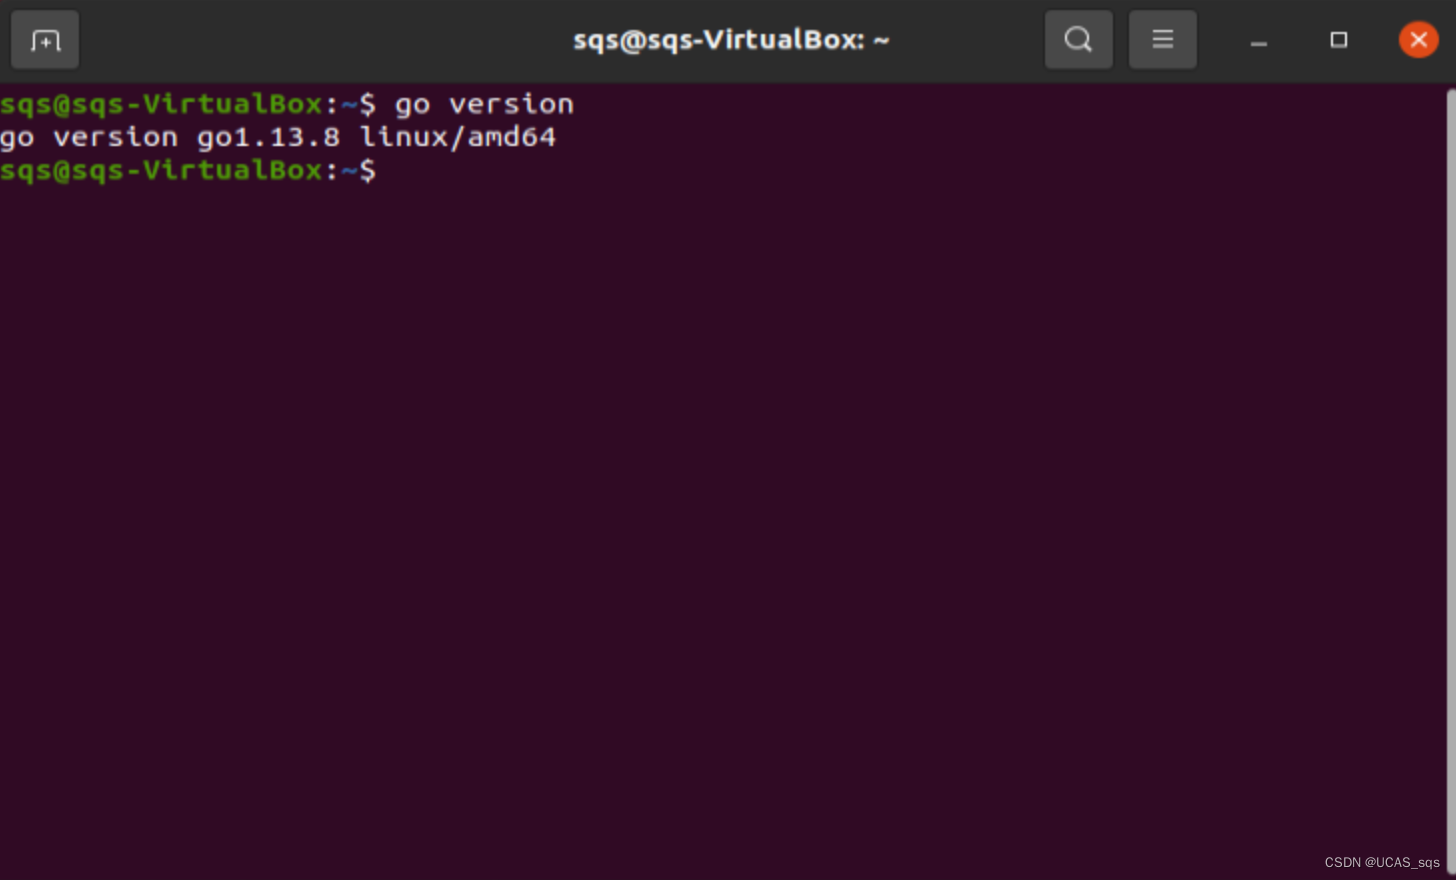
2 geth1.10.25安装
在 Ubuntu 上安装 Geth 版本 1.10.25 通过下载特定版本的二进制文件或从源代码编译来实现。下面是具体步骤:
2.1 方法 1: 下载二进制文件
- 访问 Geth GitHub 仓库:
- 打开 Go-Ethereum Releases 页面。
- 下载特定版本:
- 在 Releases 页面中,找到
1.10.25版本。
- 在 Releases 页面中,找到
- 下载适用于 Linux 的文件,通常会是一个名为
geth-linux-amd64-1.10.25-xxxxxx.tar.gz的压缩文件。
-
解压文件:
-
使用命令行解压下载的文件。例如:
tar -xvzf geth-linux-amd64-1.10.25-xxxxxx.tar.gz- 1
-
-
移动 Geth 到可执行目录:
-
将解压后的
geth可执行文件移动到一个在你的 PATH 环境变量中的目录,如/usr/local/bin。sudo mv geth-linux-amd64-1.10.25-xxxxxx/geth /usr/local/bin/- 1
-
-
验证安装:
-
在终端执行以下命令以确认安装:
geth version- 1
-
2.2 方法 2: 从源代码编译
如果想从源代码编译 Geth,可以按照以下步骤操作:
-
安装编译依赖:
-
安装
build-essential、git、golang等必要工具:sudo apt-get update sudo apt-get install -y build-essential git golang- 1
- 2
-
-
克隆源代码仓库:
-
克隆 Go-Ethereum 仓库:
git clone https://github.com/ethereum/go-ethereum.git- 1
-
-
切换到指定版本:
-
进入仓库目录,并切换到
1.10.25版本:cd go-ethereum git checkout v1.10.25- 1
- 2
-
-
编译 Geth:
-
在仓库根目录下执行编译命令:
make geth- 1
-
-
安装 Geth:
-
将编译好的
geth可执行文件复制到/usr/local/bin:sudo cp build/bin/geth /usr/local/bin/- 1
-
-
验证安装:
- 运行
geth version来验证安装。
- 运行
注意事项:
- 从源代码编译可能需要一定时间,取决于你的系统性能。
注:以上两种方式都需要可访问外网才可
(其实是calsh删库跑路了,我没找到linux版本的calsh进行科学上网,所以才有了方法三)
2.3 方法3:直接下载编译好的
在网上找到一个编译好的版本。
下载:https://download.csdn.net/download/yezhijing/86811420
解压改文件:
tar -xvzf geth-linux-amd64-1.10.25-xxxxxx.tar.gz
- 1
后续同方法1 4,5
效果:

3 部署以太坊区块链私有网络
3.1启动私链
创建创世区块信息文件:genesis.json
{
    "config": {
          "chainId": 1001,//据说666没法进行多节点交互,不知道为啥,迷之操作
          "homesteadBlock": 0,
          "eip150Block": 0,
          "eip155Block": 0,
          "eip158Block": 0
      },
    "coinbase"   : "0x0000000000000000000000000000000000000000",
    "difficulty" : "0x1111111",
    "extraData"  : "",
    "gasLimit"   : "0x2fefd8",
    "nonce"      : "0x0000000000000042",
    "mixhash"    : "0x0000000000000000000000000000000000000000000000000000000000000000",
    "parentHash" : "0x0000000000000000000000000000000000000000000000000000000000000000",
    "timestamp"  : "0x00",
    "alloc"      : {}
 }
- 1
- 2
- 3
- 4
- 5
- 6
- 7
- 8
- 9
- 10
- 11
- 12
- 13
- 14
- 15
- 16
- 17
- 18
- 19
初始化一个以太坊节点数据目录
# 当前目录/home/network/ethdata
geth --datadir ./ init genesis.json

#node1
geth --datadir ./node2 init ./genesis.json

#node2
geth --datadir ./node3 init ./genesis.json

#node3
geth --datadir ./node3 init ./genesis.json
- 1
- 2
- 3
- 4
- 5
- 6
- 7
- 8
- 9
- 10
- 11
这条命令是用于初始化一个以太坊 (Ethereum) 节点的 Geth 客户端的命令,它配置了节点的数据存储目录并设置了初始的区块链状态(创世块)。命令中的各个部分有特定的含义:
-
geth:这是执行以太坊节点的命令行工具(客户端)。 -
--datadir ./ethdata:这个参数告诉 Geth 在当前目录下的ethdata文件夹中存储所有区块链数据。如果该文件夹不存在,Geth 会自动创建它。 -
init:这个子命令用于初始化一个新的区块链或重置已有区块链的状态。 -
genesis.json:这个文件定义了创世块的配置,它是 JSON 格式的文件。这个文件包含了区块链初始状态的信息,比如预置的账户余额、共识规则、网络ID等。
运行这条命令后,Geth 会根据 genesis.json 文件中的信息,创建一个创世块,并将其存储在指定的数据目录中。这是搭建新的私有以太坊网络的第一步。
效果如图:

启动一个以太坊节点
geth --datadir ./ --networkid 1001 --identity "node1" --port 30303 --http  --nodiscover --verbosity 4 console 2 > node1.log


geth --datadir ./node2 --networkid 1001 --identity "node2" --port 30304 --http --http.port 8546 --authrpc.port 8547 --nodiscover --verbosity 4 console 2 > node2.log


geth --datadir ./node3 --networkid 1001 --identity "node3" --port 30305 --http --http.port 8548 --authrpc.port 8549 --nodiscover --verbosity 4 console 2 > node3.log

#==================================================================================

geth --datadir ./ --networkid 1001 --identity "node1" --port 30303 --http --http.port 8545 --http.corsdomain "https://remix.ethereum.org" --http.api "web3,eth,debug,personal,net" --vmdebug --nodiscover --verbosity 4 console 2 > node1.log


# 节点2
geth --datadir ./node2 --networkid 1001 --identity "node2" --port 30304 --http --http.port 8546 --http.corsdomain "https://remix.ethereum.org" --http.api "web3,eth,debug,personal,net"  --authrpc.port 8547 --nodiscover --verbosity 4 console 2 > node2.log

# 节点3
geth --datadir ./node3 --networkid 1001 --identity "node3" --port 30305 --http --http.port 8548 --http.corsdomain "https://remix.ethereum.org" --http.api "web3,eth,debug,personal,net"  --authrpc.port 8549 --nodiscover --verbosity 4 console 2 > node3.log

# 节点4
geth --datadir ./node4 --networkid 1001 --identity "node3" --port 30306 --http --http.port 8550 --http.corsdomain "https://remix.ethereum.org" --http.api "web3,eth,debug,personal,net"  --authrpc.port 8549 --nodiscover --verbosity 4 console 2 > node4.log
- 1
- 2
- 3
- 4
- 5
- 6
- 7
- 8
- 9
- 10
- 11
- 12
- 13
- 14
- 15
- 16
- 17
- 18
- 19
- 20
- 21
- 22
geth --datadir /ethdata --networkid 1001 --identity "node1" --port 30303 --http --nodiscover --verbosity 4 console 2 > node1.log 用于启动 Geth 节点,并具有以下配置:
-
--datadir /ethdata:
指定 Geth 存储区块链数据的目录为/ethdata。请确保此目录存在且可写。 -
--networkid 1001:
设置私有网络的网络ID为 1001。这个值在私有网络中是必要的,以区分不同的以太坊网络。 -
--identity "node1":
为节点设置一个标识名 “node1”。 -
--port 30303:
设置节点之间通信的端口为 30303,这是默认的以太坊 P2P 端口。 -
--http:
启用 HTTP RPC 服务,使可以通过 HTTP 请求与节点交互。 -
--nodiscover:
禁用节点发现。这意味着节点不会主动去发现其他节点,适用于私有网络。 -
--verbosity 4:
设置日志详细级别为 4。这将提供较详细的日志输出。 -
console:
打开 Geth 的 JavaScript 控制台,允许节点交互。 -
2 > node1.log:
将标准错误(stderr)输出重定向到文件node1.log。这意味着错误和一些日志信息将被写入此文件。
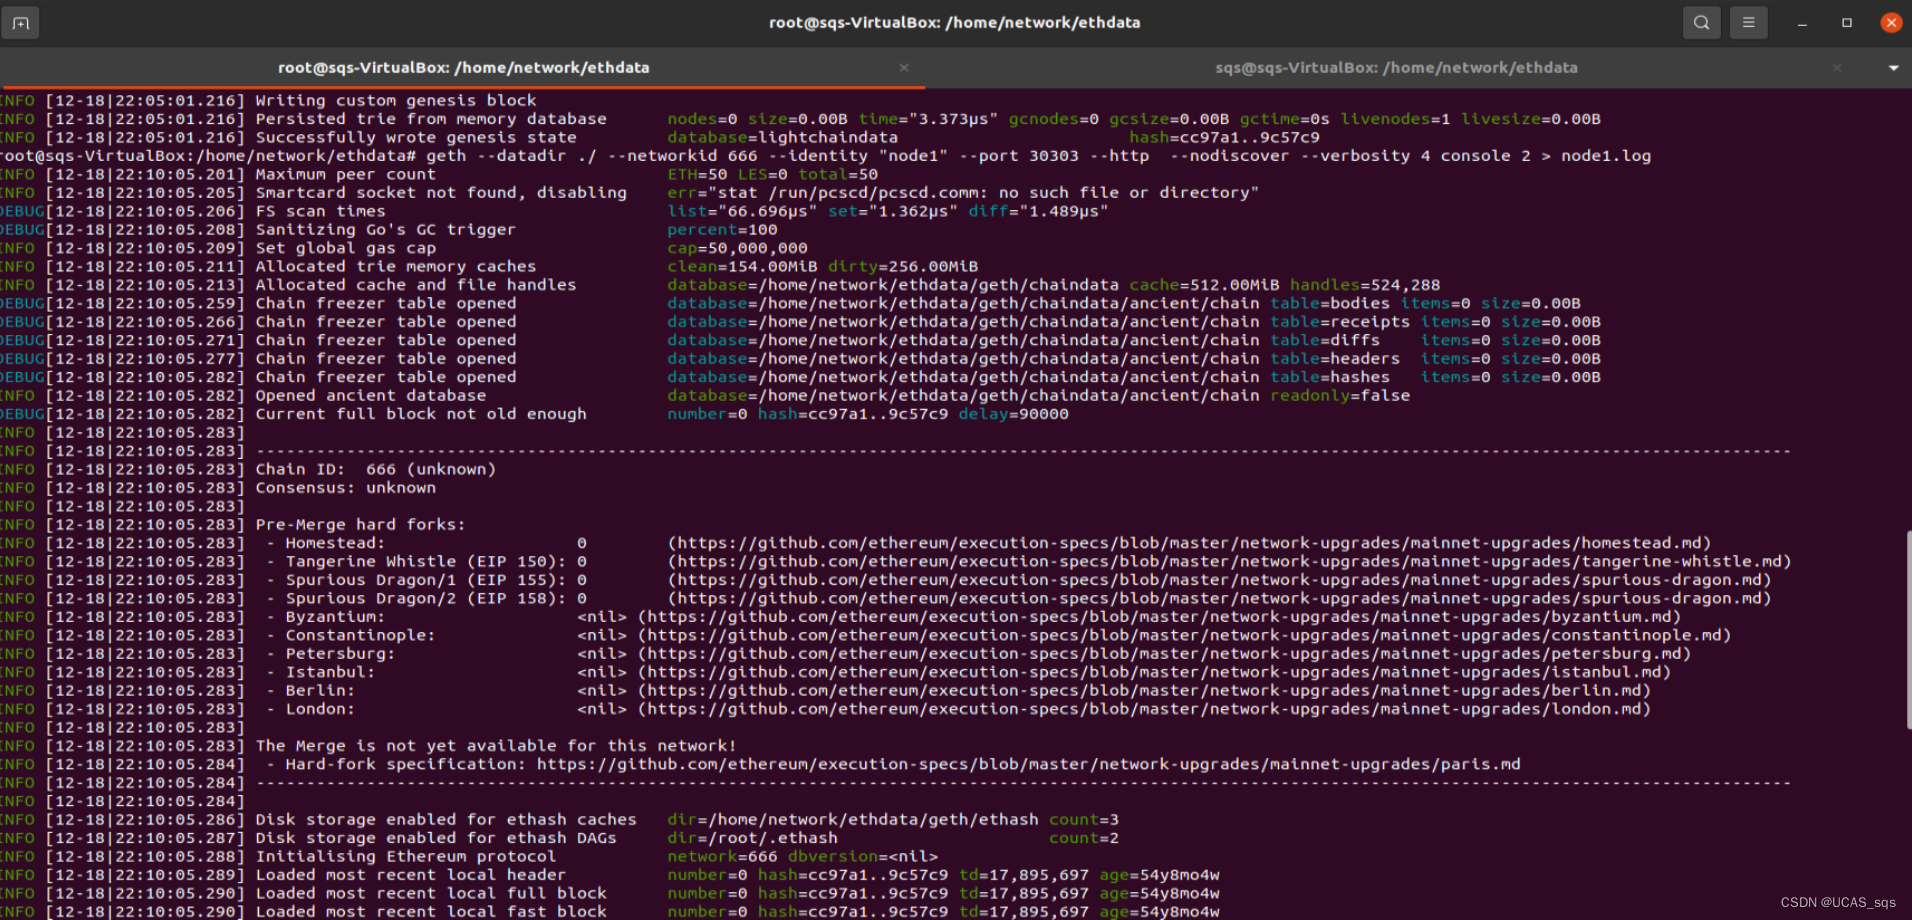
访问日志文件
通过 tail -f node1.log 命令来实时查看 node1.log 文件的内容,这对于调试和监控节点状态很有用。

链内创建账户 personal.newAccount()
-
打开新的终端,并确保Ethereum节点正在运行(已使用命令启动)。
-
连接到节点的JavaScript控制台。运行以下命令:
geth attach geth attach ipc:./geth.ipc- 1
- 2

-
在JavaScript控制台中,使用以下命令创建一个新账户:
personal.newAccount()- 1
- 1
执行结果
personal.newAccount()
Passphrase:
Repeat passphrase:
“0x6b754c28176d8146dabddf3a3b3f310802761135”
- 1

系统将提示输入密码来保护新账户,并生成一个新的以太坊地址。
启动挖矿 miner.start()
在JavaScript控制台中,运行以下命令以开始挖矿(在私有网络上挖矿是可行的,公网没有强大的算力应该挖不到吧):
miner.start()
- 1
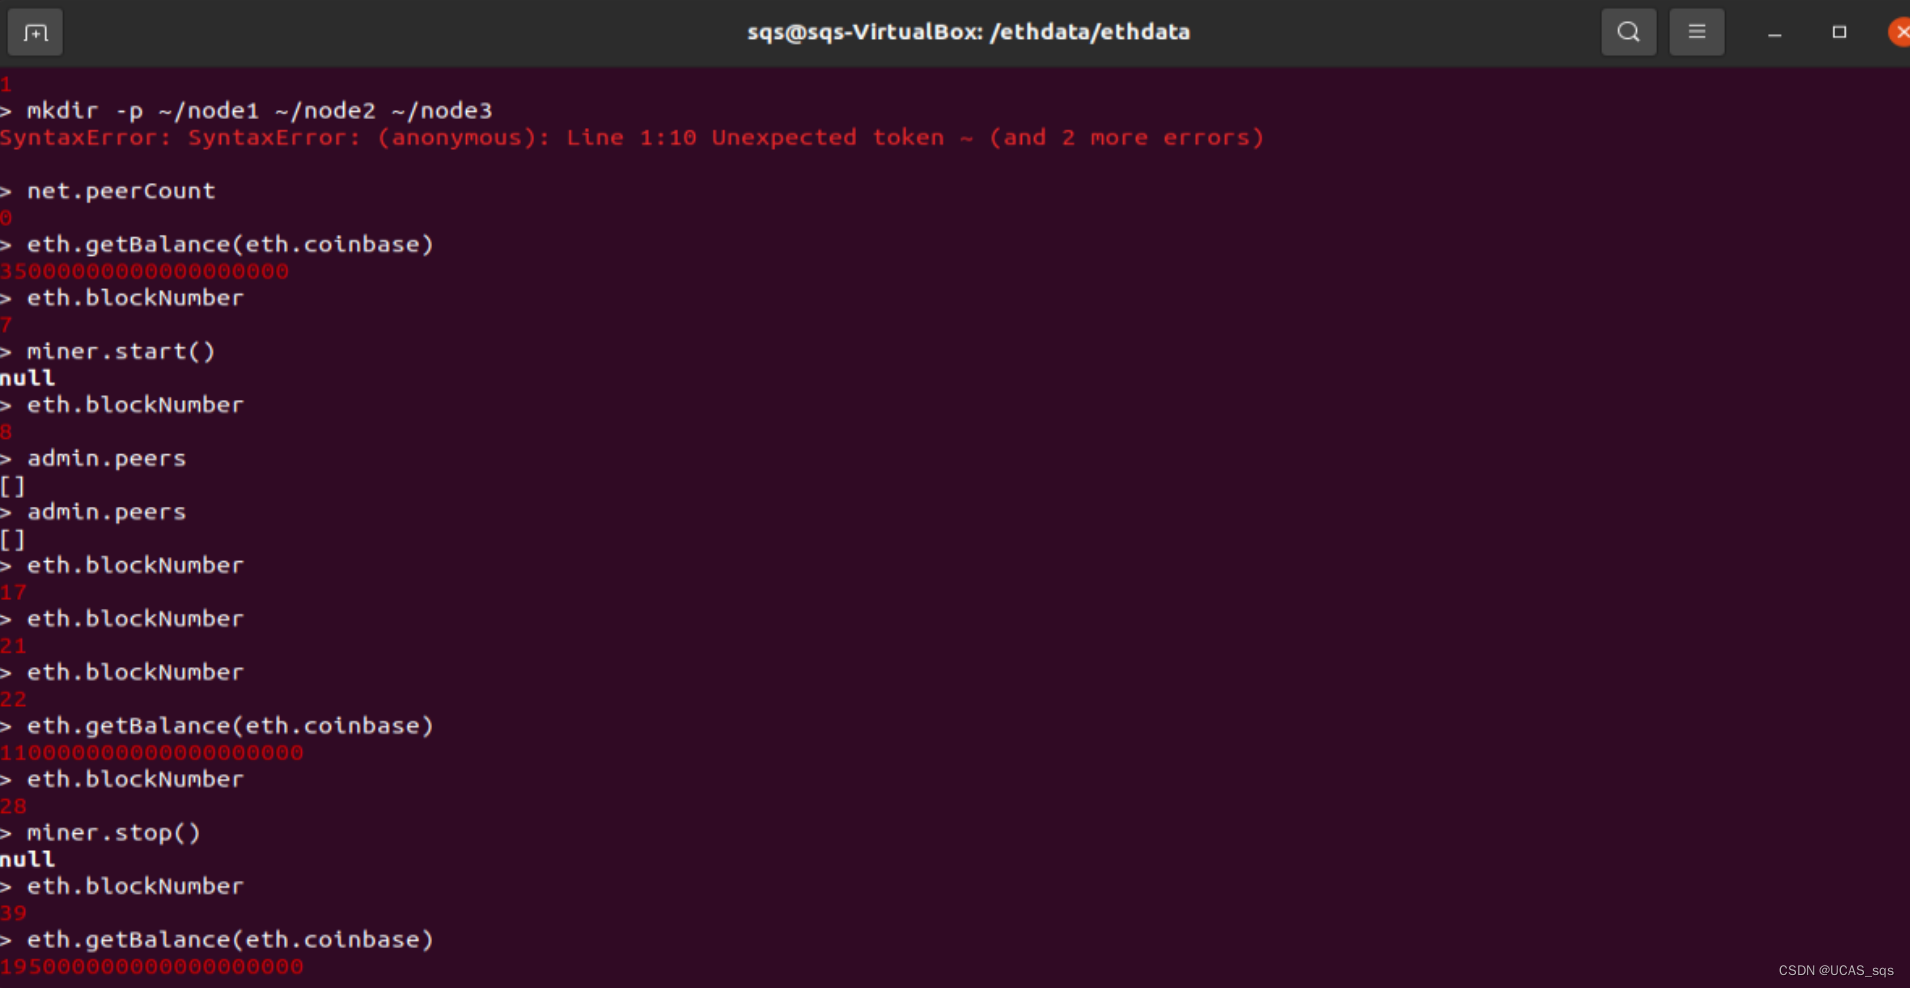
这将开始挖矿操作,并将挖矿奖励发送到创建的账户。
3.2 多节点交互
创建多个文件夹和节点
-
创建多个目录,每个目录将用于一个独立的节点
node2,node3,node4。 -
在每个节点目录中,创建一个新的数据目录,以存储节点数据
./node2,./node3,./node4。 -
在每个节点目录中,使用创世区块信息文件
genesis.json,以便每个节点都使用相同的创世区块。 -
使用不同的标识(identity)、端口和数据目录启动不同的节点。例如,对于第二个节点:
geth --datadir ./node2 --networkid 1001 --identity "node2" --port 30304 --http --http.port 8546 --http.corsdomain "https://remix.ethereum.org" --http.api "web3,eth,debug,personal,net" --authrpc.port 8547 --nodiscover --verbosity 4 console 2 > node2.log- 1
对于第三个节点:
geth --datadir ./node3 --networkid 1001 --identity "node3" --port 30305 --http --http.port 8548 --http.corsdomain "https://remix.ethereum.org" --http.api "web3,eth,debug,personal,net" --authrpc.port 8549 --nodiscover --verbosity 4 console 2 > node3.log- 1
以此类推。
节点之间建立联系
使用 admin.addPeer() 添加节点
在每个节点的JavaScript控制台中,可以使用 admin.addPeer() 来添加其他节点。例如,对于节点2来说,可以执行以下命令:
admin.addPeer("enode://enode-info")
- 1
其中,enode-info 是其他节点的 enode 信息。
使用admin.addPeer()
1、在第一个节点中使用admin.nodeInfo.enode命令查看enode信息,如下所示:
admin.nodeInfo.enode
- 1
"enode://2c4eb7a267b1c00a8550e0237277234ca4bf8076b48268693e689f0657d6eb40eb88ee3f4d619b2361471c72881918a300a0de2943f6a29bd2a7c78e7a820d85@127.0.0.1:30303?discport=0"
- 1
2、在新建节点中使用admin.addPeer命令添加联系,如下所示:
admin.addPeer("enode://2c4eb7a267b1c00a8550e0237277234ca4bf8076b48268693e689f0657d6eb40eb88ee3f4d619b2361471c72881918a300a0de2943f6a29bd2a7c78e7a820d85@127.0.0.1:30303?discport=0")
- 1
true
- 1
3、添加完成后如图所示

查看当前以太坊节点已经连接的对等节点(peers)的信息
admin.peers
- 1
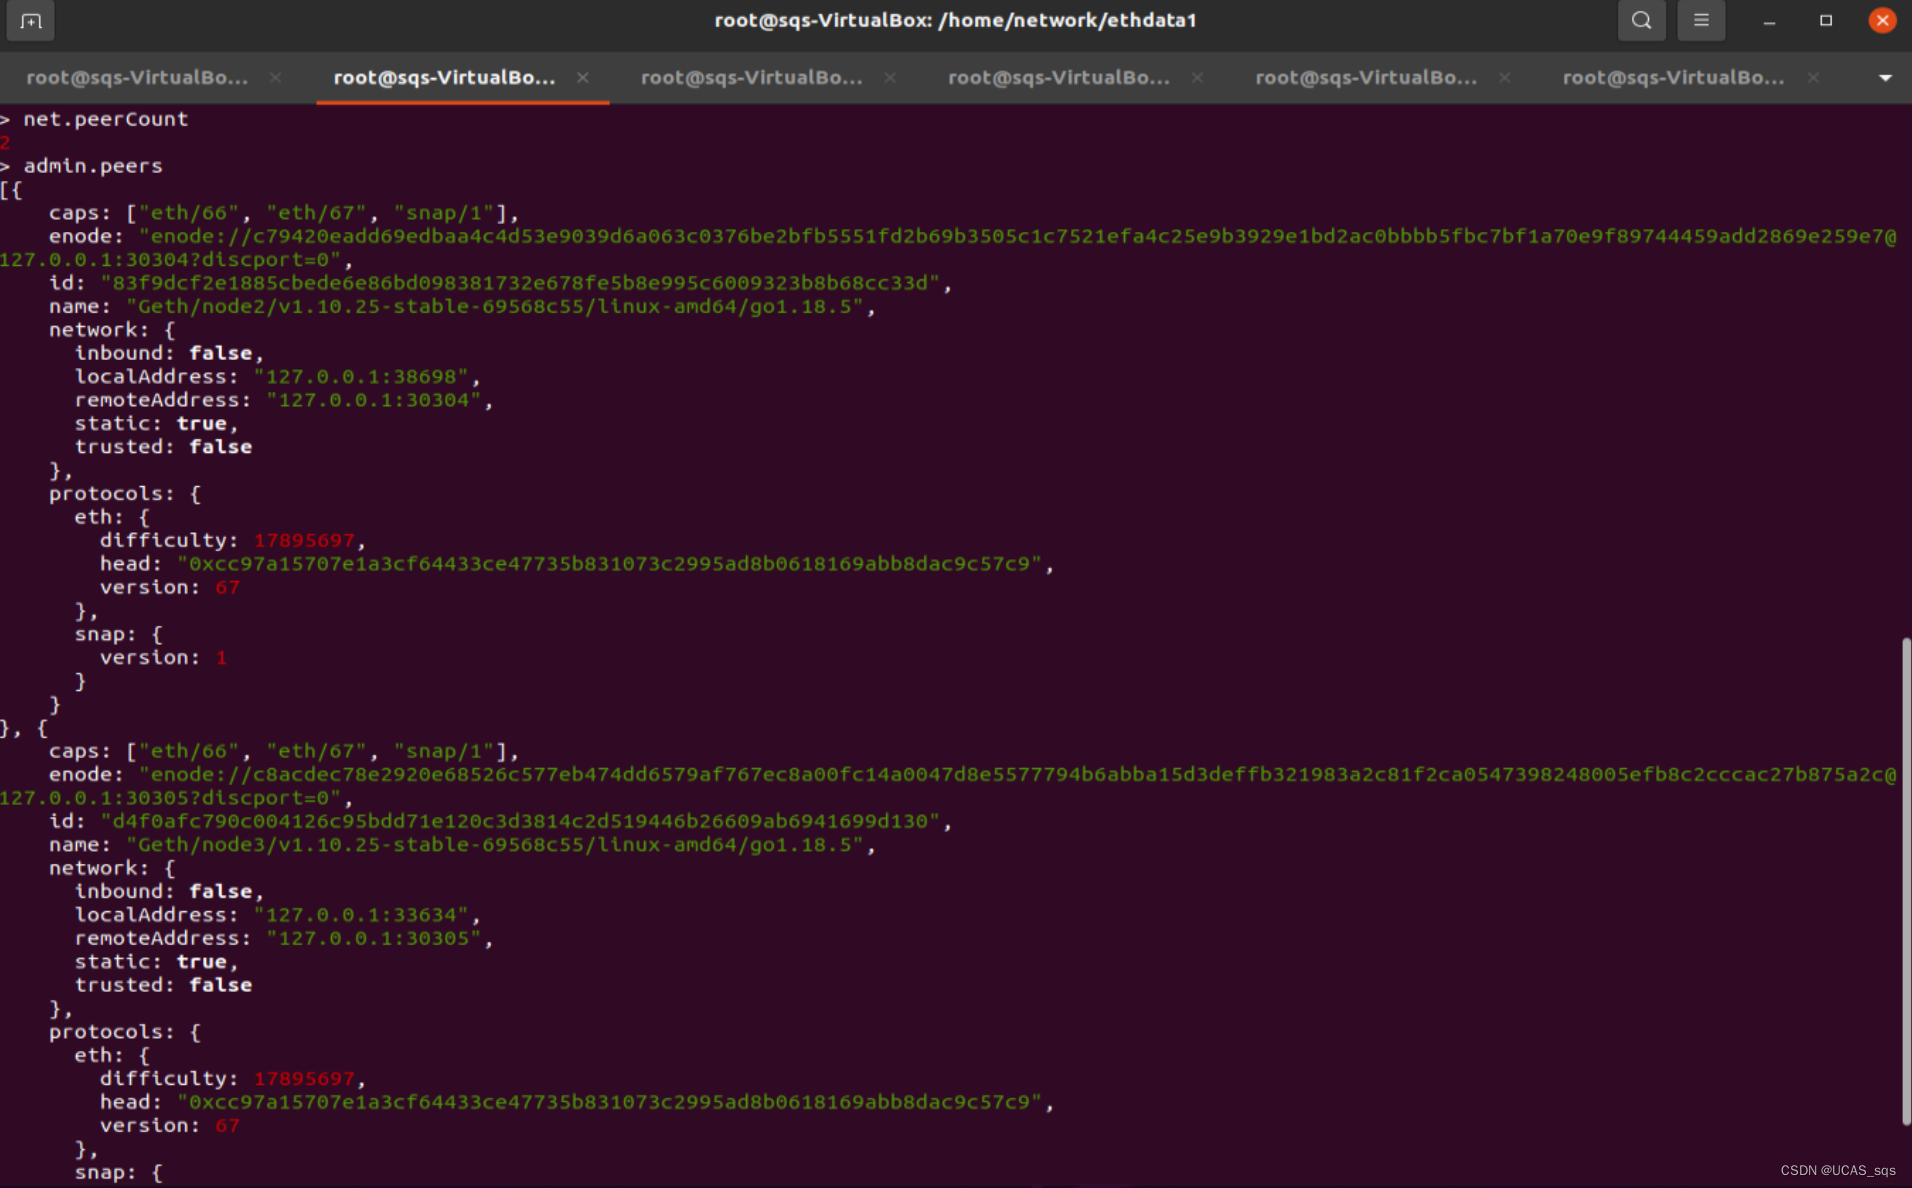
在 --datadir 目录中添加 static-nodes.json 文件
在节点的 --datadir 目录中创建一个 static-nodes.json 文件,以让节点知道其他节点的联系信息。此文件包含其他节点的 enode 信息。
使用 --bootnodes 启动节点
在启动节点时,可以使用 --bootnodes 参数来指定引导节点(bootstrap node),这些节点通常是网络上的一些已知节点,用于引导新节点加入网络。
例如,如果要将节点2连接到节点1,可以使用以下命令:
geth --datadir ./node2 --networkid 1001 --identity "node2" --port 30304 --http --nodiscover --verbosity 4 --bootnodes "enode://enode-info-of-node1" console 2 > node2.log
- 1
请替换 enode-info-of-node1 为节点1的实际 enode 信息。
这些步骤创建多个节点,使它们互相连接,并与以太坊私有链进行交互。确保在实际操作中修改配置以适应网络和需求。
enode-info-of-node1 是一个占位符,代表节点1的实际 enode 信息。每个以太坊节点都有一个唯一的 enode 标识符,用于在网络中标识和连接到其他节点。要在节点1上获取节点1的 enode 信息,可以按照以下步骤操作:
- 打开节点1的JavaScript控制台,连接到节点1,如下所示:
geth attach
- 1
- 2
-
在节点1的JavaScript控制台中,运行以下命令来获取节点1的
enode信息:admin.nodeInfo.enode- 1
这将返回节点1的
enode信息,类似于以下内容(示例数据,实际数据会有所不同):"enode://5a5f7d1a3f2b9c39e5e31c1e15da40a9b9853d15a8a746799d9aa8505b0912f2d22c52f9971d144f3c9d2ba1ea2bf6cb75371ccf4f93cbcd10b2f8cd8@192.168.1.100:30303"- 1
将此信息复制并替换
enode-info-of-node1,然后将该命令用于启动其他节点,以便它们可以连接到节点1。
3.3 remix平台
https://remix.ethereum.org/
Remix是一种用于以太坊智能合约开发的在线集成开发环境(IDE),它提供了一个友好的界面,使开发人员能够轻松地创建、测试和部署以太坊智能合约。以下是一些关于Remix平台的信息:
-
在线IDE:Remix是一个基于Web的在线IDE,无需下载或安装任何软件。只需通过浏览器访问Remix官方网站,就可以开始使用。
-
智能合约开发:Remix支持Solidity智能合约语言,并提供了代码编辑器、编译器和调试工具,使开发人员能够创建和测试智能合约。
-
内置编译器:Remix包含了一个内置的Solidity编译器,可以将Solidity合约编译成字节码,以便在以太坊虚拟机上执行。
-
部署和测试:Remix允许将智能合约部署到不同的以太坊网络上,并提供了模拟器和测试工具,以便进行合约测试。
-
交互式调试:Remix提供了交互式调试功能,允许在合约执行过程中逐步执行代码并查看变量状态。
-
插件支持:Remix支持插件,可以通过安装插件来扩展其功能,例如与硬件钱包集成、代码静态分析等。
-
多网络支持:Remix支持连接到不同的以太坊网络,包括本地开发网络、测试网络和主网络等。
-
自动保存:Remix会自动保存项目和代码,以确保不会丢失任何进展。
-
开源:Remix是一个开源项目,可在GitHub上找到其源代码并参与贡献。
点击deploy 启动挖矿
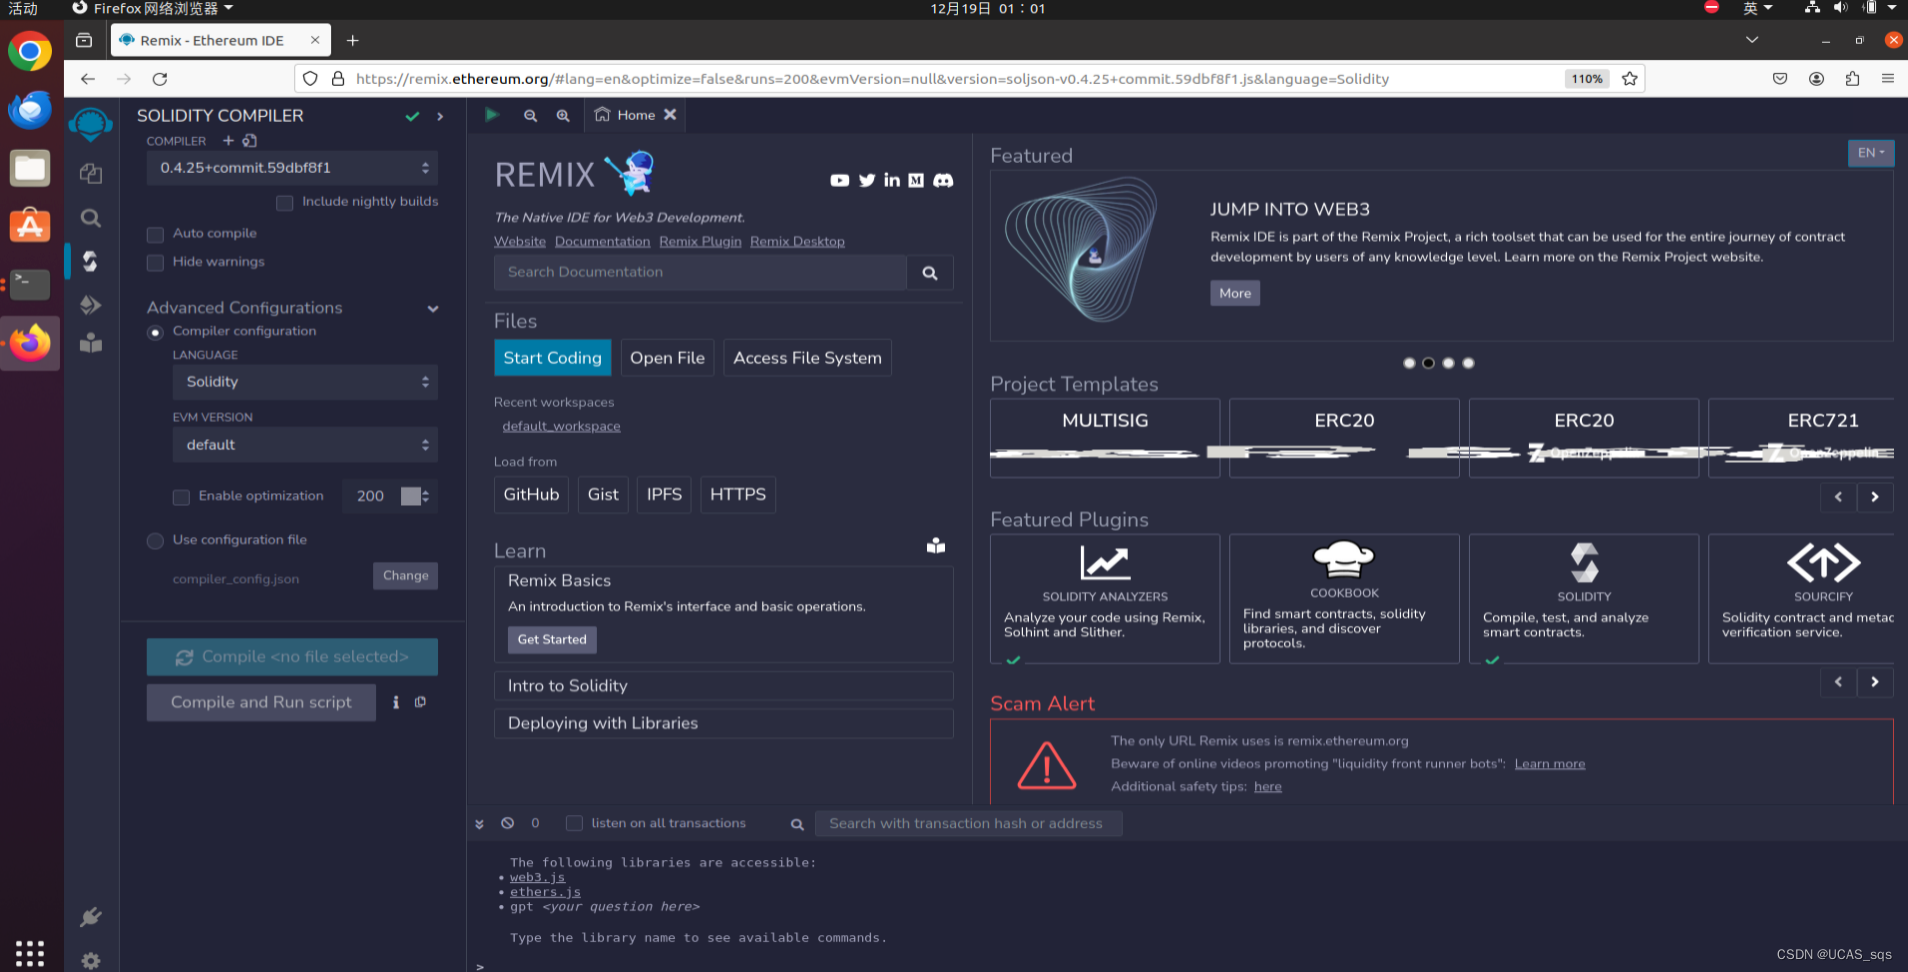
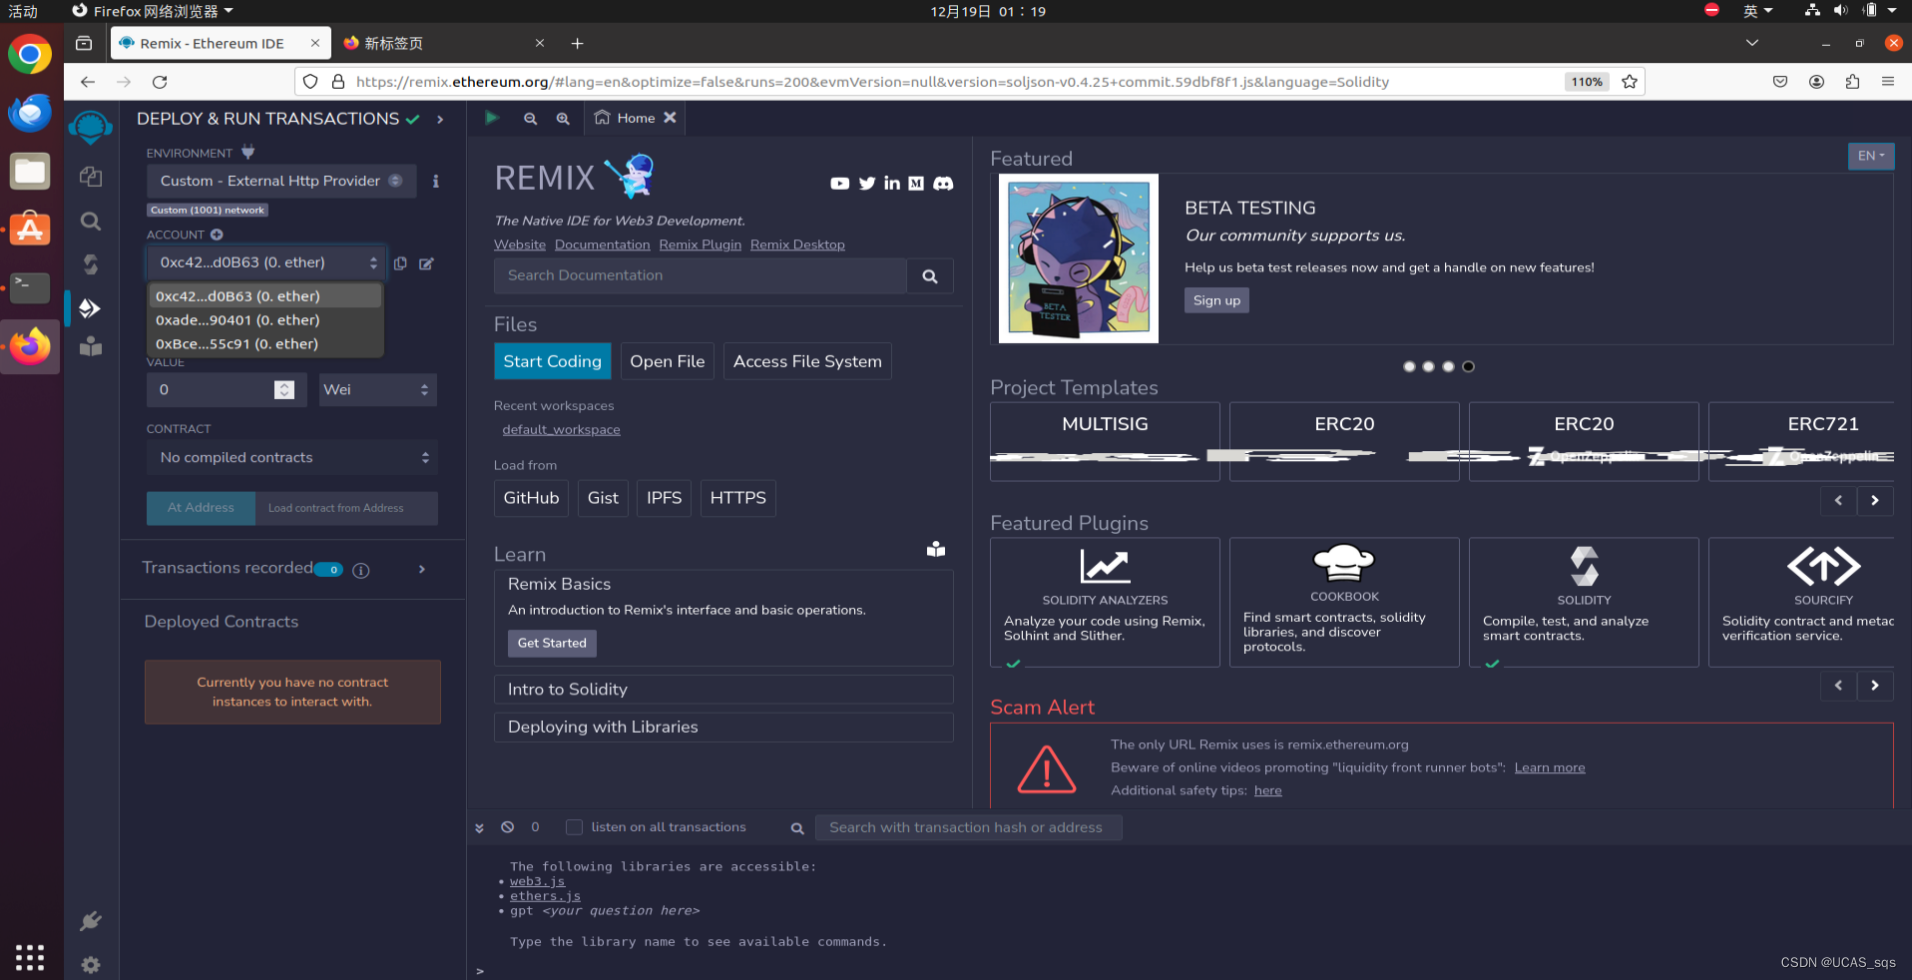
合约代码
// SPDX-License-Identifier: GPL-3.0
pragma solidity >=0.4.16 <0.9.0;

contract SimpleStorage {
    uint storedData;

    function set(uint x) public {
        storedData = x;
    }

    function get() public view returns (uint) {
        return storedData;
    }
}
- 1
- 2
- 3
- 4
- 5
- 6
- 7
- 8
- 9
- 10
- 11
- 12
- 13
- 14
abi文件
{
  "accounts": {
    "account{0}": "0x5B38Da6a701c568545dCfcB03FcB875f56beddC4"
  },
  "linkReferences": {},
  "transactions": [
    {
      "timestamp": 1702920383750,
      "record": {
        "value": "0",
        "inputs": "()",
        "parameters": [],
        "name": "",
        "type": "constructor",
        "abi": "0x87ffd8ade60e42979d05c9f20c82da7bc3b83edd90b5e21b99f1c7fc22b3f4c4",
        "contractName": "SimpleStorage",
        "bytecode": "608060405234801561001057600080fd5b5060df8061001f6000396000f3006080604052600436106049576000357c0100000000000000000000000000000000000000000000000000000000900463ffffffff16806360fe47b114604e5780636d4ce63c146078575b600080fd5b348015605957600080fd5b5060766004803603810190808035906020019092919050505060a0565b005b348015608357600080fd5b50608a60aa565b6040518082815260200191505060405180910390f35b8060008190555050565b600080549050905600a165627a7a72305820e88ab6cf60239ef75ac75ee4f05782c5ba81fe8d68165ed5320bd223b26e8fb90029",
        "linkReferences": {},
        "from": "account{0}"
      }
    }
  ],
  "abis": {
    "0x87ffd8ade60e42979d05c9f20c82da7bc3b83edd90b5e21b99f1c7fc22b3f4c4": [
      {
        "constant": false,
        "inputs": [
          {
            "name": "x",
            "type": "uint256"
          }
        ],
        "name": "set",
        "outputs": [],
        "payable": false,
        "stateMutability": "nonpayable",
        "type": "function"
      },
      {
        "constant": true,
        "inputs": [],
        "name": "get",
        "outputs": [
          {
            "name": "",
            "type": "uint256"
          }
        ],
        "payable": false,
        "stateMutability": "view",
        "type": "function"
      }
    ]
  }
}
- 1
- 2
- 3
- 4
- 5
- 6
- 7
- 8
- 9
- 10
- 11
- 12
- 13
- 14
- 15
- 16
- 17
- 18
- 19
- 20
- 21
- 22
- 23
- 24
- 25
- 26
- 27
- 28
- 29
- 30
- 31
- 32
- 33
- 34
- 35
- 36
- 37
- 38
- 39
- 40
- 41
- 42
- 43
- 44
- 45
- 46
- 47
- 48
- 49
- 50
- 51
- 52
- 53
- 54
- 55
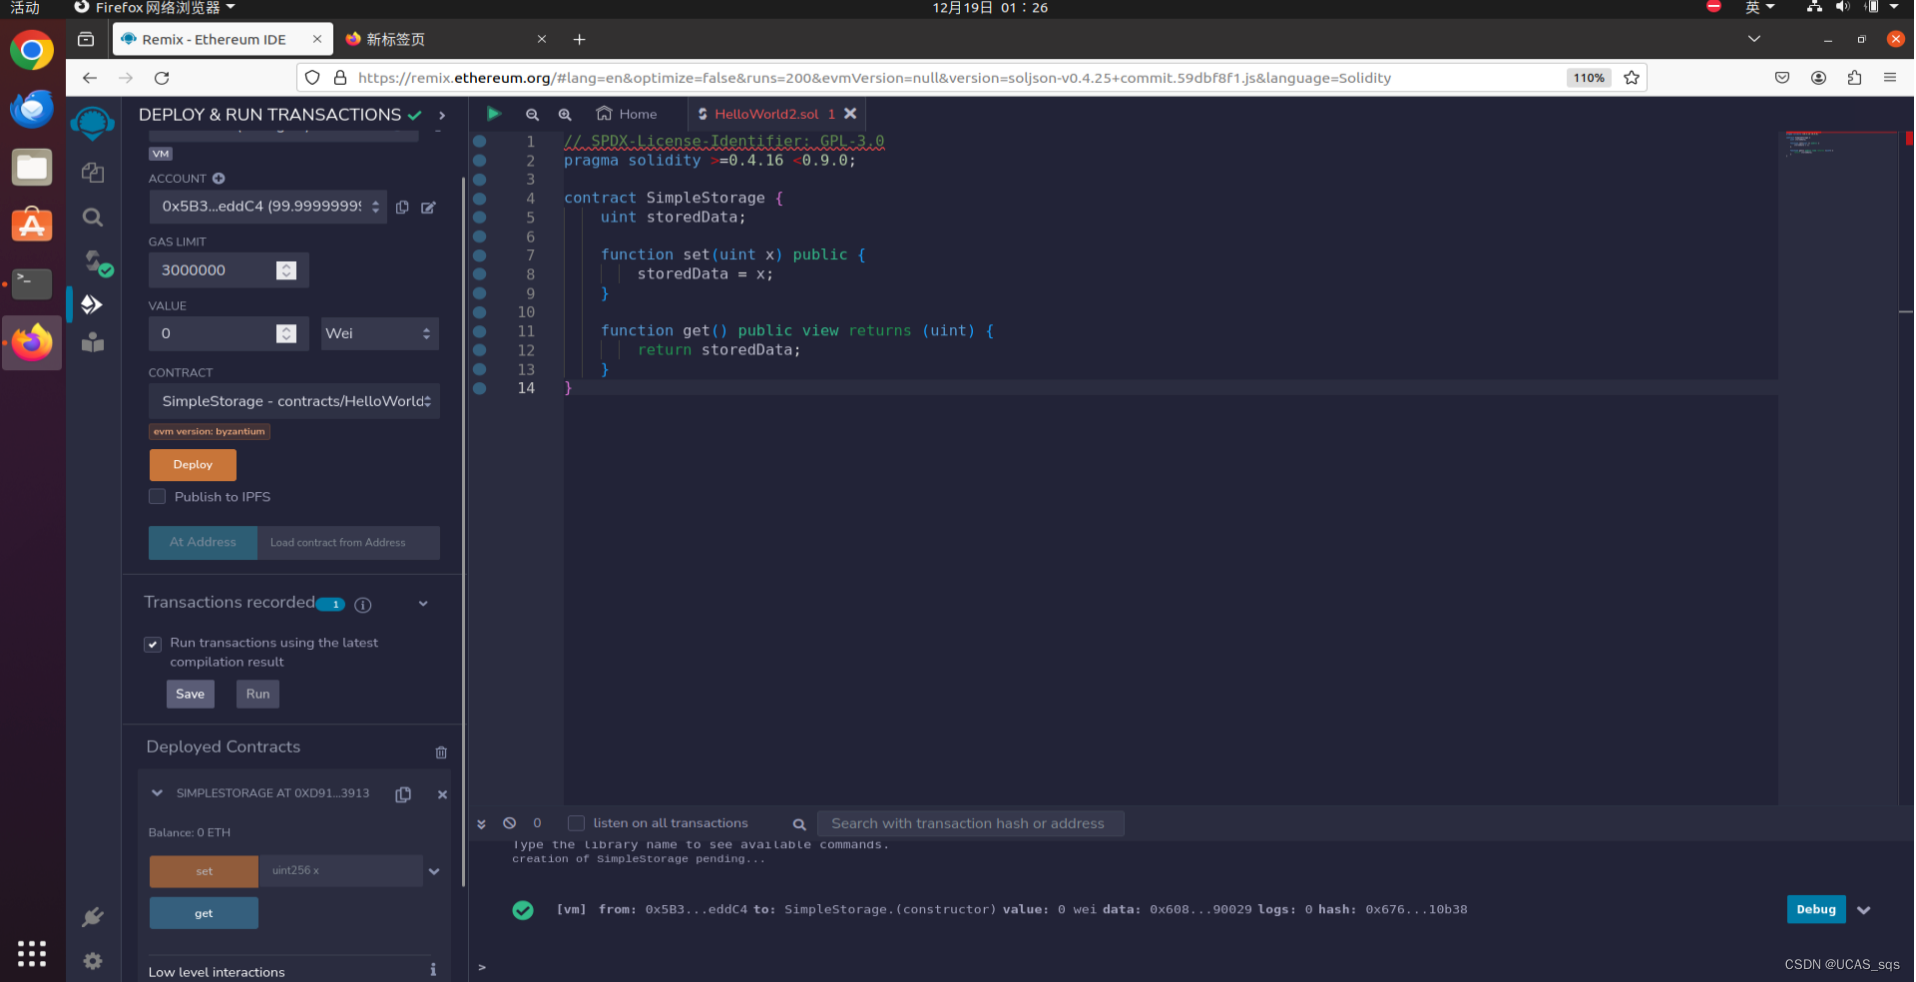
四个节点节点信息
node1:
{
  enode: "enode://1cfeb52d4b3f16dad23bc33b26b4fd1de172ca1887449be5067edb3c2f07e362ddd174141efdccfb73f7bc4ba26de8aedd8b11c6e1b9d0689cc5084cdf798335@127.0.0.1:30303?discport=0",
  enr: "enr:-Jy4QJGbI7JRI5myR2Pxqg7Xt5vao0bFSWJ1e8tYuKGndq0VIC1VYQWYUN_NPtcFoNIe5vCBe4OP3L6g7asgmF51Uu2GAYx9rlrsg2V0aMfGhJ0r3hCAgmlkgnY0gmlwhH8AAAGJc2VjcDI1NmsxoQMc_rUtSz8W2tI7wzsmtP0d4XLKGIdEm-UGfts8LwfjYoRzbmFwwIN0Y3CCdl8",
  id: "af1588b49ceded64e6ffea5ff8975e5feb411566c2d083eb3e6efd2ed37e5dfa",
  ip: "127.0.0.1",
  listenAddr: "[::]:30303",
  name: "Geth/node1/v1.10.25-stable-69568c55/linux-amd64/go1.18.5",
  ports: {
    discovery: 0,
    listener: 30303
  },
  protocols: {
    eth: {
      config: {
        chainId: 1001,
        eip150Block: 0,
        eip150Hash: "0x0000000000000000000000000000000000000000000000000000000000000000",
        eip155Block: 0,
        eip158Block: 0,
        homesteadBlock: 0
      },
      difficulty: 17895697,
      genesis: "0xcc97a15707e1a3cf64433ce47735b831073c2995ad8b0618169abb8dac9c57c9",
      head: "0xcc97a15707e1a3cf64433ce47735b831073c2995ad8b0618169abb8dac9c57c9",
      network: 1001
    },
    snap: {}
  }
}
- 1
- 2
- 3
- 4
- 5
- 6
- 7
- 8
- 9
- 10
- 11
- 12
- 13
- 14
- 15
- 16
- 17
- 18
- 19
- 20
- 21
- 22
- 23
- 24
- 25
- 26
- 27
- 28
- 29
node2:
{
  enode: "enode://c79420eadd69edbaa4c4d53e9039d6a063c0376be2bfb5551fd2b69b3505c1c7521efa4c25e9b3929e1bd2ac0bbbb5fbc7bf1a70e9f89744459add2869e259e7@127.0.0.1:30304?discport=0",
  enr: "enr:-Jy4QAFVZFNhaOj91TF5_yBRhLWwbYd-Bq_R8X9GL9hQ6n-xddNTu-vUQpfJrvqGjWO55nWhIWleMySrJUyXsl2CKe6GAYx9tJSlg2V0aMfGhJ0r3hCAgmlkgnY0gmlwhH8AAAGJc2VjcDI1NmsxoQPHlCDq3WntuqTE1T6QOdagY8A3a-K_tVUf0rabNQXBx4RzbmFwwIN0Y3CCdmA",
  id: "83f9dcf2e1885cbede6e86bd098381732e678fe5b8e995c6009323b8b68cc33d",
  ip: "127.0.0.1",
  listenAddr: "[::]:30304",
  name: "Geth/node2/v1.10.25-stable-69568c55/linux-amd64/go1.18.5",
  ports: {
    discovery: 0,
    listener: 30304
  },
  protocols: {
    eth: {
      config: {
        chainId: 1001,
        eip150Block: 0,
        eip150Hash: "0x0000000000000000000000000000000000000000000000000000000000000000",
        eip155Block: 0,
        eip158Block: 0,
        homesteadBlock: 0
      },
      difficulty: 17895697,
      genesis: "0xcc97a15707e1a3cf64433ce47735b831073c2995ad8b0618169abb8dac9c57c9",
      head: "0xcc97a15707e1a3cf64433ce47735b831073c2995ad8b0618169abb8dac9c57c9",
      network: 1001
    },
    snap: {}
  }
}
- 1
- 2
- 3
- 4
- 5
- 6
- 7
- 8
- 9
- 10
- 11
- 12
- 13
- 14
- 15
- 16
- 17
- 18
- 19
- 20
- 21
- 22
- 23
- 24
- 25
- 26
- 27
- 28
- 29
- 30
node3:
{
  enode: "enode://c8acdec78e2920e68526c577eb474dd6579af767ec8a00fc14a0047d8e5577794b6abba15d3deffb321983a2c81f2ca0547398248005efb8c2cccac27b875a2c@127.0.0.1:30305?discport=0",
  enr: "enr:-Jy4QFVKitcbQ5k0mfigmp5AoLINiCHWq95n7-Fw0yeHPB67RgmkDclHixlEqHixQD08sEcvJHmrX3R1ENjmD4xZhfGGAYx91NwEg2V0aMfGhJ0r3hCAgmlkgnY0gmlwhH8AAAGJc2VjcDI1NmsxoQLIrN7Hjikg5oUmxXfrR03WV5r3Z-yKAPwUoAR9jlV3eYRzbmFwwIN0Y3CCdmE",
  id: "d4f0afc790c004126c95bdd71e120c3d3814c2d519446b26609ab6941699d130",
  ip: "127.0.0.1",
  listenAddr: "[::]:30305",
  name: "Geth/node3/v1.10.25-stable-69568c55/linux-amd64/go1.18.5",
  ports: {
    discovery: 0,
    listener: 30305
  },
  protocols: {
    eth: {
      config: {
        chainId: 1001,
        eip150Block: 0,
        eip150Hash: "0x0000000000000000000000000000000000000000000000000000000000000000",
        eip155Block: 0,
        eip158Block: 0,
        homesteadBlock: 0
      },
      difficulty: 17895697,
      genesis: "0xcc97a15707e1a3cf64433ce47735b831073c2995ad8b0618169abb8dac9c57c9",
      head: "0xcc97a15707e1a3cf64433ce47735b831073c2995ad8b0618169abb8dac9c57c9",
      network: 1001
    },
    snap: {}
  }
}
- 1
- 2
- 3
- 4
- 5
- 6
- 7
- 8
- 9
- 10
- 11
- 12
- 13
- 14
- 15
- 16
- 17
- 18
- 19
- 20
- 21
- 22
- 23
- 24
- 25
- 26
- 27
- 28
- 29
- 30
node4:
{
  enode:
"enode://5a5f7d1a3f2b9c39e5e31c1e15da40a9b9853d15a8a746799d9aa8505b0912f2d22c52f9971d144f3c9d2ba1ea2bf6cb75371ccf4f93cbcd10b2f8cd8@192.168.1.100:30303",
  enr: "enr:-Jy4QAFVZFNhaOj91TF5_yBRhLWwbYd-Bq_R8X9GL9hQ6n-xddNTu-vUQpfJrvqGjWO55nWhIWleMySrJUyXsl2CKe6GAYx9tJSlg2V0aMfGhJ0r3hCAgmlkgnY0gmlwhH8AAAGJc2VjcDI1NmsxoQPHlCDq3WntuqTE1T6QOdagY8A3a-K_tVUf0rabNQXBx4RzbmFwwIN0Y3CCdmA",
  id: "83f9dcf2e1885cbede6e86bd098381732e678fe5b8e995c6009323b8b68cc33d",
  ip: "127.0.0.1",
  listenAddr: "[::]:30304",
  name: "Geth/node2/v1.10.25-stable-69568c55/linux-amd64/go1.18.5",
  ports: {
    discovery: 0,
    listener: 30304
  },
  protocols: {
    eth: {
      config: {
        chainId: 1001,
        eip150Block: 0,
        eip150Hash: "0x0000000000000000000000000000000000000000000000000000000000000000",
        eip155Block: 0,
        eip158Block: 0,
        homesteadBlock: 0
      },
      difficulty: 17895697,
      genesis: "0xcc97a15707e1a3cf64433ce47735b831073c2995ad8b0618169abb8dac9c57c9",
      head: "0xcc97a15707e1a3cf64433ce47735b831073c2995ad8b0618169abb8dac9c57c9",
      network: 1001
    },
    snap: {}
  }
}
- 1
- 2
- 3
- 4
- 5
- 6
- 7
- 8
- 9
- 10
- 11
- 12
- 13
- 14
- 15
- 16
- 17
- 18
- 19
- 20
- 21
- 22
- 23
- 24
- 25
- 26
- 27
- 28
- 29
- 30
3.4 存储操作的命令
const Web3 = require('web3');
const web3 = new Web3('https://127.0.0.1:8854');

const contractABI = [0x5B38Da6a701c568545dCfcB03FcB875f56beddC4]; // 合约的ABI
const contractAddress = '0x87ffd8ade60e42979d05c9f20c82da7bc3b83edd90b5e21b99f1c7fc22b3f4c4'; // 合约地址
const privateKey = '0xbcea812a244c0ac6ce96d877a023747c20c55c91'; // 发送交易的私钥

const contract = new web3.eth.Contract(contractABI, contractAddress);

const key = '123456';
const value = '10';

const data = contract.methods.store(key, value).encodeABI();

web3.eth.accounts.signTransaction({
    to: contractAddress,
    data: data,
    gas: '5000000', // 适当设置gas
}, privateKey).then(signedTx => {
    web3.eth.sendSignedTransaction(signedTx.rawTransaction)
        .on('receipt', receipt => {
            console.log('Transaction receipt:', receipt);
        });
});
- 1
- 2
- 3
- 4
- 5
- 6
- 7
- 8
- 9
- 10
- 11
- 12
- 13
- 14
- 15
- 16
- 17
- 18
- 19
- 20
- 21
- 22
- 23
- 24
- 25
3.5 根据key查询value操作的命令
const Web3 = require('web3');
const web3 = new Web3('https://127.0.0.1:8854');

const contractABI = [0x5B38Da6a701c568545dCfcB03FcB875f56beddC4]; // 合约的ABI
const contractAddress = '0x87ffd8ade60e42979d05c9f20c82da7bc3b83edd90b5e21b99f1c7fc22b3f4c4'; // 合约地址

const contract = new web3.eth.Contract(contractABI, contractAddress);

const key = '123456';

contract.methods.getValue(key).call()
    .then(result => {
        console.log('Value for key', key, 'is', result);
    });
- 1
- 2
- 3
- 4
- 5
- 6
- 7
- 8
- 9
- 10
- 11
- 12
- 13
- 14
- 15


