- 1面试之MySQL调优问题
- 2hbase的安装部署(很详细)_hbase2.3部署
- 3西瓜视频登录页面_sm62.vip
- 4Java语言+前端框架html+Thymeleaf +后端框架springboot开发的UWB智能定位系统源码 UWB三维可视化人员定位系统源码
- 5WordPress xmlrpc.php 漏洞利用_wordpress xmlrpc漏洞
- 6抓取高德地图位置信息及预览图片,生成excel文件小白教程_怎么把高德地图里的门店位置做成excl表哥
- 7【EI会议征稿】2024年第四届人工智能、自动化与高性能计算国际会议(AIAHPC 2024)_2024年ei会议
- 8opencv之图片处理看这一篇就够了(一)_opencv图像处理
- 9〖Python零基础入门篇㉘〗- Python中不同数据类型间的转换_python不同类型数据转换
- 10本地知识库开源框架Fastgpt、MaxKB产品体验_fastgpt maxkb
【制作100个unity游戏之27】使用unity复刻经典游戏《植物大战僵尸》,制作属于自己的植物大战僵尸随机版和杂交版6(附带项目源码)_unity植物大战僵尸
赞
踩
最终效果
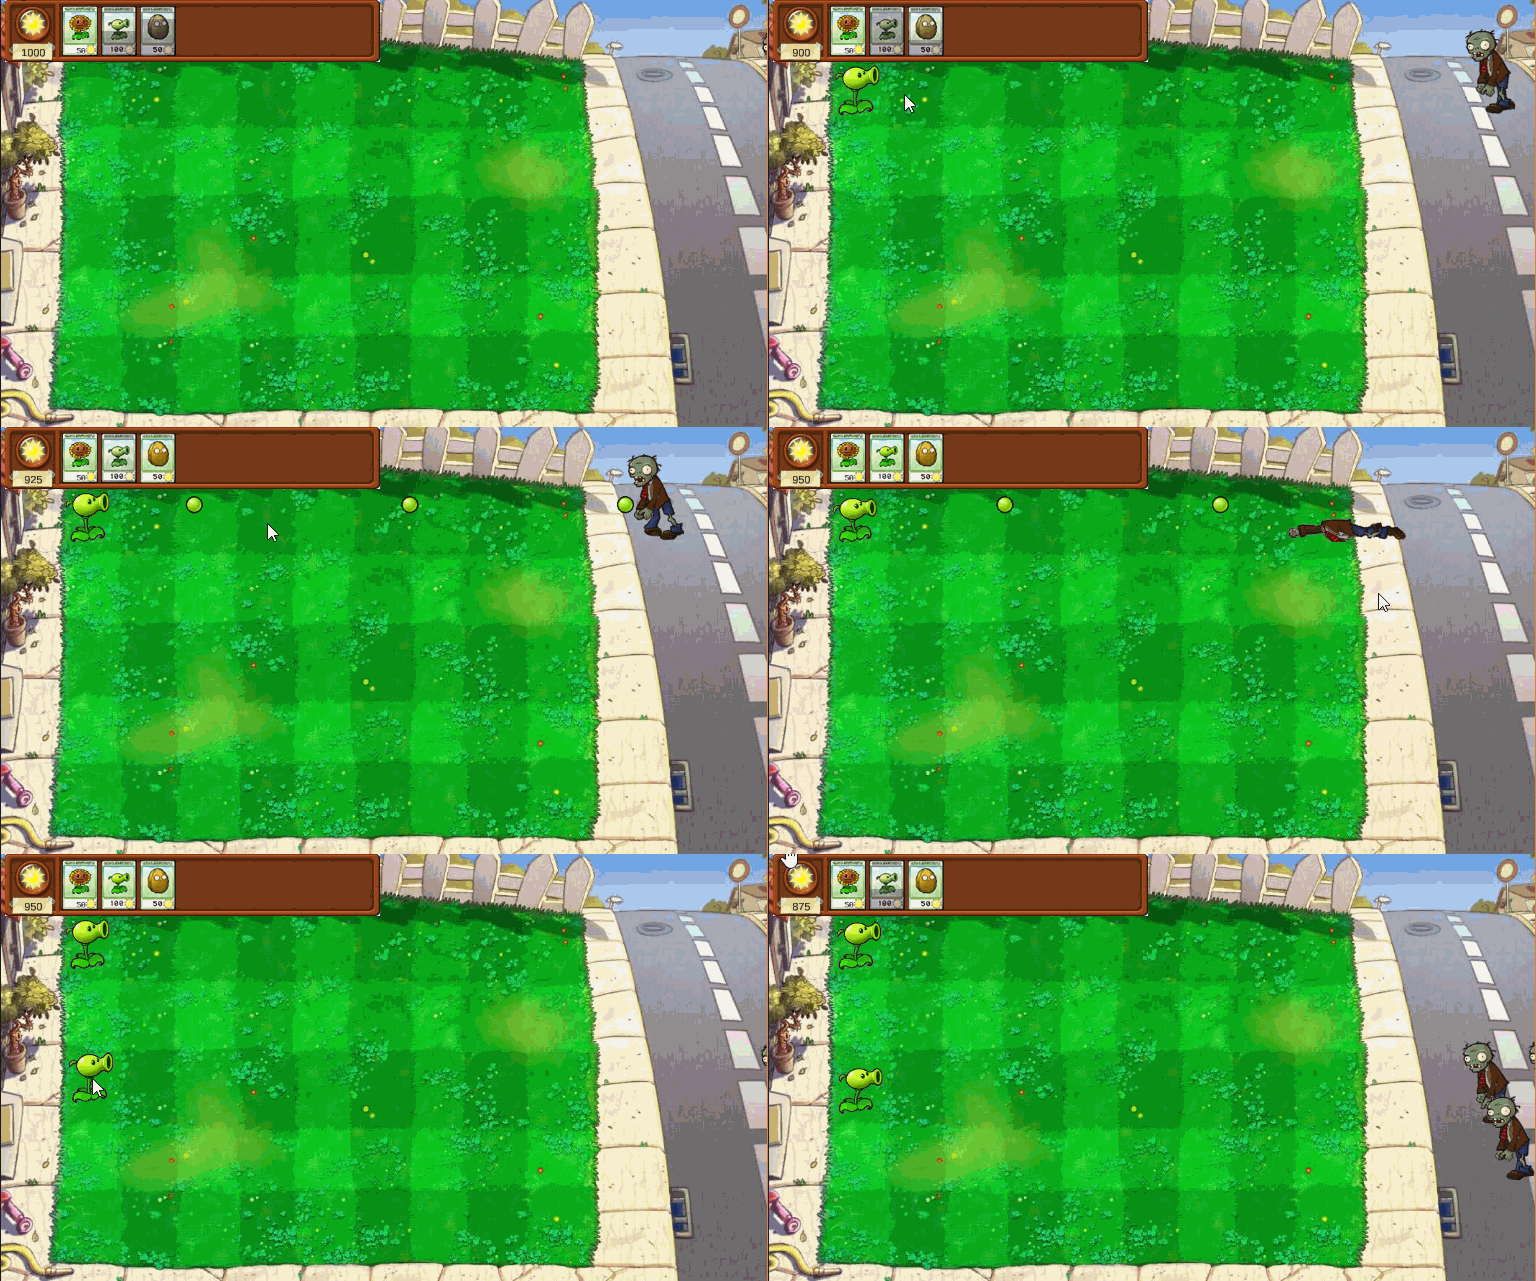
系列导航
制作100个unity游戏之27】使用unity复刻经典游戏《植物大战僵尸》,制作属于自己的植物大战僵尸随机版和杂交版13(完结)
制作100个unity游戏之27】使用unity复刻经典游戏《植物大战僵尸》,制作属于自己的植物大战僵尸随机版和杂交版12
制作100个unity游戏之27】使用unity复刻经典游戏《植物大战僵尸》,制作属于自己的植物大战僵尸随机版和杂交版11
制作100个unity游戏之27】使用unity复刻经典游戏《植物大战僵尸》,制作属于自己的植物大战僵尸随机版和杂交版10
制作100个unity游戏之27】使用unity复刻经典游戏《植物大战僵尸》,制作属于自己的植物大战僵尸随机版和杂交版9
制作100个unity游戏之27】使用unity复刻经典游戏《植物大战僵尸》,制作属于自己的植物大战僵尸随机版和杂交版8
制作100个unity游戏之27】使用unity复刻经典游戏《植物大战僵尸》,制作属于自己的植物大战僵尸随机版和杂交版7
制作100个unity游戏之27】使用unity复刻经典游戏《植物大战僵尸》,制作属于自己的植物大战僵尸随机版和杂交版6
制作100个unity游戏之27】使用unity复刻经典游戏《植物大战僵尸》,制作属于自己的植物大战僵尸随机版和杂交版5
制作100个unity游戏之27】使用unity复刻经典游戏《植物大战僵尸》,制作属于自己的植物大战僵尸随机版和杂交版4
制作100个unity游戏之27】使用unity复刻经典游戏《植物大战僵尸》,制作属于自己的植物大战僵尸随机版和杂交版3
制作100个unity游戏之27】使用unity复刻经典游戏《植物大战僵尸》,制作属于自己的植物大战僵尸随机版和杂交版2
制作100个unity游戏之27】使用unity复刻经典游戏《植物大战僵尸》,制作属于自己的植物大战僵尸随机版和杂交版1
前言
本节主要是推荐两种实现配置关卡信息,并按表生成僵尸和关卡波次
方法一、使用excel配置表
前面我们只是简单的随机生成僵尸,实际关卡编辑肯定不可能按这种方式,这里教大家一个读取excel配置表的方法,具体可以参考我之前的文章,这里就不过多介绍了:【unity小技巧】unity读excel配置表操作,excel转txt文本,并读取txt文本内容,实例说明
excel转txt文本
比如配置表大概样式
level.xlsx
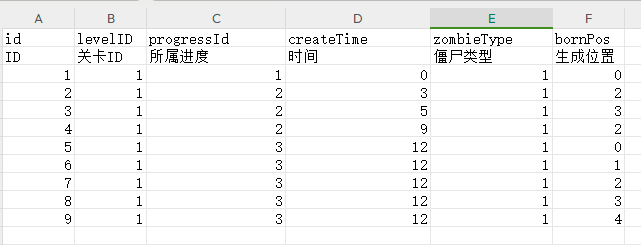
转换为txt文本后效果
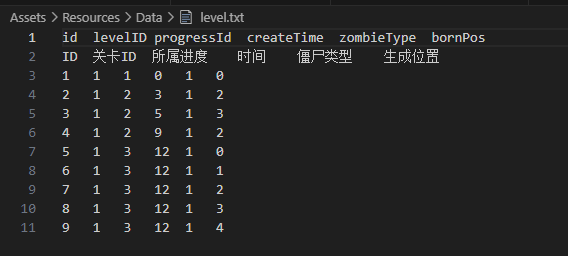
读取txt数据
新增GameConfigData游戏配置表类,每个对象对应一个txt配置表
public class GameConfigData
{
    // 存储配置表中的所有数据
    private List<Dictionary<string, string>> dataDic;
    // 构造函数,参数为字符串
    public GameConfigData(string str)
    {
        // 初始化数据字典
        dataDic = new List<Dictionary<string, string>>();
        // 按换行符切割字符串
        string[] lines = str.Split('\n');
        // 第一行是存储数据的类型
        string[] title = lines[0].Trim().Split('\t');//tab切割
        // 从第三行(下标为2)开始遍历数据,第二行数据是解释说明
        for (int i = 2; i < lines.Length; i++)
        {
            // 创建新的字典存储每行数据
            Dictionary<string, string> dic = new Dictionary<string, string>();
            // 按tab切割每行数据
            string[] tempArr = lines[i].Trim().Split("\t");
            // 将切割后的数据添加到字典中
            for (int j = 0; j < tempArr.Length; j++)
            {
                dic.Add(title[j], tempArr[j]);
            }
            // 将字典添加到数据列表中
            dataDic.Add(dic);
        }
    }

    // 获取所有行的数据
    public List<Dictionary<string, string>> GetLines()
    {
        return dataDic;
    }

    // 根据ID获取一行数据
    public Dictionary<string, string> GetOneById(string id)
    {
        // 遍历数据列表
        for (int i = 0; i < dataDic.Count; i++)
        {
            // 获取当前字典
            Dictionary<string, string> dic = dataDic[i];
            // 如果字典中的ID与参数相同,返回该字典
            if (dic["Id"] == id)
            {
                return dic;
            }
        }
        // 如果没有找到,返回null
        return null;
    }

    // 根据levelId获取数据
    public List<Dictionary<string, string>> GetListByLevelId(string levelId)
    {
        List<Dictionary<string, string>> levelList = new List<Dictionary<string, string>>();
        // 遍历数据列表
        for (int i = 0; i < dataDic.Count; i++)
        {
            // 获取当前字典
            Dictionary<string, string> dic = dataDic[i];
            // 如果字典中的levelID与参数相同
            if (dic["levelID"] == levelId)
            {
                // 将字典添加到数据列表中
                levelList.Add(dic);
            }
        }
        return levelList;
    }
}
- 1
- 2
- 3
- 4
- 5
- 6
- 7
- 8
- 9
- 10
- 11
- 12
- 13
- 14
- 15
- 16
- 17
- 18
- 19
- 20
- 21
- 22
- 23
- 24
- 25
- 26
- 27
- 28
- 29
- 30
- 31
- 32
- 33
- 34
- 35
- 36
- 37
- 38
- 39
- 40
- 41
- 42
- 43
- 44
- 45
- 46
- 47
- 48
- 49
- 50
- 51
- 52
- 53
- 54
- 55
- 56
- 57
- 58
- 59
- 60
- 61
- 62
- 63
- 64
- 65
- 66
- 67
- 68
- 69
- 70
- 71
- 72
- 73
新增GameConfigManager代码如下
// 游戏配置管理类
public class GameConfigManager
{
    public static GameConfigManager Instance = new GameConfigManager();

    private GameConfigData levelData;//关卡数据

    // 文本资源
    private TextAsset textAsset;

    // 初始化配置文件(txt文件 存储到内存)
    public void Init()
    {
        // 加载关卡数据
        textAsset = Resources.Load<TextAsset>("Data/level");
        levelData = new GameConfigData(textAsset.text);
    }

    // 获取关卡行数据
    public List<Dictionary<string, string>> GetLevelLines()
    {
        return levelData.GetLines();
    }

    // 根据ID获取关卡数据
    public Dictionary<string, string> GetLevelById(string id)
    {
        return levelData.GetOneById(id);
    }

	//根据关卡id获取数据
    public List<Dictionary<string, string>> GetLevelList(string levelId)
    {
        return levelData.GetListByLevelId(levelId);
    }
}
- 1
- 2
- 3
- 4
- 5
- 6
- 7
- 8
- 9
- 10
- 11
- 12
- 13
- 14
- 15
- 16
- 17
- 18
- 19
- 20
- 21
- 22
- 23
- 24
- 25
- 26
- 27
- 28
- 29
- 30
- 31
- 32
- 33
- 34
- 35
- 36
按配置信息生成僵尸
修改GameManager,初始化配置表信息并获取当前关卡数据
public int curLevelId = 1; //当前关卡
public int curProgressId = 1;//当前进度
public List<Dictionary<string, string>> listData;//当前关卡数据

private void Awake()
{
    Instance = this;
    //初始化配置表
    GameConfigManager.Instance.Init();
    //获取当前关卡数据
    listData = GameConfigManager.Instance.GetLevelList(curLevelId.ToString());
}
- 1
- 2
- 3
- 4
- 5
- 6
- 7
- 8
- 9
- 10
- 11
- 12
修改GenerateZombies,调用配置表信息并使用
public class GenerateZombies : MonoBehaviour
{
    public static GenerateZombies Instance { get; private set; }
    public List<GameObject> curProgressZombie;//保存当前进度的敌人
    int zOrderIndex = 0;//排序


    private void Awake()
    {
        Instance = this;
    }

    private void Start()
    {
        curProgressZombie = new List<GameObject>();
        TableCreateZombie();
    }

    //生成僵尸
    private void TableCreateZombie()
    {
        //判断是否是最后一波敌人,如果表格中当前进度没有可以创建的敌人,及游戏胜利
        bool canCreate = false;

        //获取当前关卡数据
        GameManager.Instance.listData.ForEach(data =>
        {
            //属于当前进度的僵尸
            if (data["progressId"] == GameManager.Instance.curProgressId.ToString())
            {
                //延迟一段时间创建僵尸
                StartCoroutine(ITableCreateZombie(data));
                //代表当前进度有敌人
                canCreate = true;
            }
        });

        if(!canCreate){
            StopAllCoroutines();//停止所有的携程
            //TODO:游戏胜利处理
            Debug.Log("游戏胜利");
        }
    }

    IEnumerator ITableCreateZombie(Dictionary<string, string> levelItem)
    {
        yield return new WaitForSeconds(float.Parse(levelItem["createTime"]));

        //加载预制件:从Resources文件夹中加载,例如Zombie1
        GameObject zombiePrefab = Resources.Load("Prefabs/Enemy/Zombie" + levelItem["zombieType"]) as GameObject;

        //生成僵尸实例
        GameObject zombie = Instantiate(zombiePrefab);

        //根据配表的生成位置,找到父物体
        Transform zombieLine = transform.GetChild(int.Parse(levelItem["bornPos"]));
        zombie.transform.parent = zombieLine;
        zombie.transform.localPosition = Vector3.zero;
        zombie.GetComponent<SpriteRenderer>().sortingOrder = zOrderIndex;
        zOrderIndex ++;

        curProgressZombie.Add(zombie);
    }

    //消灭敌人
    public void ZombieDied(GameObject gameObject){
        if(curProgressZombie.Contains(gameObject)){
            curProgressZombie.Remove(gameObject);
        }
        //当前进度的僵尸全部消灭了,开启下一个进度
        if(curProgressZombie.Count == 0){
            GameManager.Instance.curProgressId += 1;
            TableCreateZombie();
        }
    }
}
- 1
- 2
- 3
- 4
- 5
- 6
- 7
- 8
- 9
- 10
- 11
- 12
- 13
- 14
- 15
- 16
- 17
- 18
- 19
- 20
- 21
- 22
- 23
- 24
- 25
- 26
- 27
- 28
- 29
- 30
- 31
- 32
- 33
- 34
- 35
- 36
- 37
- 38
- 39
- 40
- 41
- 42
- 43
- 44
- 45
- 46
- 47
- 48
- 49
- 50
- 51
- 52
- 53
- 54
- 55
- 56
- 57
- 58
- 59
- 60
- 61
- 62
- 63
- 64
- 65
- 66
- 67
- 68
- 69
- 70
- 71
- 72
- 73
- 74
- 75
- 76
修改Zombie里的OnDie方法,消灭敌人时调用下面代码,控制游戏进度变化
GenerateZombies.Instance.ZombieDied(gameObject);
- 1
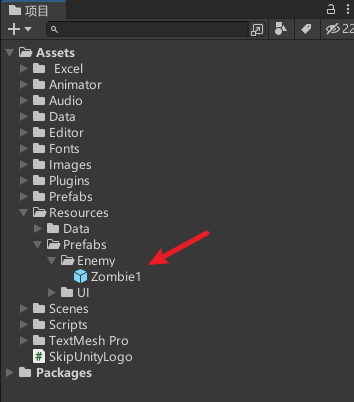
记得配置敌人信息
效果,可以看到僵尸按配置表在指定位置逐渐生成

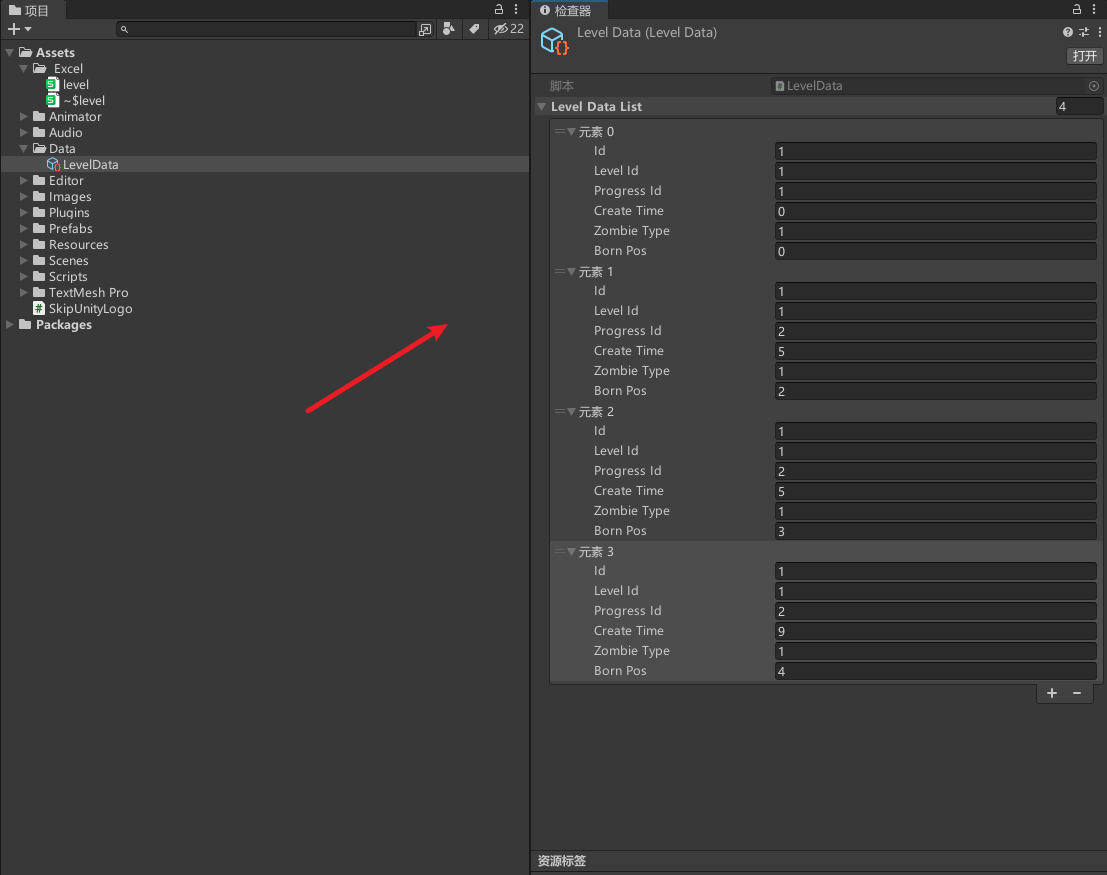
方法二、使用ScriptableObject 配置关卡信息
前面的excel转txt配置表使用比较方便,如果你觉得太复杂,并不理解他的用法。那也没关系,这里推荐另一种方法使用ScriptableObject 做配置关卡信息,省去了读excel和txt的步骤,也能实现一样的效果
新增LevelData
using System.Collections.Generic;
using UnityEngine;

[CreateAssetMenu(fileName = "LevelData", menuName = "LevelData", order = 0)]
public class LevelData : ScriptableObject {
    // 存储关卡数据的列表
    public List<LevelItem> levelDataList = new List<LevelItem>();
}

// 表示单个关卡的数据
[System.Serializable]
public class LevelItem {
    public int id;           // 关卡ID
    public int levelId;      // 等级ID
    public int progressId;   // 进度ID
    public int createTime;   // 创建时间
    public int zombieType;   // 僵尸类型
    public int bornPos;      // 出生位置

    // 自定义的ToString方法,用于返回关键信息的字符串表示
    override
    public string ToString(){
        return "[id]: " + id.ToString();
    }
}
- 1
- 2
- 3
- 4
- 5
- 6
- 7
- 8
- 9
- 10
- 11
- 12
- 13
- 14
- 15
- 16
- 17
- 18
- 19
- 20
- 21
- 22
- 23
- 24
- 25
配置和excel表基本一样,然后再去获取这个LevelData 使用即可,使用方法和前面类似,这里就不多介绍了
源码
源码不出意外的话我会放在最后一节
结束语
赠人玫瑰,手有余香!如果文章内容对你有所帮助,请不要吝啬你的点赞评论和关注,以便我第一时间收到反馈,你的每一次支持都是我不断创作的最大动力。当然如果你发现了文章中存在错误或者有更好的解决方法,也欢迎评论私信告诉我哦!
好了,我是向宇,https://xiangyu.blog.csdn.net
一位在小公司默默奋斗的开发者,出于兴趣爱好,最近开始自学unity,闲暇之余,边学习边记录分享,站在巨人的肩膀上,通过学习前辈们的经验总是会给我很多帮助和启发!php是工作,unity是生活!如果你遇到任何问题,也欢迎你评论私信找我, 虽然有些问题我也不一定会,但是我会查阅各方资料,争取给出最好的建议,希望可以帮助更多想学编程的人,共勉~


