- 1AI基本概念和应用_ai应用基础
- 24 个实用示例帮助你掌握 JavaScript 中Proxy功能_proxy(array)
- 3微软商店错误代码: 0x80131500解决方案
- 4Socket编程详解
- 5WPS 手动去除广告_ksomisc启动项
- 6微软登录界面加载不出_微软为何把Office365改名为Microsoft365? Part 1
- 7阿里云服务器迁移数据到新账号简单教程_阿里云转移服务器到新账号
- 8pytorch神经网络学习笔记03----几种网络的维度计算_神经网络维度计算
- 9【毕业设计选题】基于深度学习的柑橘果实目标检测系统 YOLO python 卷积神经网络 人工智能_柑橘内部品质检测毕业设计
- 10百面嵌入式专栏(面试题)内存管理相关面试题1.0
unity编辑器扩展#1 自定义窗口、面板、和属性_unity editorwindow自定义class
赞
踩
撸一遍unity官方文档的给的三个案例:https://docs.unity3d.com/2017.4/Documentation/Manual/editor-EditorWindows.html
自定义窗口
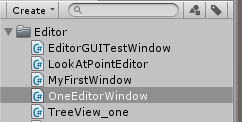
首先,要注意和编辑器相关的脚本都应该把放到Editor文件夹里,可以有多个Editor文件夹。

然后创建一个继承自EditorWindow的类
- using System.Collections;
- using System.Collections.Generic;
- using UnityEngine;
- using UnityEditor;
-
- //要创建的编辑器窗口类应该继承EditorWindow;
- public class OneEditorWindow : EditorWindow
- {
-
- //MenuItem是一个特性,会在顶部按路径生成选项,点击就会调用下面的方法,也就是打开窗口
- [MenuItem("Unity编辑器/OneEditorWindow")]
- public static void OpenWindow()
- {
- //打开窗口的方法 注释掉的方法你可以设置打开的窗口的位置和大小
- //可以直接用没参数的重载方法,参数用来设置窗口名称,是否用标签窗口形式之类的
- EditorWindow.GetWindow<OneEditorWindow>(false,"一个窗口");
- //EditorWindow.GetWindowWithRect<MyFirstWindow>(new Rect(0f, 0f, 500, 500));
- }
-
-
- private Color col;
- private float f;
-
- //OnGUI里写你想绘制在窗口里的内容
- private void OnGUI()
- {
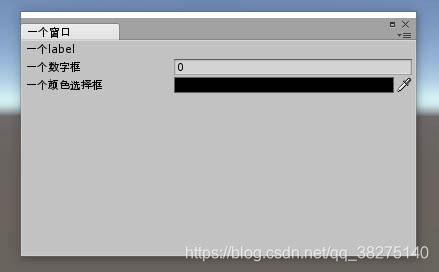
- EditorGUILayout.LabelField("一个label");
- f = EditorGUILayout.FloatField("一个数字框", f);
- col=EditorGUILayout.ColorField("一个颜色选择框",col);
- }
- }

就好了~


自定义类和成员的显示
这里提到的脚本不需要放到Editor文件夹里,因为他只是修改原有的显示而已
修改类实例的的显示


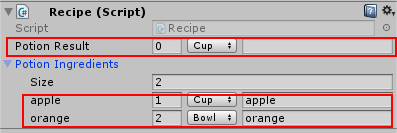
红色框的就是我们要修改的类 Ingredient在Inspector面板上的显示,左边是Unity默认的显示,右边是修改后的。
首先是用于实验的类
- public class Recipe: MonoBehaviour
- {
- public Ingredient PotionResult;
- public Ingredient[] PotionIngredients;
- }
-
- public enum IngredientUnit {Cup,Bowl,Spoon,Piece}
-
- [Serializable]//这个特性表示该类可以被序列化,但是不加好像也没关系
- public class Ingredient {
- //需要重新设计属性面板的类
- public string Name;
- public int Amount;
- public IngredientUnit Unit;
- }
接下来就是写可以修改显示的类
修改显示的类应该继承:PropertyDrawer
用特性[CustomPropertyDrawer(typeof(type))]表明它是用来针对修改哪个类的
和窗口一样,在OnGUI里写绘制的代码,
方法提供来三个参数,Rect是位置和宽高;property里面存着类的相关信息,可以用FindPropertyRelative(name)来找类成员;label就是名字;
在BeginProperty()和EndProperty()里写可以确保布局的整齐
- [CustomPropertyDrawer(typeof(Ingredient))]
- public class IngredientDrawer:PropertyDrawer
- {
- //重新绘制面板
- public override void OnGUI(Rect position, SerializedProperty property, GUIContent label)
- {
- EditorGUI.BeginProperty(position, label, property);
-
-
- //每个实例的名字 本来应该是Element0123 ,但这里显示了Name字符串
- position = EditorGUI.PrefixLabel(position, GUIUtility.GetControlID(FocusType.Passive), label);
-
- //本来是1层,要缩进,设置成0和他的上级size同级,使之与其对齐;
- var index = EditorGUI.indentLevel;
- EditorGUI.indentLevel = 0;
-
- //给三个属性安排位置
- var amountRect = new Rect(position.x, position.y, 30, position.height);
- var unitRect = new Rect(position.x + 35, position.y, 50, position.height);
- var nameRect = new Rect(position.x + 90, position.y, position.width - 90, position.height);
-
- //绘制属性
- EditorGUI.PropertyField(amountRect, property.FindPropertyRelative("Amount"), GUIContent.none);
- EditorGUI.PropertyField(unitRect, property.FindPropertyRelative("Unit"), GUIContent.none);
- EditorGUI.PropertyField(nameRect, property.FindPropertyRelative("Name"), GUIContent.none);
-
- //重新设置为原来的层级
- EditorGUI.indentLevel = index;
-
- EditorGUI.EndProperty();
-
- }
- }

修改类中成员的显示
修改类成员的显示通过给成员添加属性特性(Property Attributes)来实现,像unity自带的[Range(min,max)]就是一个特性,这里实现一个自己的Range来作为例子
先定义一个特性类,继承:PropertyAttribute
- public class MyRangeAttribute : PropertyAttribute
- {
- public float min;
- public float max;
-
- public MyRangeAttribute(float min, float max)
- {
- this.min = min;
- this.max = max;
- }
- }
然后和修改类的显示类似,写一个继承PropertyDrawer的类,在OnGUI里写显示的代码
- [CustomPropertyDrawer(typeof(MyRangeAttribute))]
- public class RangeDrawer : PropertyDrawer
- {
- public override void OnGUI(Rect position, SerializedProperty property, GUIContent label)
- {
- MyRangeAttribute range = (MyRangeAttribute) attribute;
- if (property.propertyType == SerializedPropertyType.Float)
- EditorGUI.Slider(position, property, range.min, range.max, label);
- else if (property.propertyType == SerializedPropertyType.Integer)
- EditorGUI.IntSlider(position, property, (int) range.min, (int) range.max, label);
- else
- EditorGUI.LabelField(position, label.text, "Use MyRange with float or int.");
- }
- }
attribute是PropertyDrawer里的成员,存储了所对应的特性类,强转出真正的特性。 然后就是读取attribute和property里的数据生成slider控件了,关于GUI里的各种控件看#2.
自定义编辑器
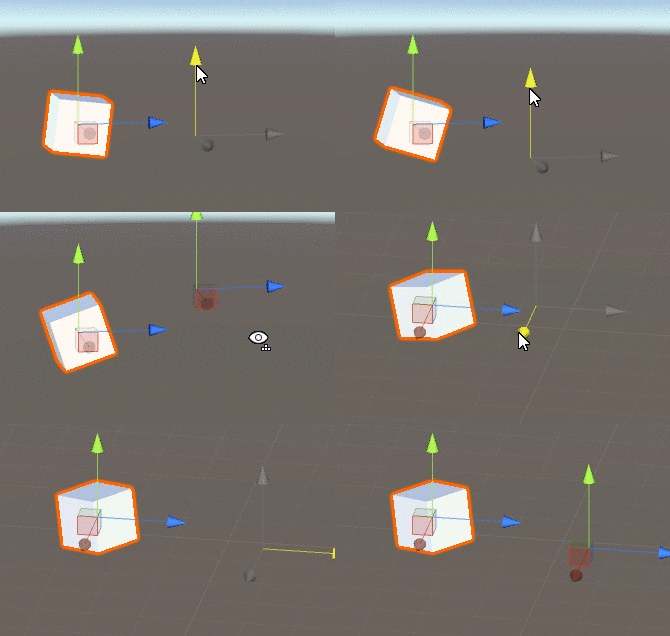
就是像游戏中的地形系统啊、布料系统啊,你添加组件到游戏物体,然后就可以在编辑状态,在Sence或者哪里里做各种修改和操作。

首先是写一个用于实验的类,因为要在编辑模式也能运行,所以加了个[ExecuteInEditMode]的特性
- [ExecuteInEditMode]
- public class LookAtPoint : MonoBehaviour
- {
-
- public Transform lookPoint;
- public Vector3 lookPos;
-
- public void Update()
- {
- if (lookPoint)
- {
- transform.LookAt(lookPos);
- }
-
- }
- }

接下来就是重要的编辑器类了,继承:Editor,要放在Editor文件夹里
- [CustomEditor(typeof(LookAtPoint))]
- [CanEditMultipleObjects]
- public class LookAtPointEditor : Editor
- {
- private SerializedProperty lookAtPoint;
- private SerializedProperty lookPos;
-
- private void OnEnable()
- {
- lookAtPoint = serializedObject.FindProperty("lookPoint");
- lookPos = serializedObject.FindProperty("lookPos");
-
- }
-
- //调整在Inspector上的布局
- public override void OnInspectorGUI()
- {
-
- serializedObject.Update();//更新面板显示
- //选择的transform
- EditorGUILayout.PropertyField(lookPos);
- serializedObject.ApplyModifiedProperties();//将面板值应用到属性
-
- /*
- //转化成实际的类型
- Transform a=(Transform)lookAtPoint.objectReferenceValue;
- if (a.position.y > ((LookAtPoint)target).transform.position.y)
- {
- EditorGUILayout.LabelField("(Above this object)");
- }
- if (a.position.y < ((LookAtPoint)target).transform.position.y)
- {
- EditorGUILayout.LabelField("(Below this object)");
- }
- */
-
- }
-
- //在Scene场景里添加绘制一些需要的UI布局
- public void OnSceneGUI()
- {
- var t = (target as LookAtPoint);
- EditorGUI.BeginChangeCheck();
- //绘制一个图形(移动物体的那个三箭头),位置对应lookPos
- Vector3 pos = Handles.PositionHandle(t.lookPos, Quaternion.identity);
- if (EditorGUI.EndChangeCheck())
- {//有调整就修改数值
- Undo.RecordObject(target, "Move point");
- t.lookPos = pos;
- t.Update();
- }
- }
-
- //protected override void OnHeaderGUI();
- //public override void OnPreviewGUI(Rect r, GUIStyle background)
- //public override void OnInteractivePreviewGUI(Rect r, GUIStyle background)
- }

首先是两个特性,[CustomEditor(typeof(type))]和前面的类似,用来表示你这个Editor管的是哪个组件,这里就是我们的LookAtPoint,[CanEditMultipleObjects]则表示该编辑器可以支持多个物体。
用serializedObject.FindProperty来找需要的数据
这里用到了两个显示的函数,一个处理Inspector上脚本的显示,一个处理Scene场景中的显示,后面还注释了几个没用到的。
记得把SerializedProperty转化成正确的类型,一般的数据结构它独有对应的属性,像lookAtPoint.doubleValue就会返回double,当然lookAtPoint不是double类型,会报错,对于引用类型,用.objectReferenceValue,然后再转一下,像文中注释的部分一样


