- 1用GVIM/VIM写Verilog——VIM配置分享_gvim svstemverilog 插件
- 2深度学习之RNN循环神经网络(理论+图解+Python代码部分)
- 3数据流分析(一)_数据流分析怎么写
- 4python 之弗洛伊德算法_floyd-warshall算法python代码
- 5FPGA 静态时序分析与约束(2)_quartus unconstrained path
- 6微信小程序开发与应用——字体样式设置_微信小程序style属性
- 7多无人机对组网雷达的协同干扰问题 数学建模
- 8Python实现mysql数据库验证_python3 构建一个源和目的都是mysql的数据校验程序
- 9Win10安装安卓模拟器入坑记_exagear win10
- 10岛屿数量(dfs)
Stable Diffusion web UI 安装、启动脚本、插件(Debian12)_debian12关闭休眠
赞
踩
一、Debian12安装
教程很多,这儿就不详细说明啦,小编使用的是“debian-12.5.0-amd64-DVD-1.iso”。
二、换源
Debian12需要先换源,才能在安装第三方包时不出现报错 。
1、备份当前镜像源
cp /etc/apt/sources.list /etc/apt/sources.list.bak
2、进入超级管理员用户
su3、给sources.list最高权限
sudo chmod 777 /etc/apt/sources.list4、 编辑sources.list的内容,使用文本编辑器打开即可,先将里面原有内容删除或者注释掉(清空源信息),再添加新的镜像源,下面推荐几个镜像源,添加任意一个即可,小编此处添加的是清华源。
- # 阿里云镜像站
- deb https://mirrors.aliyun.com/debian/ bookworm main non-free non-free-firmware contrib
- deb-src https://mirrors.aliyun.com/debian/ bookworm main non-free non-free-firmware contrib
- deb https://mirrors.aliyun.com/debian-security/ bookworm-security main
- deb-src https://mirrors.aliyun.com/debian-security/ bookworm-security main
- deb https://mirrors.aliyun.com/debian/ bookworm-updates main non-free non-free-firmware contrib
- deb-src https://mirrors.aliyun.com/debian/ bookworm-updates main non-free non-free-firmware contrib
- deb https://mirrors.aliyun.com/debian/ bookworm-backports main non-free non-free-firmware contrib
- deb-src https://mirrors.aliyun.com/debian/ bookworm-backports main non-free non-free-firmware contrib
-
- # 腾讯云镜像站
- deb https://mirrors.tencent.com/debian/ bookworm main non-free non-free-firmware contrib
- deb-src https://mirrors.tencent.com/debian/ bookworm main non-free non-free-firmware contrib
- deb https://mirrors.tencent.com/debian-security/ bookworm-security main
- deb-src https://mirrors.tencent.com/debian-security/ bookworm-security main
- deb https://mirrors.tencent.com/debian/ bookworm-updates main non-free non-free-firmware contrib
- deb-src https://mirrors.tencent.com/debian/ bookworm-updates main non-free non-free-firmware contrib
- deb https://mirrors.tencent.com/debian/ bookworm-backports main non-free non-free-firmware contrib
- deb-src https://mirrors.tencent.com/debian/ bookworm-backports main non-free non-free-firmware contrib
-
- # 网易镜像站
- deb https://mirrors.163.com/debian/ bookworm main non-free non-free-firmware contrib
- deb-src https://mirrors.163.com/debian/ bookworm main non-free non-free-firmware contrib
- deb https://mirrors.163.com/debian-security/ bookworm-security main
- deb-src https://mirrors.163.com/debian-security/ bookworm-security main
- deb https://mirrors.163.com/debian/ bookworm-updates main non-free non-free-firmware contrib
- deb-src https://mirrors.163.com/debian/ bookworm-updates main non-free non-free-firmware contrib
- deb https://mirrors.163.com/debian/ bookworm-backports main non-free non-free-firmware contrib
- deb-src https://mirrors.163.com/debian/ bookworm-backports main non-free non-free-firmware contrib
-
- # 华为镜像站
- deb https://mirrors.huaweicloud.com/debian/ bookworm main non-free non-free-firmware contrib
- deb-src https://mirrors.huaweicloud.com/debian/ bookworm main non-free non-free-firmware contrib
- deb https://mirrors.huaweicloud.com/debian-security/ bookworm-security main
- deb-src https://mirrors.huaweicloud.com/debian-security/ bookworm-security main
- deb https://mirrors.huaweicloud.com/debian/ bookworm-updates main non-free non-free-firmware contrib
- deb-src https://mirrors.huaweicloud.com/debian/ bookworm-updates main non-free non-free-firmware contrib
- deb https://mirrors.huaweicloud.com/debian/ bookworm-backports main non-free non-free-firmware contrib
- deb-src https://mirrors.huaweicloud.com/debian/ bookworm-backports main non-free non-free-firmware contrib
-
- # 清华大学镜像站
- deb https://mirrors.tuna.tsinghua.edu.cn/debian/ bookworm main contrib non-free non-free-firmware
- deb-src https://mirrors.tuna.tsinghua.edu.cn/debian/ bookworm main contrib non-free non-free-firmware
- deb https://mirrors.tuna.tsinghua.edu.cn/debian/ bookworm-updates main contrib non-free non-free-firmware
- deb-src https://mirrors.tuna.tsinghua.edu.cn/debian/ bookworm-updates main contrib non-free non-free-firmware
- deb https://mirrors.tuna.tsinghua.edu.cn/debian/ bookworm-backports main contrib non-free non-free-firmware
- deb-src https://mirrors.tuna.tsinghua.edu.cn/debian/ bookworm-backports main contrib non-free non-free-firmware
- deb https://mirrors.tuna.tsinghua.edu.cn/debian-security bookworm-security main contrib non-free non-free-firmware
- deb-src https://mirrors.tuna.tsinghua.edu.cn/debian-security bookworm-security main contrib non-free non-free-firmware
-
- # 中科大镜像站
- deb https://mirrors.ustc.edu.cn/debian/ bookworm main contrib non-free non-free-firmware
- deb-src https://mirrors.ustc.edu.cn/debian/ bookworm main contrib non-free non-free-firmware
- deb https://mirrors.ustc.edu.cn/debian/ bookworm-updates main contrib non-free non-free-firmware
- deb-src https://mirrors.ustc.edu.cn/debian/ bookworm-updates main contrib non-free non-free-firmware
- deb https://mirrors.ustc.edu.cn/debian/ bookworm-backports main contrib non-free non-free-firmware
- deb-src https://mirrors.ustc.edu.cn/debian/ bookworm-backports main contrib non-free non-free-firmware
- deb https://mirrors.ustc.edu.cn/debian-security/ bookworm-security main contrib non-free non-free-firmware
- deb-src https://mirrors.ustc.edu.cn/debian-security/ bookworm-security main contrib non-free non-free-firmware

5、更新源信息
sudo apt update三、取消休眠
1、查看Debian12休眠任务
systemctl status sleep.target 2、关闭休眠
systemctl mask sleep.target suspend.target hibernate.target hybrid-sleep.targetsystemd 支持四种休眠模式:
suspend
休眠到内存。 操作系统停止运行, 如果主机失去电力 将会导致数据丢失, 但是休眠和唤醒速度很快。 这对应于内核的 suspend, standby, freeze 状态。
hibernate
休眠到硬盘。 操作系统停止运行, 即使主机失去电力 也不会导致数据丢失, 但是休眠和唤醒速度很慢。 这对应于内核的 hibernation 状态。
hybrid-sleep
混合休眠(同时休眠到内存和硬盘)。 操作系统停止运行, 如果主机一直没有失去电力, 那么休眠和唤醒速度很快。 如果主机失去电力, 那么休眠和唤醒速度很慢,但是不会导致数据丢失。 这对应于内核的 suspend-to-both 状态。
suspend-then-hibernate
两阶段休眠(先休眠到内存再休眠到硬盘)。 系统首先休眠到内存,如果经过 HibernateDelaySec= 时长之后仍然没有任何操作, 那么系统将会被 RTC 警报唤醒并立即休眠到硬盘。
四、安装NVIDIA显卡驱动
1、安装nvidia-driver
sudo apt install nvidia-driver2、重新启动客户机
3、 查看NVIDIA显卡相关信息
nvidia-smi五、安装必须的依赖项
1、Python 3.10.6 和 Git
sudo apt install wget git python3 python3-venv libgl1 libglib2.0-0python3版本无所谓,需注意, python3-venv可能会出现安装失败的情况,需要注意名称,有的源中它的命名是python3.xx-venv,xx值得是版本版本号,如python的版本是python3.11.2,则对应的是python3.11-venv。
2、克隆stable-diffusion-webui
git clone https://github.com/AUTOMATIC1111/stable-diffusion-webui.git需要注意存储路径,最好不要乱放,可以放到Home目录下。
3、更改stable-diffusion-webui文件权限
sudo chmod -R 777 stable-diffusion-webui # 此处名称可能会略有不同六、环境配置
1、使用python3-venv创建一个python虚拟环境
- # 安装依赖,前面有安装,可忽略
- sudo apt install git python3.xx-venv -y
-
- # 克隆stable-diffusion-webui并进入此文件夹,若之前有克隆且修改了权限,只需要输入&&后的代码进入文件夹即可
- git clone https://github.com/AUTOMATIC1111/stable-diffusion-webui && cd stable-diffusion-webui
-
- # 创建虚拟环境,第一个venv是包名,第二个是虚拟环境名称(可自定义)
- python3.xx -m venv venv
创建完成后会在stable-diffusion-webui目录下出现一个名为venv(自定义名称)的文件夹
2、修改venv文件夹权限
sudo chmod -R 777 venv3、进入虚拟环境(无需root权限,可重新打开终端)
source venv/bin/activate4、安装第三方包(无需root权限)
- pip install -i https://pypi.tuna.tsinghua.edu.cn/simple -r requirements.txt
-
- ./webui.sh
-
- pip install -i https://pypi.tuna.tsinghua.edu.cn/simple -r requirements_versions.txt
-
- python launch.py
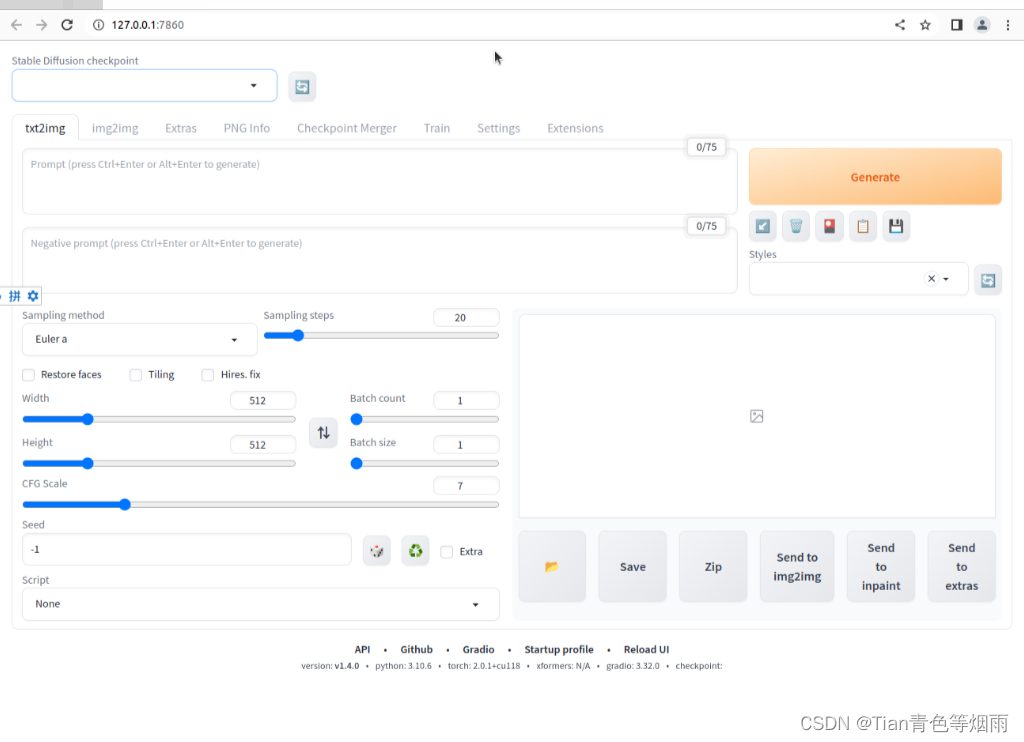
此处可能会出现很多报错,大多数是网络问题,建议多次尝试或者解决网络问题,部署环境看着简单,有时候全凭运气。若全部下载完毕,会默认打开127.0.0.1:7860这个网址,出现默认的界面,注意此时大模型和提词器可能会下载失败,需要通过Windows端翻墙下载然后拷贝到Debian12相关目录中。

5、下载大模型
在Windows端输入地址“https://huggingface.co/runwayml/stable-diffusion-v1-5/resolve/main/v1-5-pruned-emaonly.safetensors”,将这个3.97GB的大模型拷贝到到Debian12中的“stable-diffusion-webui/models/Stable-diffusion/v1-5-pruned-emaonly.safetensors”目录下,没有文件夹则自己创建。
6、下载提词器
在Windows端输入地址“https://huggingface.co/openai/clip-vit-large-patch14/tree/main”,将全部为文件下载下来并拷贝到Debian12中的“stable-diffusion-webui\openai\clip-vit-large-patch14\”目录下,没有文件夹则自己创建。
七、启用Stable Diffusion web UI
打开终端,依次输入以下代码即可打开Stable Diffusion web UI

- # 进入stable-diffusion-webui文件夹中
- cd stable-diffusion-webui/
-
- # 激活虚拟环境
- source venv/bin/activate
-
- # 执行以下命令之一
- python launch.py # 默认本机访问
- python launch.py --listen # 局域网访问 ***.***.***.***:7860
- python launch.py --port 7777 # 更改端口 ***.***.***.***:7777
八、相关插件
1、暗黑模式
127.0.0.1:7860/?__theme=dark
注意问号后面试两个英文下划线
2、汉化界面

3、设置密码
编辑“stable-diffusion-webui/modules/paths_internal.py”文件,找到如下代码并修改参数即可。
commandline_args = os.environ.get('COMMANDLINE_ARGS', "--gradio-auth 用户名:密码", "--listen")


