热门标签
热门文章
- 1Java根据excel模版导出Excel(easyexcel、poi)——含项目测试例子拿来即用_java根据模板导出excel
- 2未来园区 - 基于IoT、边缘计算和人工智能的科技物流园_打造基于人工智能的物流园区
- 3从GitHub克隆项目到本地
- 4自己动手设计输入法_怎么样才能自创输入法
- 5maven-surefire-plugin总结
- 6【论文阅读】【yolo系列】YOLO-Pose的论文阅读_yolo-pose和openpose对比
- 7RabbitMQ优化消息阻塞系列(一)解决方案梳理_rabbitmq 发送消息阻塞
- 8数据交互系列:简述vue项目中的两种请求方式(axios和vueResource)_vue-resource和axios
- 9数据库期末知识点汇总_数据库期末知识点总结
- 10河南发文明确!这类企业数字化转型有了“时间表”_制定数改时间表
当前位置: article > 正文
Ubuntu 部署ChatGLM3大语言模型_chatglm3 ubun
作者:羊村懒王 | 2024-05-23 17:47:12
赞
踩
chatglm3 ubun
Ubuntu 部署ChatGLM3大语言模型
ChatGLM3 是智谱AI和清华大学 KEG 实验室联合发布的对话预训练模型。
源码:https://github.com/THUDM/ChatGLM3
部署步骤
1.服务器配置
Ubuntu 20.04
8核(vCPU) 32GiB 5Mbps GPU NVIDIA T4 16GB 硬盘 100GiB
CUDA 版本 12.2.2/Driver 版本 535.161.07/CUDNN 版本 8.9.4
查看CUDA版本:nvidia-smi
2.程序和模型文件
程序:
程序保存目录/home/ubuntu/ChatGLM3Test2,注意目录权限要可写
https://github.com/THUDM/ChatGLM3
模型:
建议从魔塔下载
模型保存目录/home/ubuntu/THUDM
https://www.modelscope.cn/models/ZhipuAI/chatglm3-6b/summary
注意:记得修改程序里面的模型目录
文件:composite_demo/client.py 第18行
3.Python环境
服务器安装Python3.10.0,参考https://blog.csdn.net/luobowangjing/article/details/137726093
安装Python3.10.0虚拟环境,参考https://blog.csdn.net/luobowangjing/article/details/131081787
cd /home/ubuntu/ChatGLM3Test2
#安装虚拟环境依赖
pip install virtualenv

#*创建虚拟环境
virtualenv venv
#*激活虚拟环境
source venv/bin/activate

#退出虚拟环境
deactivate
- 1
- 2
- 3
- 4
- 5
- 6
- 7
- 8
- 9
- 10
- 11
4.安装依赖包
进入虚拟环境进行操作
前面安装虚拟环境时已经进入了。
#设置pip源设置为清华大学的镜像,如果已设置就不用设置查看镜像源使用命令pip config get global.index-url
pip config set global.index-url https://pypi.tuna.tsinghua.edu.cn/simple
#如果版本是24.0就不用更新
python -m pip install --upgrade pip

#*安装项目依赖
pip install -r requirements.txt
#*安装Demo依赖,注意修改requirements.txt里面的huggingface_hub==0.19.4,否则运行demo会报错
pip install -r composite_demo/requirements.txt
- 1
- 2
- 3
- 4
- 5
- 6
- 7
- 8
- 9
5.运行测试
streamlit run composite_demo/main.py --server.port 8502
- 1

6.配置服务器自启动
6.1.设置启动脚本 llmservice2.sh,vi llmservice2.sh,退出:wq
#!/bin/sh
cd /home/ubuntu/ChatGLM3Test2
source venv/bin/activate
streamlit run composite_demo/main.py --server.port 8502
- 1
- 2
- 3
- 4
6.2.新建启动服务
路径:/usr/lib/systemd/system/llmservice2.service
[Unit]
Description=llmservice
After=network.target

[Service]
ExecStart=/home/ubuntu/llmservice2.sh

[Install]
WantedBy=default.target
- 1
- 2
- 3
- 4
- 5
- 6
- 7
- 8
- 9
7.服务自启动
sudo systemctl enable llmservice2.service
sudo systemctl start llmservice2.service
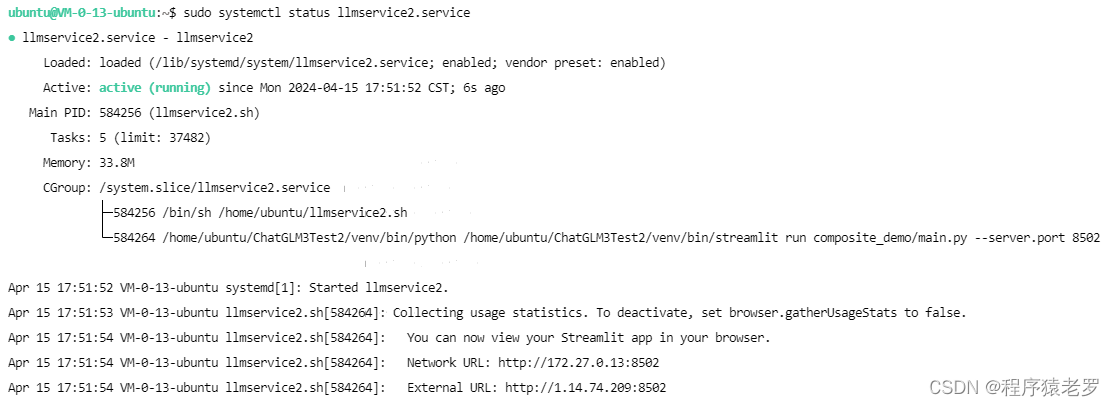
sudo systemctl status llmservice2.service
sudo systemctl stop llmservice2.service
sudo systemctl restart llmservice2.service
- 1
- 2
- 3
- 4
- 5
8.启动成功截图

声明:本文内容由网友自发贡献,不代表【wpsshop博客】立场,版权归原作者所有,本站不承担相应法律责任。如您发现有侵权的内容,请联系我们。转载请注明出处:https://www.wpsshop.cn/w/羊村懒王/article/detail/613828
推荐阅读
相关标签


