- 1测试开发 | 词嵌入(Word Embeddings):赋予语言以向量的魔力_词嵌入是将词汇表中的每个词映射到
- 2OpenMV:21控制多个舵机(需要模块PCA9685)_openmv控制双舵机
- 3AIGC内容分享(五十五):AIGC周刊
- 4在NVIDIA Orin中编译Apollo 9_apollo 9.0 orin
- 5大数据项目在线实习_数据测试员实习项目
- 6Elasticsearch 未授权访问_elasticsearch未授权访问
- 7【推荐系统】DeepFM模型分析
- 8跟着我,在PS里成功装上SD插件(终极教程!附基本操作步骤)_ps sd插件
- 9stm32+cubemx+淘晶驰串口屏+收发通信并应用_stm32驱动陶晶驰x系列串口屏
- 10原生php开发学生信息管理系统源码_php学生信息管理系统源代码
RAG实战1 - 使用Mistral-7b, LangChain, ChromaDB搭建自己的WEB聊天界面
赞
踩
转载自:LLM之RAG实战(一):使用Mistral-7b, LangChain, ChromaDB搭建自己的WEB聊天界面
https://mp.weixin.qq.com/s/VplqlXqIZrBYNU6o_ju_FA

一、RAG介绍
如何使用没有被LLM训练过的数据来提高LLM性能?
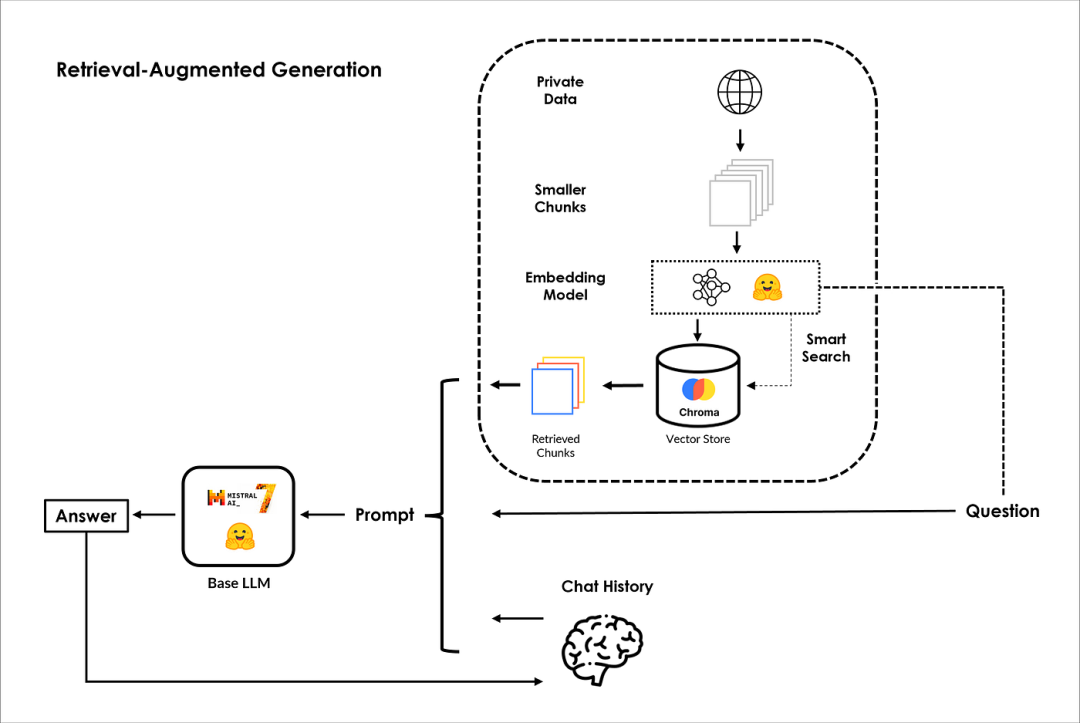
检索增强生成(RAG)是未来的发展方向,下面将解释一下它的含义和实际工作原理。
假设您有自己的数据集,例如来自公司的文本文档。如何让ChatGPT和其他LLM了解它并回答问题?
这可以通过四个步骤轻松完成:
- Embedding:使用embedding模型对文档进行 embedding 操作,比如OpenAI的text-Embedding-ada-002或 S-BERT(https://arxiv.org/abs/1908.10084)。
将文档的句子或单词块转换为 数字向量。
就向量之间的距离而言,彼此相似的句子应该很近,而不同的句子应该离得更远; - Vector Store:embedding文档之后就可以把它们存储在矢量存储中,比如ChromaDB、FAISS 或 Pinecone。
矢量存储就像一个数据库,但顾名思义,它对矢量嵌入进行索引和存储,以实现快速检索和相似性搜索; - Query:既然你的文档已经嵌入并存储,当你向LLM提出特定问题时,它会embedding你的查询,并在向量存储中找到余弦相似度最接近你问题的句子;
- Answering Your Question:一旦找到最接近的句子,它们就会被注入到Prompt中,就这样!
LLM现在可以在没有经过任何再训练或微调的情况下,回答有关数据的特定问题!
整体的架构,如下图所示:
PS:有关RAG的更多信息,请查看IBM高级研究科学家Marina Danilevsky的这段来自IBM的精彩视频,地址是:https://www.youtube.com/watch?v=T-D1OfcDW1M。
二、安装python环境以及相关的包
pip install gradio --quiet
pip install xformer --quiet
pip install chromadb --quiet
pip install langchain --quiet
pip install accelerate --quiet
pip install transformers --quiet
pip install bitsandbytes --quiet
pip install unstructured --quiet
pip install sentence-transformers --quiet
- 1
- 2
- 3
- 4
- 5
- 6
- 7
- 8
- 9
三、导入相关包
import torch
import gradio as gr

from textwrap import fill
from IPython.display import Markdown, display

from langchain.prompts.chat import (
    ChatPromptTemplate,
    HumanMessagePromptTemplate,
    SystemMessagePromptTemplate,
)

from langchain import PromptTemplate
from langchain import HuggingFacePipeline

from langchain.vectorstores import Chroma
from langchain.schema import AIMessage, HumanMessage
from langchain.memory import ConversationBufferMemory
from langchain.embeddings import HuggingFaceEmbeddings
from langchain.text_splitter import RecursiveCharacterTextSplitter
from langchain.document_loaders import UnstructuredMarkdownLoader, UnstructuredURLLoader
from langchain.chains import LLMChain, SimpleSequentialChain, RetrievalQA, ConversationalRetrievalChain

from transformers import BitsAndBytesConfig, AutoModelForCausalLM, AutoTokenizer, GenerationConfig, pipeline

import warnings
warnings.filterwarnings('ignore')
- 1
- 2
- 3
- 4
- 5
- 6
- 7
- 8
- 9
- 10
- 11
- 12
- 13
- 14
- 15
- 16
- 17
- 18
- 19
- 20
- 21
- 22
- 23
- 24
- 25
- 26
- 27
四、Mistral-7b模型介绍
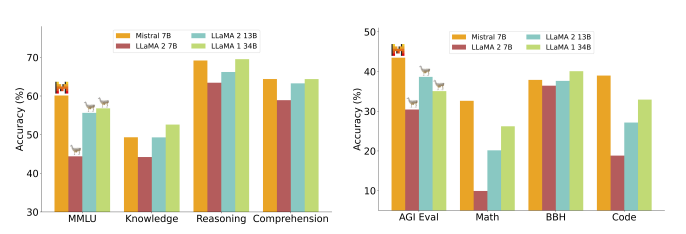
Mistral-7B是由Mistral AI开源的,在多个benchmark上超过LLaMA2,如下图所示:
下面将使用Mistral AI开发的基础LLM Mistral-7b建立了一个文本生成Pipeline,对其进行量化、分词和生成参数进行配置:
- quantiation_config=BitsAndBytesConfig(…):这里,使用BitsAndBytesConfig定义量化配置。
量化是一种用于降低深度学习模型的内存和计算需求的技术,通常通过使用更少的比特(在我们的情况下为4比特)来表示模型参数; - tokenizer=AutoTokenizer.from_pretrained(…):这一行初始化Mistral-7b模型的tokenizer,允许您预处理输入到模型的文本数据;
- model=AutoModelForCausalLM.from_pretrained(…):这初始化了用于因果语言建模的预训练语言Mistral-7b模型。
该模型配置有各种参数,包括先前设置的量化配置; - generation_config=GenerationConfig.from_pretrained(…):为模型创建一个生成配置,指定各种与生成相关的设置,如令牌的最大数量、采样温度、top-p采样和重复惩罚;
- pipeline=pipeline(…):最后,使用pipeline函数创建一个文本生成管道。
这个管道是为文本生成而设置的,它将预先训练的模型、标记器和生成配置作为输入。它被配置为返回全文输出。
MODEL_NAME = "mistralai/Mistral-7B-Instruct-v0.1"

quantization_config = BitsAndBytesConfig(
    load_in_4bit=True,
    bnb_4bit_compute_dtype=torch.float16,
    bnb_4bit_quant_type="nf4",
    bnb_4bit_use_double_quant=True,
)

tokenizer = AutoTokenizer.from_pretrained(MODEL_NAME, use_fast=True)
tokenizer.pad_token = tokenizer.eos_token

model = AutoModelForCausalLM.from_pretrained(
    MODEL_NAME, torch_dtype=torch.float16,
    trust_remote_code=True,
    device_map="auto",
    quantization_config=quantization_config
)

generation_config = GenerationConfig.from_pretrained(MODEL_NAME)
generation_config.max_new_tokens = 1024
generation_config.temperature = 0.0001
generation_config.top_p = 0.95
generation_config.do_sample = True
generation_config.repetition_penalty = 1.15

pipeline = pipeline(
    "text-generation",
    model=model,
    tokenizer=tokenizer,
    return_full_text=True,
    generation_config=generation_config,
)
- 1
- 2
- 3
- 4
- 5
- 6
- 7
- 8
- 9
- 10
- 11
- 12
- 13
- 14
- 15
- 16
- 17
- 18
- 19
- 20
- 21
- 22
- 23
- 24
- 25
- 26
- 27
- 28
- 29
- 30
- 31
- 32
- 33
HuggingFacePipeline是一个允许您在本地运行Hugging Face模型的类,它用于访问和利用Hugging Face Model Hub上托管的各种预先训练的ML模型。
在我们的案例中,我们将在 LangChain 环境中使用它作为本地包装器与Hugging Face模型进行交互。
然而,当使用HuggingFacePipeline时,建议安装xformer(https://github.com/facebookresearch/xformers),以实现更高效的内存注意力实现。这就是我们在上面安装它的原因!
llm = HuggingFacePipeline( pipeline=pipeline, )
- 1
在将我们的基础LLM Mistral-7b连接到我们的私人数据之前。
首先,让我们问一些一般性的问题。当然,它将根据在训练前获得的一般知识做出回应。
query = "Explain the difference between ChatGPT and open source LLMs in a couple of lines."
result = llm(
    query
)

display(Markdown(f"<b>{query}</b>"))
display(Markdown(f"<p>{result}</p>"))
- 1
- 2
- 3
- 4
- 5
- 6
- 7

看起来回答的不错!如果我们问它一个在预训练阶段没有遇到的问题,会发生什么?
query = "What is Hiberus GenIA Ecosystem?"
result = llm(
    query
)

display(Markdown(f"<b>{query}</b>"))
display(Markdown(f"<p>{result}</p>"))
- 1
- 2
- 3
- 4
- 5
- 6
- 7

这不是预期的答案。GenIA生态系统甚至比这更酷,这是因为Mistral-7b LLM在预训练期间从未见过任何关于GenIA生态的信息。我保证在接下来的章节中引导您获得正确答案。
五、Embedding模型
在配置基础LLM之后,我们继续来配置embedding模型。
正如您所知,每个文档都应该转换为embedding向量,以便使用用户的查询进行语义搜索,该查询也应该被embedding。
为了实现这一点,我们将利用阿里巴巴大摩学院预训练并在Hugging Face上开源的embedding模型GTE(https://arxiv.org/abs/2308.03281)。
值得注意的是,这个模型既免费又强大。
为了完成我们的任务,我们将使用 HuggingFaceEmbeddings 类,这是一个本地管道包装器,用于与Hugging Face Hub上托管的GTE模型进行交互。
embeddings = HuggingFaceEmbeddings(
    model_name="thenlper/gte-large",
    model_kwargs={"device": "cuda"},
    encode_kwargs={"normalize_embeddings": True},
)
- 1
- 2
- 3
- 4
- 5
六、Prompt Template
PromptTemplate通过结构化Prompt格式使模型按照用户期望的格式进行输出,模板可以包括指令、few-shot例子以及适合特定任务的特定上下文和问题。
template = """
[INST] <>
Act as a Machine Learning engineer who is teaching high school students.
<>

{text} [/INST]
"""

prompt = PromptTemplate(
    input_variables=["text"],
    template=template,
)
- 1
- 2
- 3
- 4
- 5
- 6
- 7
- 8
- 9
- 10
- 11
- 12
我们来看一下效果:
query = "Explain what are Deep Neural Networks in 2-3 sentences"
result = llm(prompt.format(text=query))

display(Markdown(f"<b>{query}</b>"))
display(Markdown(f"<p>{result}</p>"))
- 1
- 2
- 3
- 4
- 5

七、数据加载
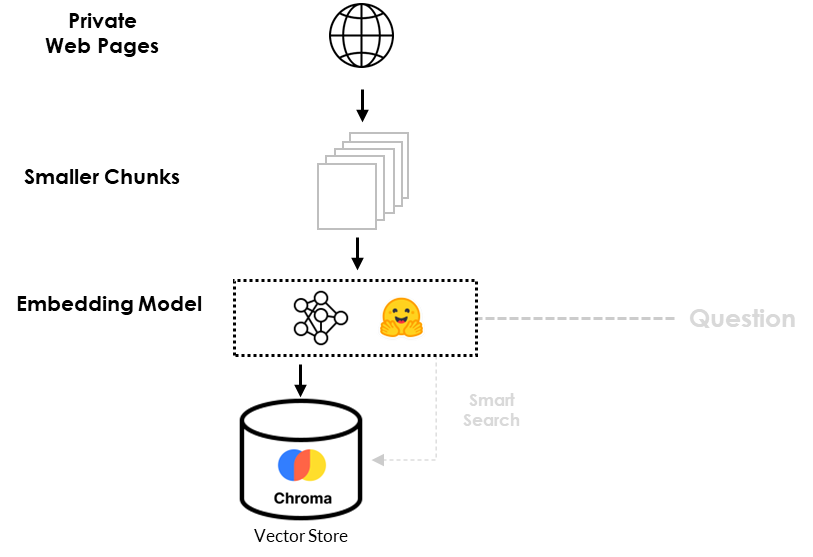
数据加载流程,如下图所示:
为了准确回答我们之前的问题(What is Hiberus GenIA Ecosystem?),我们必须将LLM与GenIA生态系统的信息联系起来。
很幸运!有两个网页是理解GenIA生态系统的关键。
urls = [
    "https://www.hiberus.com/expertos-ia-generativa-ld",
    "https://www.hiberus.com/en/experts-generative-ai-ld"
]

loader = UnstructuredURLLoader(urls=urls)
documents = loader.load()

len(documents)
# Output
- 1
- 2
- 3
- 4
- 5
- 6
- 7
- 8
- 9
- 10
由于这两个文档数据量较大,以及超过了Mistral-7b大模型的上下文窗口大小,因此我们需要将文档按照1024个tokens大小进行切分,生成21个较小的chunks,并且为了保证上下文的连续性,chunk与chunk直接设置64个重叠tokens,代码如下:
text_splitter = RecursiveCharacterTextSplitter(chunk_size=1024, chunk_overlap=64)
texts_chunks = text_splitter.split_documents(documents)

len(texts_chunks)
- 1
- 2
- 3
- 4
八、数据注入
对数据分块之后,我们将对分块数据进行embedding并存储到向量数据库Chromdb中
db = Chroma.from_documents(texts_chunks, embeddings, persist_directory="db")
- 1
数据被添加索引之后,我们可以在Prompt模板中添加RAG模型赋予营销经理专家的角色!
此外,为了将LLM与矢量数据库检索功能相结合,我们使用了关键的链接组件RetrievalQA,其中k=2。
这种设置确保检索器输出两个相关的块,然后LLM在提出问题时使用这两个块来制定答案。
template = """
[INST] <>
Act as an Hiberus marketing manager expert. Use the following information to answer the question at the end.
<>

{context}

{question} [/INST]
"""

prompt = PromptTemplate(template=template, input_variables=["context", "question"])

qa_chain = RetrievalQA.from_chain_type(
    llm=llm,
    chain_type="stuff",
    retriever=db.as_retriever(search_kwargs={"k": 2}),
    return_source_documents=True,
    chain_type_kwargs={"prompt": prompt},
)
- 1
- 2
- 3
- 4
- 5
- 6
- 7
- 8
- 9
- 10
- 11
- 12
- 13
- 14
- 15
- 16
- 17
- 18
- 19
九、查询
执行完上述步骤,我们就可以进行查询了。
例子一:
query = "What is GenAI Ecosystem?"
result_ = qa_chain(
    query
)
result = result_["result"].strip()


display(Markdown(f"<b>{query}</b>"))
display(Markdown(f"<p>{result}</p>"))
- 1
- 2
- 3
- 4
- 5
- 6
- 7
- 8
- 9

例子二:
query = "Why Hiberus has created GenAI Ecosystem?"
result_ = qa_chain(
    query
)
result = result_["result"].strip()


display(Markdown(f"<b>{query}</b>"))
display(Markdown(f"<p>{result}</p>"))
- 1
- 2
- 3
- 4
- 5
- 6
- 7
- 8
- 9

这两个问题的答案都符合预期,包括我们之前错过的那个问题。我们还可以输出LLM生成答案的源文档或参考文档。
result_["source_documents"]
- 1
十、问答
为了实现问答功能,我们首先对Prompt模板进行一些调整。
然后,我们使用ConversationBufferMemory将对话存储在内存中,然后稍后检索消息。
最后,使用链接组件ConversationalRetrievalChain将我们的LLM Mistral-7b与矢量数据库和聊天历史相结合。问答系统整体架构,如下图所示:

custom_template = """You are an Hiberus Marketing Manager AI Assistant. Given the
following conversation and a follow up question, rephrase the follow up question
to be a standalone question. At the end of standalone question add this
'Answer the question in English language.' If you do not know the answer reply with 'I am sorry, I dont have enough information'.
Chat History:
{chat_history}
Follow Up Input: {question}
Standalone question:
"""

CUSTOM_QUESTION_PROMPT = PromptTemplate.from_template(custom_template)

memory = ConversationBufferMemory(memory_key="chat_history", return_messages=True)

qa_chain = ConversationalRetrievalChain.from_llm(
    llm=llm,
    retriever=db.as_retriever(search_kwargs={"k": 2}),
    memory=memory,
    condense_question_prompt=CUSTOM_QUESTION_PROMPT,
)
- 1
- 2
- 3
- 4
- 5
- 6
- 7
- 8
- 9
- 10
- 11
- 12
- 13
- 14
- 15
- 16
- 17
- 18
- 19
- 20
我们来测试一下问答功能:
query = "Who you are?"
result_ = qa_chain({"question": query})
result = result_["answer"].strip()

display(Markdown(f"<b>{query}</b>"))
display(Markdown(f"<p>{result}</p>"))
- 1
- 2
- 3
- 4
- 5
- 6

query = "What is GenIA Ecosystem?"

result_ = qa_chain({"question": query})
result = result_["answer"].strip()

display(Markdown(f"<b>{query}</b>"))
display(Markdown(f"<p>{result}</p>"))
- 1
- 2
- 3
- 4
- 5
- 6
- 7

我们可以通过查看HumanMessages中的问题和AIMessages中的模型响应来获取聊天的历史记录。
memory.chat_memory.messages
- 1
十一、基于Gradio搭建问答UI界面
我之前写过一篇一键部署Huggingface模型工具Gradio介绍过Gradio的具体使用,Gradio具有用户友好的网络界面,任何人都可以从任何地方访问!
它的工作原理如下:我们设置了一个名为querying()的函数,它将查询作为主要输入,并使用一个名为history的名称巧妙的假参数来解决一个小问题。
当你启动这个函数时,它会返回我们的超级明星模型Mistral-7b生成的响应。
def querying(query, history):
  memory = ConversationBufferMemory(memory_key="chat_history", return_messages=True)

  qa_chain = ConversationalRetrievalChain.from_llm(
      llm=llm,
      retriever=db.as_retriever(search_kwargs={"k": 2}),
      memory=memory,
      condense_question_prompt=CUSTOM_QUESTION_PROMPT,
  )

  result = qa_chain({"question": query})
  return result["answer"].strip()
- 1
- 2
- 3
- 4
- 5
- 6
- 7
- 8
- 9
- 10
- 11
- 12
启动Gradio聊天界面
iface = gr.ChatInterface(
    fn = querying,
    chatbot=gr.Chatbot(height=600),
    textbox=gr.Textbox(placeholder="What is GenAI Ecosystem?", container=False, scale=7),
    title="HiberusBot",
    theme="soft",
    examples=["Why Hiberus has created GenAI Ecosystem?",
              "What is GenAI Ecosystem?"],

    cache_examples=True,
    retry_btn="Repetir",
    undo_btn="Deshacer",
    clear_btn="Borrar",
    submit_btn="Enviar"

    )

iface.launch(share=True)
- 1
- 2
- 3
- 4
- 5
- 6
- 7
- 8
- 9
- 10
- 11
- 12
- 13
- 14
- 15
- 16
- 17
- 18
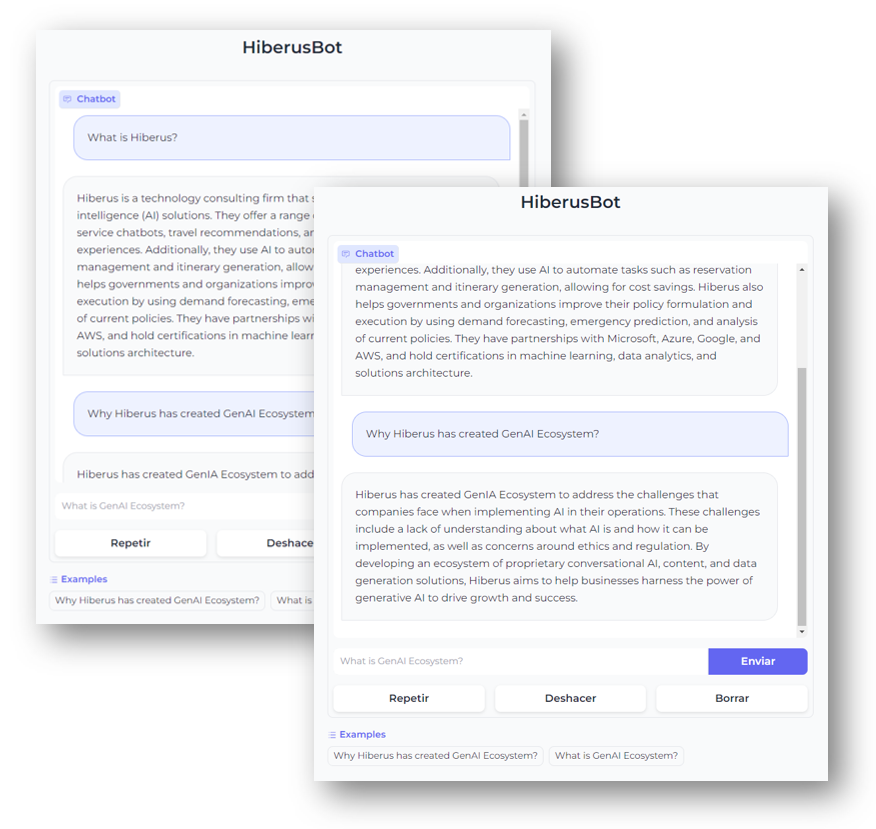
最终展示的聊天界面,如下图所示:
参考文献:
[1] https://medium.com/@zekaouinoureddine/ask-your-web-pages-using-mistral-7b-langchain-f976e1e151ca
[2] https://arxiv.org/abs/2005.11401
[3] https://arxiv.org/abs/2310.06825
[4] https://arxiv.org/abs/2308.03281
[5] https://www.youtube.com/watch?v=PuU_qf23u_8


