热门标签
热门文章
- 1python抓包(sniff)-----实现wireshark抓包功能_python sniff
- 2miniUI网站后台管理系统
- 3如何判断socket是否还处于连接状态?_判断socket连接状态
- 4QML之Column垂直定位器_qml column
- 5k8s pod控制器详解(ReplicaSet、Deployment、Horizontal Pod Autoscaler)_pod deployment limit
- 6山东大学 2020级数据库系统 实验八、九_tudent_11_2中性别是“女”的且pub.student_course中存在不及格成绩的同学数
- 7java设计模式系列--单例模式_利用java单例模式,管理文件中读取的数据,模拟程序的缓存设置。利用`get`方法获取
- 8R语言航班延误影响预测分析:lasso、决策树、朴素贝叶斯、QDA、LDA、缺失值处理、k折交叉验证...
- 9AD 域控常用组策略编辑&验证测试_ad域控策略清单
- 10【网络】网络基础入门_网络入门
当前位置: article > 正文
Unity实现图片闪烁_unity图片描边闪烁
作者:Cpp五条 | 2024-02-18 19:43:27
赞
踩
unity图片描边闪烁
先上效果:

原理
图片闪烁可以采取很多底层逻辑实现,像一些早期的街机游戏受击闪烁的实现机制是在受击的那一帧让模型变成白色。在这里我们采取透明度循环变化的方案实现。
逐帧动画实现
这个方案相对于另外两个方案是比较繁琐的,要有一组透明度循环变化的图片。
注意是循环变化也就是说要变到最值后在变回去
示例里的透明度分别为:
0.4 0.6 0.8 1 0.8 0.6 0.4
- 1
- 2
- 3
首先将素材导入
然后如果是3D模板的话要设置下图片的参数。
全选全部图片→在Inspector面板上设置Texture Type为Sprite→设置SpriteMode为Single→在面板往下拉,找到并点击Apply

剩下的就是正常制作帧动画的流程了
 速度的话在Animator里可以调

Animation录制
这个方案只需要一张图片。
导入素材和上面一样。
3D模板的话也要设置下参数。
对Animation不是很熟悉的朋友可以先补补这方面的知识。
唤出Animation窗口
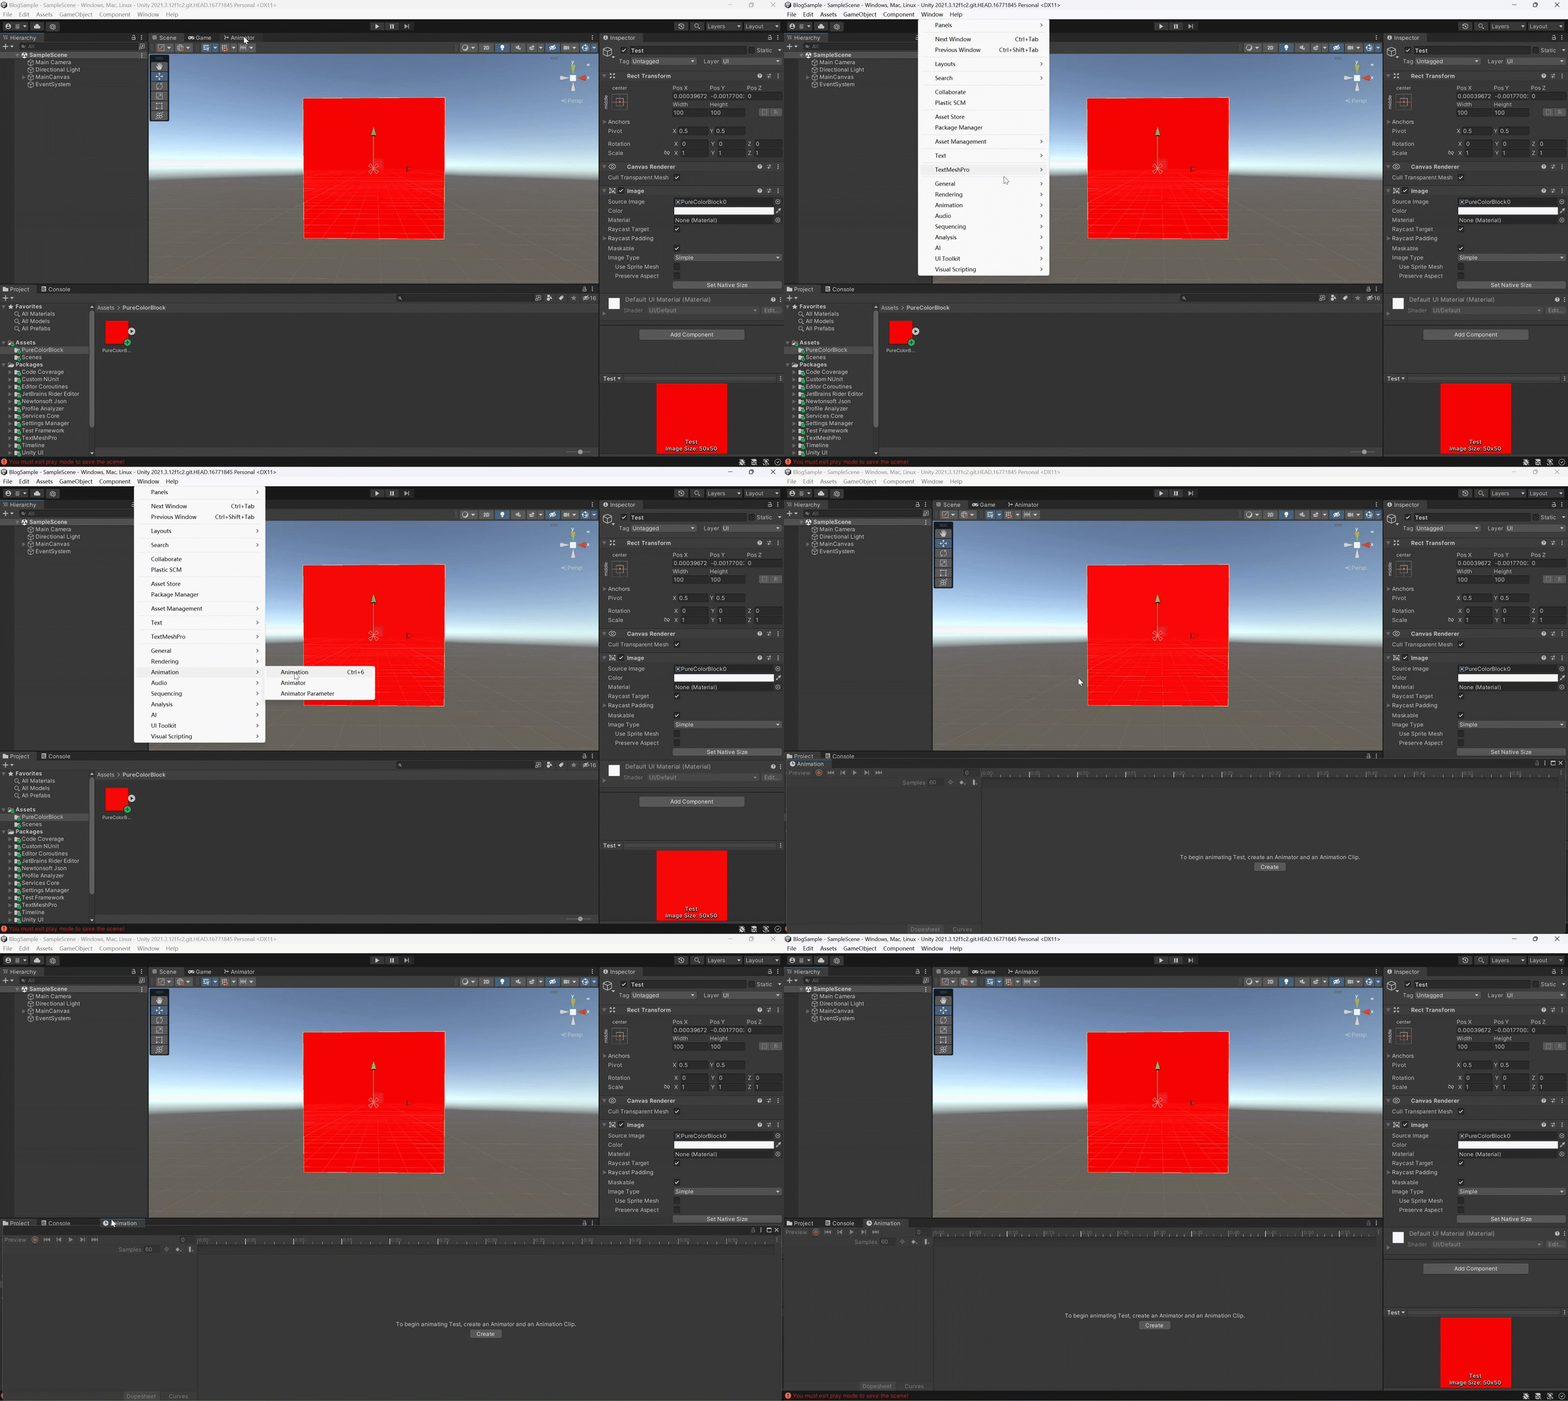
也可以直接Ctrl+6唤出窗口
创建AnimationClip
开始录制
在中间插入关键帧首先使其变化到极值
在末尾插入关键帧使其回到原样
到这Animation就做完了
c#脚本实现
这个方案也只需要一张图片。
这是笔者推荐的做法,也是本文的重点讨论对象。
这个方案相对于前两个方案有着明显的通用性和灵活性。但是弊端是需要占用一定算力资源。
我这里采用的写法有点像Update计时器,还不太了解的朋友可以移步Unity计时的实现,其中的第一种计时方式就是Update计时器。
现在这是开始写这个工具脚本:
首先给组件加上RequireComponent特性确保健壮性
[RequireComponent(typeof(Image))]
- 1
缓存Image组件的对象
	private Image image;
	private void OnEnable()
	{
    	image = GetComponent<Image>();
	}
- 1
- 2
- 3
- 4
- 5
将透明度的边界和变化速度暴露到Inspector面板,并定义一个变量来记录变化方向
	//Range特性指定参数在Inspector中的变化范围
	//Unity中用描述色值用的是RGB 0-1.0
	//所有色彩通道0为完全不具有1为完全具有
	//所以在这里0是全透明,1是全不透明
	[Range(0,1)]
	public float rangeLeft;
	[Range(0,1)]
	public float rangeRight;
	public float speed = 1;
	private int direction = 1;
- 1
- 2
- 3
- 4
- 5
- 6
- 7
- 8
- 9
- 10
现在是核心代码,在Update里逐帧更新组件
	private void Update()
    {
    	//先区别两个边界的大小
        float small;
        float big;
        if (rangeLeft > rangeRight)
        {
            big=rangeLeft;
            small=rangeRight;
        }
        else
        {
            big=rangeRight;
            small=rangeLeft;
        }
        //这一帧透明度应该变化多少
        float pre=speed*direction*Time.deltaTime;
        //本帧的透明度应变为多少
        float target = image.color.a + pre;
        //方向大于0即向更大的边界变化时
        //大于大边界为越界
        if (direction > 0)
        {
        	//如果越界了
            if (target > big)
            {
            	//将应为的透明度设为边界以避免越界
                target= big;
                //逆转方向,从下一帧开始朝另一个边界靠近
                direction *= -1;
            }
        }
        //方向小于0
        //小于小边界为越界
        else
        {
        	//如果越界了则同上
            if(target < small)
            {
                target= small;
                direction *= -1;
            }
        }
        //获取image原来的颜色
        Color oColor= image.color;
        //除了Alpha通道外其他通道的值要保留原样
        //target是上面计算出的应变为的透明度
        image.color = new(oColor.r, oColor.g, oColor.b, target);
    }
- 1
- 2
- 3
- 4
- 5
- 6
- 7
- 8
- 9
- 10
- 11
- 12
- 13
- 14
- 15
- 16
- 17
- 18
- 19
- 20
- 21
- 22
- 23
- 24
- 25
- 26
- 27
- 28
- 29
- 30
- 31
- 32
- 33
- 34
- 35
- 36
- 37
- 38
- 39
- 40
- 41
- 42
- 43
- 44
- 45
- 46
- 47
- 48
- 49
完整版
using UnityEngine;
using UnityEngine.UI;

[RequireComponent(typeof(Image))]
public class Twiklable : MonoBehaviour
{
    private Image image;
    [Range(0,1)]
    public float rangeLeft;
    [Range(0,1)]
    public float rangeRight;
    public float speed = 1;
    public float delay = 0;
    private int direction = 1;
    private void OnEnable()
    {
        image = GetComponent<Image>();
    }
    private void Update()
    {
        float small;
        float big;
        if (rangeLeft > rangeRight)
        {
            big=rangeLeft;
            small=rangeRight;
        }
        else
        {
            big=rangeRight;
            small=rangeLeft;
        }
        float pre=speed*direction*Time.deltaTime;
        float target = image.color.a + pre;
        if (direction > 0)
        {
            if (target > big)
            {
                target= big;
                direction *= -1;
            }
        }
        else
        {
            if(target < small)
            {
                target= small;
                direction *= -1;
            }
        }
        Color oColor= image.color;
        image.color = new(oColor.r, oColor.g, oColor.b, target);
    }
}
- 1
- 2
- 3
- 4
- 5
- 6
- 7
- 8
- 9
- 10
- 11
- 12
- 13
- 14
- 15
- 16
- 17
- 18
- 19
- 20
- 21
- 22
- 23
- 24
- 25
- 26
- 27
- 28
- 29
- 30
- 31
- 32
- 33
- 34
- 35
- 36
- 37
- 38
- 39
- 40
- 41
- 42
- 43
- 44
- 45
- 46
- 47
- 48
- 49
- 50
- 51
- 52
- 53
- 54
- 55
本人初来乍到,许多不足之处,欢迎大家斧正。
声明:本文内容由网友自发贡献,不代表【wpsshop博客】立场,版权归原作者所有,本站不承担相应法律责任。如您发现有侵权的内容,请联系我们。转载请注明出处:https://www.wpsshop.cn/w/Cpp五条/article/detail/110117
推荐阅读
相关标签


