- 1大地测量观测数据可视化MATLAB工具箱:(1)时间序列、统计数据可视化_visbundle
- 2ubuntu如何限制系统日志大小?
- 3UINO优锘科技助力银行业开启智慧运维,踏入智慧金融时代_优锘 故障运营
- 4SpringBoot启动流程源码分析二、SpringApplication准备阶段_设定managementfactory.getruntimemxbean().name 配置
- 5JAVA同城服务台球助教台球教练系统源码的实现流程
- 6文本生成图像新SOTA!RealCompo:逼真和构图的动态平衡(清北最新)_realcompo: dynamic equilibrium between realism and
- 7深入理解Spring Boot Controller层的作用与搭建过程_spring boot controller 处理流程
- 8PyTorch指标计算库TorchMetrics详解_pytorchlighning torchmetrics f1
- 9基础课5——垂直领域对话系统架构_垂直领域问答对话实现方法
- 10NLP-文本蕴含(文本匹配):概述【单塔模型、双塔模型】_文本蕴含任务
WIFI|软体 茶凳浅谈 高通WIN QSDK - IPQ6000 与 88Q2112 的相遇
赞
踩
Qualcomm IPQ 系列的Ethernet IC 搭配的有 QCA8075, QCA8081 … 等等Qualcomm自家出产的芯片。QSDK中内建可以支持的3rd party芯片,却寥寥可数。日前,客户使用车载以太网 - 88Q2112 - Marvell与IPQ6000做搭配。将之记录下来,以供参考。
方块图:
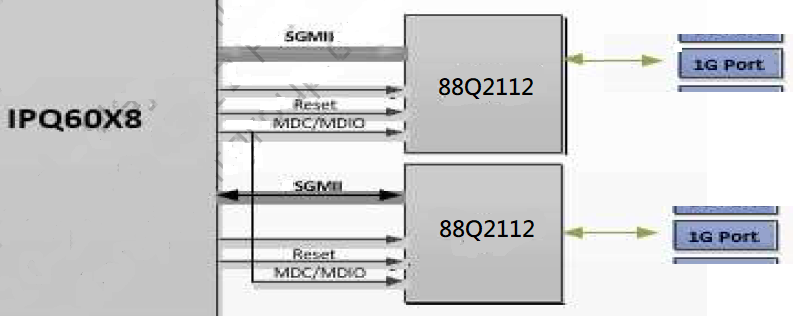
把原本reference board上的QCA8075、QCA8081都换成Marvell的88Q2112。传输界面走的protocol也由SGMII+ 、 PSGMII换成SGMII。
IPQ60x8与88Q2112之间有两个界面,一个是MDC/MDIO的控制界面,一个是GMII的资料传输界面。
使用user guide提到的方式,修改DTS
MII node :
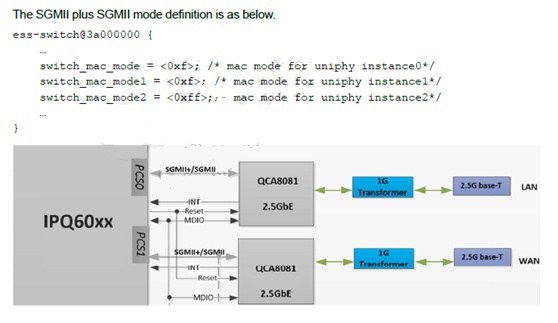
所以在本质上应该使用cp02的DTS来做修改。
MDIO node:
改用gpio16来做reset phy的脚位。tlmm的gpio改为gpio16
| mdio_pins: mdio_pinmux { …… mux_2 { pins = "gpio16"; function = "gpio"; bias-pull-up; }; }; |
mdio中使用&tlmm 再次指定phy-reset-gpio
| mdio: mdio@90000 { pinctrl-0 = <&mdio_pins>; pinctrl-names = "default"; phy-reset-gpio = <&tlmm 16 0>; …… |
后面应该照着原来的设定。因为88Q2112要用Clause 45,所以每个port都要加上compatible="ethernet-phy-ieee802.3-c45"
而那个reg参数 分别对应到 QCA8081的PHYAD[4..2]。


| mdio: mdio@90000 { pinctrl-0 = <&mdio_pins>; pinctrl-names = "default"; phy-reset-gpio = <&tlmm 16 0>; status = "ok"; phy0: ethernet-phy@0 { reg = <0x10>; compatible=”ethernet-phy-ieee802.3-c45” }; phy1: ethernet-phy@1 { reg = <0x14>; compatible=”ethernet-phy-ieee802.3-c45” }; }; |
这里要注意的是 88Q2112 只有定义 PHYAD[2..0],PHYAD[4..3]要填甚么值需要确认下。当然这个值还是要参考88Q2112的电路bootconf的设定。
ess-switch 应该跟cp02一样。注意一下phyaddress的设定,以及加上ethernet-phy-ieee802.3-c45;
| ess-switch@3a000000 { switch_cpu_bmp = <0x1>; /* cpu port bitmap */ switch_lan_bmp = <0x10>; /* lan port bitmap */ switch_wan_bmp = <0x20>; /* wan port bitmap */ switch_inner_bmp = <0xc0>; /*inner port bitmap*/ switch_mac_mode = <0xf>; /* mac mode for uniphy instance0*/switch_mac_mode1 = <0xf>; /* mac mode for uniphy instance1*/ switch_mac_mode2 = <0xff>; /* mac mode for uniphy instance2*/ qcom,port_phyinfo { port@4 { port_id = <4>; phy_address = <0x10>; port_mac_sel = "QGMAC_PORT"; ethernet-phy-ieee802.3-c45; }; port@5 { port_id = <5>; phy_address = <0x14>; port_mac_sel = "QGMAC_PORT"; ethernet-phy-ieee802.3-c45; }; }; }; |
照理说现在应该可以利用MDIO读取88Q2112的PHYID。 然后就要看看ssdk中是否有support这个PHY。让Ethernet Driver可以正常的启动。
在qsdk/qca/src/qca-ssdk/include/hsl/phy/hsl_phy.h 加个phy id define
| /*qca808x_start*/ #define QCA8081_PHY_V1_1 0x004DD101 +#define 88Q2112_PHY 0x002b0983 #define INVALID_PHY_ID 0xFFFFFFFF |
在qsdk/qca/src/qca-ssdk/src/hsl/phy/hsl_phy.c 里面 借用QCA8081的driver来用。这样就不用全部重写。
| /*qca808x_start*/ case QCA8081_PHY_V1_1: + case 88Q2112_PHY: phytype = QCA808X_PHY_CHIP; break; |
之后循着 qca-ssdk/src/hsl/phy/qca808x.c, qca808x_phy.c 去debug。
mdio 觉得都无法正常的使用;
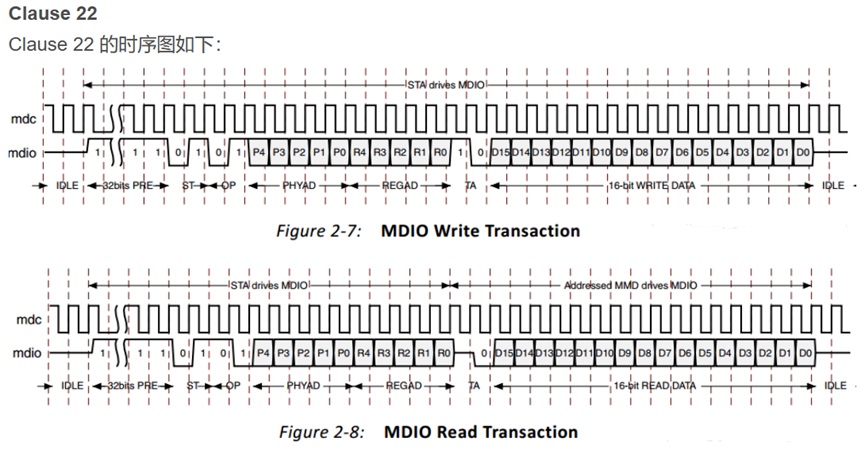
ssdk一开始会使用mvl88q_phy_reg_read 这个function。可是marvell的phy不支持Clause22的格式,这个呼叫就会失败。进而导致异常。所以这里要直接回应return PHY_INVALID_DATA;给ssdk,让他不要再使用这个command。
在qca808x_phy.c中有qca808x_phy_reg_read/write, 以及qca808x_phy_mmd_read/write之分,xxx_phy_mmd_read/write 走的就是Clause45的方式来存取phy上的register。
我们在使用mvl88q的时候,就都要改成使用xxx_phy_mmd_read/write的方式。在DTS中加ethernet-phy-ieee802.3-c45;这个参数,无法全面地改用Clause45的方式来存取phy。只会影响部分的api。
尤其是注册给kernel的ops function。其他模组在调用api的时候,传进来的参数并没有附带c45的flag。 现在明确的分开成两个api。可以确认,在DUT上可以透过mdio正确的access marvell 88q2112的register了。
因为无法全面使用CAUSE45的方式来存取phy,重新参考aquantia_phy.c 来实作marvell 88Q2112的driver,把最底层读写phy reg的函式,套用成 Clause45的格式。
| static sw_error_t marvell_phy_reg_read(a_uint32_t dev_id, a_uint32_t phy_id, a_uint32_t reg_mmd, a_uint32_t reg_id, a_uint16_t *phy_data) { sw_error_t rv; SSDK_INFO("+++++++++++++++++++++++++++++++++++\n"); reg_id = MARVELL_REG_ADDRESS(reg_mmd, reg_id); HSL_PHY_GET(rv, dev_id, phy_id, reg_id, phy_data); SSDK_INFO("+---------------------------------+\n"); return rv; } |
这样就可以正常的存取Phy了。可见88Q2112 对PHYAD[4..3]是一种Don’t care的状态。
实际碰到的问题:
在T1 上量测到的波型,像是digital 的讯号。很奇怪。
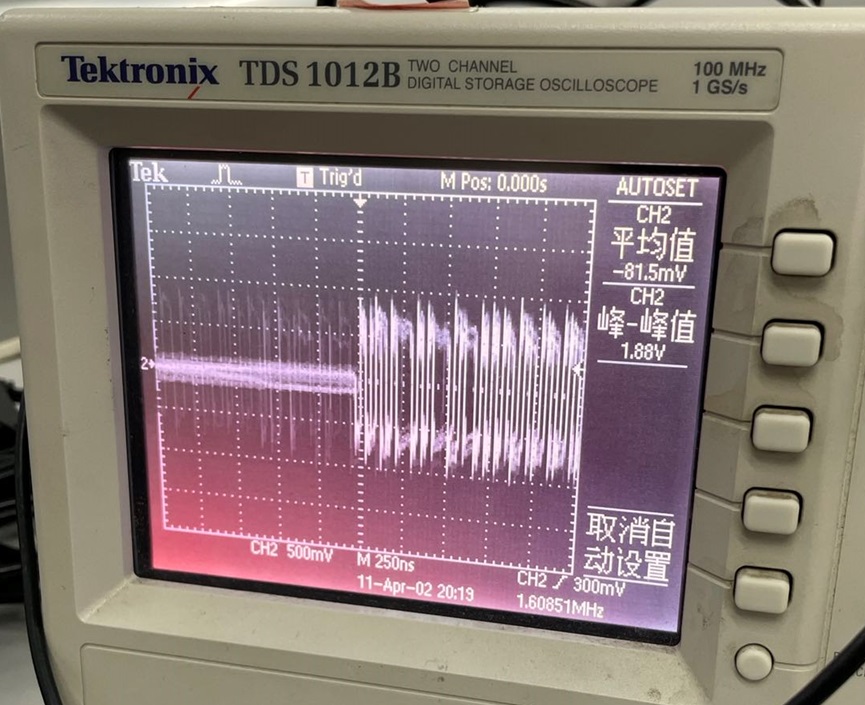
客人的线路图中,C110,C113 与C157,C154 使用的数值应该是4700pF。用470pF反而把讯号给滤掉了。把电容换掉,波型就正常,auto nego就正常了。

接着,就一个萝卜一个坑的把marvell_phy_api_ops_init 中所指定的call back function 给填写好就行了。
| static int marvell_phy_api_ops_init(void) { int ret; hsl_phy_ops_t *marvell_phy_api_ops = NULL; SSDK_INFO("\n"); SSDK_INFO("+++++++++++++++++++++++++++++++++++\n"); marvell_phy_api_ops = kzalloc(sizeof(hsl_phy_ops_t), GFP_KERNEL); if (marvell_phy_api_ops == NULL) { SSDK_ERROR("marvell phy ops kzalloc failed!\n"); return -ENOMEM; } phy_api_ops_init(MARVELL_PHY_CHIP); marvell_phy_api_ops->phy_speed_get = marvell_phy_get_speed; marvell_phy_api_ops->phy_speed_set = marvell_phy_set_speed; marvell_phy_api_ops->phy_duplex_get = marvell_phy_get_duplex; marvell_phy_api_ops->phy_duplex_set = marvell_phy_set_duplex; marvell_phy_api_ops->phy_autoneg_enable_set = marvell_phy_enable_autoneg; marvell_phy_api_ops->phy_restart_autoneg = marvell_phy_restart_autoneg; marvell_phy_api_ops->phy_autoneg_status_get = marvell_phy_autoneg_status; marvell_phy_api_ops->phy_autoneg_adv_set = marvell_phy_set_autoneg_adv; marvell_phy_api_ops->phy_autoneg_adv_get = marvell_phy_get_autoneg_adv; … |
透过QSDK中的ssdk framework,只要follow phy driver的模板把 marvel phy 的api都实作起来。就可以轻松地将3’rd party 芯片给porting上了。
参考:
aquantia_phy.c
qca808x_phy.c
linux-4.4\Documentation\devicetree
88Q2110_88Q2112 Datasheet
Marvell New SMI Register Access GUI User Guide
IPQ401x/IPQ806x/IPQ807x NSS Networking Debug User Guide
SOHO Switch Software Development Kit Reference Manual
Q&A:
1. 我想换用其他厂牌的Switch IC,高通会帮忙porting吗?
Ans: 不会,请参考SOHO Switch Software Development Kit Reference Manual自行porting。
2. Porting 3’rd party 的Switch/Phy IC 碰到问题,该如何获得协助?
Ans: 高通本身有完整的产品Switch/Phy IC,基本上不支持porting第三方的IC。Porting 3rd party的switch/phy IC 要靠自己,建议使用高通产品。诠鼎的优质客户可直接联系我们PM。
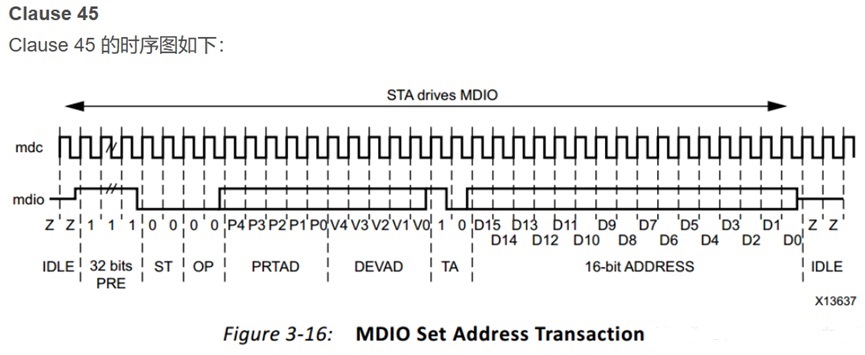
3. 甚么是Clause45?


4. 甚么是Clause 22?
5. 挂载多的Switch, MDIO界面不够用怎么办?
Ans: MDIO界面可以支持并联多个Switch的。只要区分好Phy Address就可以。如果真没办法,可以使用I2C去模拟送出Clause22以及Clause45的指令,读写Switch内的设定。


