- 1Language Modeling with Gated Convolutional Networks ( GLU )理解_glu模型
- 2Three.js一起学-对比WebGL和Three.js的渲染流程_web 渲染3d模型
- 3CentOS安装 ping 命令_centos 安装ping命令
- 4Linux查看用户信息的几种方法_linux 查看用户
- 5FANUC机器人某个轴编码器损坏时进行单轴零点标定的具体方法
- 6Matlab——快速查找素数(0-50)_matlab素数
- 7Harmony的状态管理@State数据更新后不刷新的问题_鸿蒙setinterval 不能实时刷新页面
- 8Transformers in Single Object Tracking An Experimental Survey(目标跟踪最新综述CVPR2023)学习笔记_transformers in single object tracking: an experim
- 9Django中websocket的实现_djiango 实现websocket
- 10重磅!英伟达官宣全球最强AI芯片:性能提升 30 倍,并将重新设计整个底层软件堆栈
动手实战 | 使用 Transformers 包进行概率时间序列预测_transformer时间序列预测
赞
踩
最近使用深度学习进行时间序列预测而不是经典方法涌现出诸多创新。本文将为大家演示一个基于 HuggingFace Transformers 包构建的概率时间序列预测的案例。
概率预测
通常,经典方法针对数据集中的每个时间序列单独拟合。然而,当处理大量时间序列时,在所有可用时间序列上训练一个“全局”模型是有益的,这使模型能够从许多不同的来源学习潜在的表示。
深度学习非常适合训练 全局概率模型,而不是训练局部点预测模型,因为神经网络可以从几个相关的时间序列中学习表示,并对数据的不确定性进行建模。
在概率设定中学习某些选定参数分布的未来参数很常见,例如高斯分布或 Student-T,或者学习条件分位数函数,或使用适应时间序列设置的共型预测框架。通过采用经验均值或中值,人们总是可以将概率模型转变为点预测模型。
时间序列Transformer
这篇博文中,我们将利用传统 vanilla Transformer 进行单变量概率预测任务 (即预测每个时间序列的一维分布)。由于 Encoder-Decoder Transformer 很好地封装了几个归纳偏差,所以它成为了我们预测的自然选择。
首先,使用 Encoder-Decoder 架构在推理时很有帮助。通常对于一些记录的数据,我们希望提前预知未来的一些预测步骤。我们可以在给定某种分布类型的情况下,从中抽样以提供预测,直到我们期望的预测范围。这被称为贪婪采样 (Greedy Sampling)/搜索。
其次,Transformer 帮助我们训练可能包含成千上万个时间点的时间序列数据。由于时间和内存限制,一次性将所有时间序列的完整历史输入模型或许不太可行。因此,在为随机梯度下降构建批次时,可以考虑适当的上下文窗口大小,并从训练数据中对该窗口和后续预测长度大小的窗口进行采样。可以将调整过大小的上下文窗口传递给编码器、预测窗口传递给 ausal-masked 解码器。
Transformers 相对于其他架构的另一个好处是,我们可以将缺失值作为编码器或解码器的额外掩蔽值,并且仍然可以在不诉诸于填充或插补的情况下进行训练。
技术交流
技术要学会分享、交流,不建议闭门造车。一个人可以走的很快、一堆人可以走的更远。
本文由粉丝群小伙伴的分享、总结。文章源码、数据、技术交流提升,均可加交流群获取,群友已超过2000人,添加时最好的备注方式为:来源+兴趣方向,方便找到志同道合的朋友。
方式①、添加微信号:dkl88194,备注:来自CSDN + 加群
方式②、微信搜索公众号:Python学习与数据挖掘,后台回复:加群
01设置环境
首先,让我们安装必要的库: Transformers、Datasets、Evaluate、Accelerate 和 GluonTS。
正如我们将展示的那样,GluonTS 将用于转换数据以创建特征以及创建适当的训练、验证和测试批次。
!pip install -q transformers
!pip install -q datasets
!pip install -q evaluate
!pip install -q accelerate
!pip install -q gluonts ujson
- 1
- 2
- 3
- 4
- 5
02 加载数据集
在这篇博文中,我们将使用 Hugging Face Hub 上提供的 tourism_monthly 数据集。该数据集包含澳大利亚 366 个地区的每月旅游流量。
此数据集是 Monash Time Series Forecasting 存储库的一部分,该存储库收纳了是来自多个领域的时间序列数据集。它可以看作是时间序列预测的 GLUE 基准。
from datasets import load_dataset
dataset = load_dataset("monash_tsf", "tourism_monthly")
- 1
- 2
可以看出,数据集包含 3 个片段: 训练、验证和测试。
dataset
DatasetDict({
        train: Dataset({
            features: ['start', 'target', 'feat_static_cat', 'feat_dynamic_real', 'item_id'],
            num_rows: 366
        })
        test: Dataset({
            features: ['start', 'target', 'feat_static_cat', 'feat_dynamic_real', 'item_id'],
            num_rows: 366
        })
        validation: Dataset({
            features: ['start', 'target', 'feat_static_cat', 'feat_dynamic_real', 'item_id'],
            num_rows: 366
        })
    })
- 1
- 2
- 3
- 4
- 5
- 6
- 7
- 8
- 9
- 10
- 11
- 12
- 13
- 14
- 15
每个示例都包含一些键,其中 start 和 target 是最重要的键。让我们看一下数据集中的第一个时间序列:
train_example = dataset['train'][0]
train_example.keys()

dict_keys(['start', 'target', 'feat_static_cat', 'feat_dynamic_real', 'item_id'])
- 1
- 2
- 3
- 4
start 仅指示时间序列的开始 (类型为 datetime) ,而 target 包含时间序列的实际值。
start 将有助于将时间相关的特征添加到时间序列值中,作为模型的额外输入 (例如“一年中的月份”) 。因为我们已经知道数据的频率是 每月,所以也能推算第二个值的时间戳为 1979-02-01,等等。
print(train_example['start'])
print(train_example['target'])
1979-01-01 00:00:00
    [1149.8699951171875, 1053.8001708984375, ..., 5772.876953125]
- 1
- 2
- 3
- 4
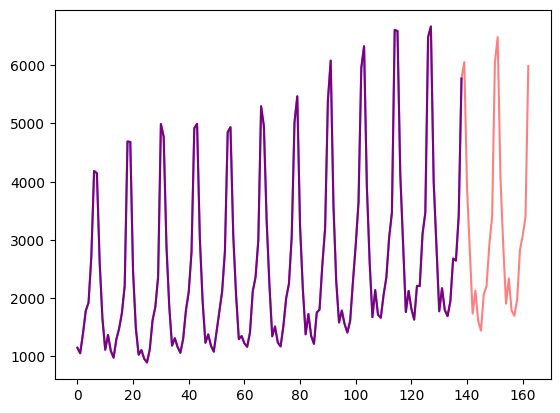
验证集包含与训练集相同的数据,只是数据时间范围延长了 prediction_length 那么多。这使我们能够根据真实情况验证模型的预测。
与验证集相比,测试集还是比验证集多包含 prediction_length 时间的数据 (或者使用比训练集多出数个 prediction_length 时长数据的测试集,实现在多重滚动窗口上的测试任务)。
validation_example = dataset['validation'][0]
validation_example.keys()

dict_keys(['start', 'target', 'feat_static_cat', 'feat_dynamic_real', 'item_id'])
- 1
- 2
- 3
- 4
验证的初始值与相应的训练示例完全相同:
print(validation_example['start'])
print(validation_example['target'])

1979-01-01 00:00:00
    [1149.8699951171875, 1053.8001708984375, ..., 5985.830078125]
- 1
- 2
- 3
- 4
- 5
但是,与训练示例相比,此示例具有 prediction_length=24 个额外的数据。让我们验证一下。
freq = "1M"
prediction_length = 24

assert len(train_example["target"]) + prediction_length == len(
    validation_example["target"]
)
- 1
- 2
- 3
- 4
- 5
- 6
让我们可视化一下:
import matplotlib.pyplot as plt

figure, axes = plt.subplots()
axes.plot(train_example["target"], color="blue")
axes.plot(validation_example["target"], color="red", alpha=0.5)

plt.show()
- 1
- 2
- 3
- 4
- 5
- 6
- 7

03 将 start 更新为 pd.Period
我们要做的第一件事是根据数据的 freq 值将每个时间序列的 start 特征转换为 pandas 的 Period 索引:
from functools import lru_cache

import pandas as pd
import numpy as np

@lru_cache(10_000)
def convert_to_pandas_period(date, freq):
    return pd.Period(date, freq)

def transform_start_field(batch, freq):
    batch["start"] = [convert_to_pandas_period(date, freq) for date in batch["start"]]
    return batch
- 1
- 2
- 3
- 4
- 5
- 6
- 7
- 8
- 9
- 10
- 11
- 12
这里我们使用 datasets 的 set_transform 来实现:
from functools import partial

train_dataset.set_transform(partial(transform_start_field, freq=freq))
test_dataset.set_transform(partial(transform_start_field, freq=freq))
- 1
- 2
- 3
- 4
定义模型
接下来,让我们实例化一个模型。该模型将从头开始训练,因此我们不使用 from_pretrained 方法,而是从 config 中随机初始化模型。
我们为模型指定了几个附加参数:
-
prediction_length (在我们的例子中是 24 个月) : 这是 Transformer 的解码器将学习预测的范围;
-
context_length: 如果未指定 context_length,模型会将 context_length (编码器的输入) 设置为等于 prediction_length;
-
给定频率的 lags(滞后): 这将决定模型“回头看”的程度,也会作为附加特征。例如对于 Daily 频率,我们可能会考虑回顾 [1, 2, 7, 30, …],也就是回顾 1、2……天的数据,而对于 Minute数据,我们可能会考虑 [1, 30, 60, 60*24, …] 等;
-
时间特征的数量: 在我们的例子中设置为 2,因为我们将添加 MonthOfYear 和 Age 特征;
-
静态类别型特征的数量: 在我们的例子中,这将只是 1,因为我们将添加一个“时间序列 ID”特征;
-
基数: 将每个静态类别型特征的值的数量构成一个列表,对于本例来说将是 [366],因为我们有 366 个不同的时间序列;
-
嵌入维度: 每个静态类别型特征的嵌入维度,也是构成列表。例如 [3] 意味着模型将为每个 366 时间序列 (区域) 学习大小为 3 的嵌入向量。
让我们使用 GluonTS 为给定频率 (“每月”) 提供的默认滞后值:
from gluonts.time_feature import get_lags_for_frequency

lags_sequence = get_lags_for_frequency(freq)
print(lags_sequence)

>>> [1, 2, 3, 4, 5, 6, 7, 11, 12, 13, 23, 24, 25, 35, 36, 37]
- 1
- 2
- 3
- 4
- 5
- 6
这意味着我们每个时间步将回顾长达 37 个月的数据,作为附加特征。我们还检查 GluonTS 为我们提供的默认时间特征:
from gluonts.time_feature import time_features_from_frequency_str

time_features = time_features_from_frequency_str(freq)
print(time_features)

>>> [<function month_of_year at 0x7fa496d0ca70>]
- 1
- 2
- 3
- 4
- 5
- 6
在这种情况下,只有一个特征,即“一年中的月份”。这意味着对于每个时间步长,我们将添加月份作为标量值 (例如,如果时间戳为 “january”,则为 1;如果时间戳为 “february”,则为 2,等等) 。
我们现在准备好定义模型需要的所有内容了:
from transformers import TimeSeriesTransformerConfig, TimeSeriesTransformerForPrediction

config = TimeSeriesTransformerConfig(
    prediction_length=prediction_length,
    # context length:
    context_length=prediction_length * 2,
    # lags coming from helper given the freq:
    lags_sequence=lags_sequence,
    # we'll add 2 time features ("month of year" and "age", see further):
    num_time_features=len(time_features) + 1,
    # we have a single static categorical feature, namely time series ID:
    num_static_categorical_features=1,
    # it has 366 possible values:
    cardinality=[len(train_dataset)],
    # the model will learn an embedding of size 2 for each of the 366 possible values:
    embedding_dimension=[2],

    # transformer params:
    encoder_layers=4,
    decoder_layers=4,
    d_model=32,
)

model = TimeSeriesTransformerForPrediction(config)
- 1
- 2
- 3
- 4
- 5
- 6
- 7
- 8
- 9
- 10
- 11
- 12
- 13
- 14
- 15
- 16
- 17
- 18
- 19
- 20
- 21
- 22
- 23
- 24
请注意,与 Transformers 库中的其他模型类似,TimeSeriesTransformerModel 对应于没有任何顶部前置头的编码器-解码器 Transformer,而 TimeSeriesTransformerForPrediction 对应于顶部有一个分布前置头 (distribution head) 的 TimeSeriesTransformerForPrediction。默认情况下,该模型使用 Student-t 分布 (也可以自行配置):
model.config.distribution_output

>>> student_t
- 1
- 2
- 3
这是具体实现层面与用于 NLP 的 Transformers 的一个重要区别,其中头部通常由一个固定的分类分布组成,实现为 nn.Linear 层。
定义转换
接下来,我们定义数据的转换,尤其是需要基于样本数据集或通用数据集来创建其中的时间特征。
同样,我们用到了 GluonTS 库。这里定义了一个 Chain (有点类似于图像训练的 torchvision.transforms.Compose) 。它允许我们将多个转换组合到一个流水线中。
from gluonts.time_feature import (
    time_features_from_frequency_str,
    TimeFeature,
    get_lags_for_frequency,
)
from gluonts.dataset.field_names import FieldName
from gluonts.transform import (
    AddAgeFeature,
    AddObservedValuesIndicator,
    AddTimeFeatures,
    AsNumpyArray,
    Chain,
    ExpectedNumInstanceSampler,
    InstanceSplitter,
    RemoveFields,
    SelectFields,
    SetField,
    TestSplitSampler,
    Transformation,
    ValidationSplitSampler,
    VstackFeatures,
    RenameFields,
)
- 1
- 2
- 3
- 4
- 5
- 6
- 7
- 8
- 9
- 10
- 11
- 12
- 13
- 14
- 15
- 16
- 17
- 18
- 19
- 20
- 21
- 22
- 23
下面的转换代码带有注释供大家查看具体的操作步骤。从全局来说,我们将迭代数据集的各个时间序列并添加、删除某些字段或特征:
from transformers import PretrainedConfig

def create_transformation(freq: str, config: PretrainedConfig) -> Transformation:
    remove_field_names = []
    if config.num_static_real_features == 0:
        remove_field_names.append(FieldName.FEAT_STATIC_REAL)
    if config.num_dynamic_real_features == 0:
        remove_field_names.append(FieldName.FEAT_DYNAMIC_REAL)
    if config.num_static_categorical_features == 0:
        remove_field_names.append(FieldName.FEAT_STATIC_CAT)

    # a bit like torchvision.transforms.Compose
    return Chain(
        # step 1: remove static/dynamic fields if not specified
        [RemoveFields(field_names=remove_field_names)]
        # step 2: convert the data to NumPy (potentially not needed)
        + (
            [
                AsNumpyArray(
                    field=FieldName.FEAT_STATIC_CAT,
                    expected_ndim=1,
                    dtype=int,
                )
            ]
            if config.num_static_categorical_features > 0
            else []
        )
        + (
            [
                AsNumpyArray(
                    field=FieldName.FEAT_STATIC_REAL,
                    expected_ndim=1,
                )
            ]
            if config.num_static_real_features > 0
            else []
        )
        + [
            AsNumpyArray(
                field=FieldName.TARGET,
                # we expect an extra dim for the multivariate case:
                expected_ndim=1 if config.input_size == 1 else 2,
            ),
            # step 3: handle the NaN's by filling in the target with zero
            # and return the mask (which is in the observed values)
            # true for observed values, false for nan's
            # the decoder uses this mask (no loss is incurred for unobserved values)
            # see loss_weights inside the xxxForPrediction model
            AddObservedValuesIndicator(
                target_field=FieldName.TARGET,
                output_field=FieldName.OBSERVED_VALUES,
            ),
            # step 4: add temporal features based on freq of the dataset
            # month of year in the case when freq="M"
            # these serve as positional encodings
            AddTimeFeatures(
                start_field=FieldName.START,
                target_field=FieldName.TARGET,
                output_field=FieldName.FEAT_TIME,
                time_features=time_features_from_frequency_str(freq),
                pred_length=config.prediction_length,
            ),
            # step 5: add another temporal feature (just a single number)
            # tells the model where in its life the value of the time series is,
            # sort of a running counter
            AddAgeFeature(
                target_field=FieldName.TARGET,
                output_field=FieldName.FEAT_AGE,
                pred_length=config.prediction_length,
                log_scale=True,
            ),
            # step 6: vertically stack all the temporal features into the key FEAT_TIME
            VstackFeatures(
                output_field=FieldName.FEAT_TIME,
                input_fields=[FieldName.FEAT_TIME, FieldName.FEAT_AGE]
                + (
                    [FieldName.FEAT_DYNAMIC_REAL]
                    if config.num_dynamic_real_features > 0
                    else []
                ),
            ),
            # step 7: rename to match HuggingFace names
            RenameFields(
                mapping={
                    FieldName.FEAT_STATIC_CAT: "static_categorical_features",
                    FieldName.FEAT_STATIC_REAL: "static_real_features",
                    FieldName.FEAT_TIME: "time_features",
                    FieldName.TARGET: "values",
                    FieldName.OBSERVED_VALUES: "observed_mask",
                }
            ),
        ]
    )
- 1
- 2
- 3
- 4
- 5
- 6
- 7
- 8
- 9
- 10
- 11
- 12
- 13
- 14
- 15
- 16
- 17
- 18
- 19
- 20
- 21
- 22
- 23
- 24
- 25
- 26
- 27
- 28
- 29
- 30
- 31
- 32
- 33
- 34
- 35
- 36
- 37
- 38
- 39
- 40
- 41
- 42
- 43
- 44
- 45
- 46
- 47
- 48
- 49
- 50
- 51
- 52
- 53
- 54
- 55
- 56
- 57
- 58
- 59
- 60
- 61
- 62
- 63
- 64
- 65
- 66
- 67
- 68
- 69
- 70
- 71
- 72
- 73
- 74
- 75
- 76
- 77
- 78
- 79
- 80
- 81
- 82
- 83
- 84
- 85
- 86
- 87
- 88
- 89
- 90
- 91
- 92
- 93
InstanceSplitter
对于训练、验证、测试步骤,接下来我们创建一个 InstanceSplitter,用于从数据集中对窗口进行采样 (因为由于时间和内存限制,我们无法将整个历史值传递给 Transformer)。
实例拆分器从数据中随机采样大小为 context_length 和后续大小为 prediction_length 的窗口,并将 past_ 或 future_ 键附加到各个窗口的任何临时键。这确保了 values 被拆分为 past_values 和后续的 future_values 键,它们将分别用作编码器和解码器的输入。同样我们还需要修改 time_series_fields 参数中的所有键:
from gluonts.transform.sampler import InstanceSampler
from typing import Optional

def create_instance_splitter(
    config: PretrainedConfig,
    mode: str,
    train_sampler: Optional[InstanceSampler] = None,
    validation_sampler: Optional[InstanceSampler] = None,
) -> Transformation:
    assert mode in ["train", "validation", "test"]

    instance_sampler = {
        "train": train_sampler
        or ExpectedNumInstanceSampler(
            num_instances=1.0, min_future=config.prediction_length
        ),
        "validation": validation_sampler
        or ValidationSplitSampler(min_future=config.prediction_length),
        "test": TestSplitSampler(),
    }[mode]

    return InstanceSplitter(
        target_field="values",
        is_pad_field=FieldName.IS_PAD,
        start_field=FieldName.START,
        forecast_start_field=FieldName.FORECAST_START,
        instance_sampler=instance_sampler,
        past_length=config.context_length + max(config.lags_sequence),
        future_length=config.prediction_length,
        time_series_fields=["time_features", "observed_mask"],
    )
- 1
- 2
- 3
- 4
- 5
- 6
- 7
- 8
- 9
- 10
- 11
- 12
- 13
- 14
- 15
- 16
- 17
- 18
- 19
- 20
- 21
- 22
- 23
- 24
- 25
- 26
- 27
- 28
- 29
- 30
- 31
创建 DataLoader
有了数据,下一步需要创建 PyTorch DataLoaders。它允许我们批量处理成对的 (输入, 输出) 数据,即 (past_values, future_values)。
from typing import Iterable

import torch
from gluonts.itertools import Cached, Cyclic
from gluonts.dataset.loader import as_stacked_batches


def create_train_dataloader(
    config: PretrainedConfig,
    freq,
    data,
    batch_size: int,
    num_batches_per_epoch: int,
    shuffle_buffer_length: Optional[int] = None,
    cache_data: bool = True,
    **kwargs,
) -> Iterable:
    PREDICTION_INPUT_NAMES = [
        "past_time_features",
        "past_values",
        "past_observed_mask",
        "future_time_features",
    ]
    if config.num_static_categorical_features > 0:
        PREDICTION_INPUT_NAMES.append("static_categorical_features")

    if config.num_static_real_features > 0:
        PREDICTION_INPUT_NAMES.append("static_real_features")

    TRAINING_INPUT_NAMES = PREDICTION_INPUT_NAMES + [
        "future_values",
        "future_observed_mask",
    ]

    transformation = create_transformation(freq, config)
    transformed_data = transformation.apply(data, is_train=True)
    if cache_data:
        transformed_data = Cached(transformed_data)

    # we initialize a Training instance
    instance_splitter = create_instance_splitter(config, "train")

    # the instance splitter will sample a window of
    # context length + lags + prediction length (from the 366 possible transformed time series)
    # randomly from within the target time series and return an iterator.
    stream = Cyclic(transformed_data).stream()
    training_instances = instance_splitter.apply(
        stream, is_train=True
    )

    return as_stacked_batches(
        training_instances,
        batch_size=batch_size,
        shuffle_buffer_length=shuffle_buffer_length,
        field_names=TRAINING_INPUT_NAMES,
        output_type=torch.tensor,
        num_batches_per_epoch=num_batches_per_epoch,
    )
- 1
- 2
- 3
- 4
- 5
- 6
- 7
- 8
- 9
- 10
- 11
- 12
- 13
- 14
- 15
- 16
- 17
- 18
- 19
- 20
- 21
- 22
- 23
- 24
- 25
- 26
- 27
- 28
- 29
- 30
- 31
- 32
- 33
- 34
- 35
- 36
- 37
- 38
- 39
- 40
- 41
- 42
- 43
- 44
- 45
- 46
- 47
- 48
- 49
- 50
- 51
- 52
- 53
- 54
- 55
- 56
- 57
- 58
def create_test_dataloader(
    config: PretrainedConfig,
    freq,
    data,
    batch_size: int,
    **kwargs,
):
    PREDICTION_INPUT_NAMES = [
        "past_time_features",
        "past_values",
        "past_observed_mask",
        "future_time_features",
    ]
    if config.num_static_categorical_features > 0:
        PREDICTION_INPUT_NAMES.append("static_categorical_features")

    if config.num_static_real_features > 0:
        PREDICTION_INPUT_NAMES.append("static_real_features")

    transformation = create_transformation(freq, config)
    transformed_data = transformation.apply(data, is_train=False)

    # we create a Test Instance splitter which will sample the very last
    # context window seen during training only for the encoder.
    instance_sampler = create_instance_splitter(config, "test")

    # we apply the transformations in test mode
    testing_instances = instance_sampler.apply(transformed_data, is_train=False)

    return as_stacked_batches(
        testing_instances,
        batch_size=batch_size,
        output_type=torch.tensor,
        field_names=PREDICTION_INPUT_NAMES,
    )
- 1
- 2
- 3
- 4
- 5
- 6
- 7
- 8
- 9
- 10
- 11
- 12
- 13
- 14
- 15
- 16
- 17
- 18
- 19
- 20
- 21
- 22
- 23
- 24
- 25
- 26
- 27
- 28
- 29
- 30
- 31
- 32
- 33
- 34
- 35
train_dataloader = create_train_dataloader(
    config=config,
    freq=freq,
    data=train_dataset,
    batch_size=256,
    num_batches_per_epoch=100,
)

test_dataloader = create_test_dataloader(
    config=config,
    freq=freq,
    data=test_dataset,
    batch_size=64,
)
- 1
- 2
- 3
- 4
- 5
- 6
- 7
- 8
- 9
- 10
- 11
- 12
- 13
- 14
让我们检查第一批:
batch = next(iter(train_dataloader))
for k, v in batch.items():
    print(k, v.shape, v.type())

>>> past_time_features torch.Size([256, 85, 2]) torch.FloatTensor
    past_values torch.Size([256, 85]) torch.FloatTensor
    past_observed_mask torch.Size([256, 85]) torch.FloatTensor
    future_time_features torch.Size([256, 24, 2]) torch.FloatTensor
    static_categorical_features torch.Size([256, 1]) torch.LongTensor
    future_values torch.Size([256, 24]) torch.FloatTensor
    future_observed_mask torch.Size([256, 24]) torch.FloatTensor
- 1
- 2
- 3
- 4
- 5
- 6
- 7
- 8
- 9
- 10
- 11
可以看出,我们没有将 input_ids 和 attention_mask 提供给编码器 (训练 NLP 模型时也是这种情况),而是提供 past_values,以及 past_observed_mask、past_time_features、static_categorical_features 和 static_real_features 几项数据。
解码器的输入包括 future_values、future_observed_mask 和 future_time_features。future_values 可以看作等同于 NLP 训练中的 decoder_input_ids。
前向传播
让我们对刚刚创建的批次执行一次前向传播:
# perform forward pass
outputs = model(
    past_values=batch["past_values"],
    past_time_features=batch["past_time_features"],
    past_observed_mask=batch["past_observed_mask"],
    static_categorical_features=batch["static_categorical_features"]
    if config.num_static_categorical_features > 0
    else None,
    static_real_features=batch["static_real_features"]
    if config.num_static_real_features > 0
    else None,
    future_values=batch["future_values"],
    future_time_features=batch["future_time_features"],
    future_observed_mask=batch["future_observed_mask"],
    output_hidden_states=True,
)
- 1
- 2
- 3
- 4
- 5
- 6
- 7
- 8
- 9
- 10
- 11
- 12
- 13
- 14
- 15
- 16
print("Loss:", outputs.loss.item())

>>> Loss: 9.069628715515137
- 1
- 2
- 3
目前,该模型返回了损失值。这是由于解码器会自动将 future_values 向右移动一个位置以获得标签。这允许计算预测结果和标签值之间的误差。
另请注意,解码器使用 Causal Mask 来避免预测未来,因为它需要预测的值在 future_values 张量中。
训练模型
是时候训练模型了!我们将使用标准的 PyTorch 训练循环。
这里我们用到了 Accelerate 库,它会自动将模型、优化器和数据加载器放置在适当的 device 上。
from accelerate import Accelerator
from torch.optim import AdamW

accelerator = Accelerator()
device = accelerator.device

model.to(device)
optimizer = AdamW(model.parameters(), lr=6e-4, betas=(0.9, 0.95), weight_decay=1e-1)

model, optimizer, train_dataloader = accelerator.prepare(
    model,
    optimizer,
    train_dataloader,
)

model.train()
for epoch in range(40):
    for idx, batch in enumerate(train_dataloader):
        optimizer.zero_grad()
        outputs = model(
            static_categorical_features=batch["static_categorical_features"].to(device)
            if config.num_static_categorical_features > 0
            else None,
            static_real_features=batch["static_real_features"].to(device)
            if config.num_static_real_features > 0
            else None,
            past_time_features=batch["past_time_features"].to(device),
            past_values=batch["past_values"].to(device),
            future_time_features=batch["future_time_features"].to(device),
            future_values=batch["future_values"].to(device),
            past_observed_mask=batch["past_observed_mask"].to(device),
            future_observed_mask=batch["future_observed_mask"].to(device),
        )
        loss = outputs.loss

        # Backpropagation
        accelerator.backward(loss)
        optimizer.step()

        if idx % 100 == 0:
            print(loss.item())
- 1
- 2
- 3
- 4
- 5
- 6
- 7
- 8
- 9
- 10
- 11
- 12
- 13
- 14
- 15
- 16
- 17
- 18
- 19
- 20
- 21
- 22
- 23
- 24
- 25
- 26
- 27
- 28
- 29
- 30
- 31
- 32
- 33
- 34
- 35
- 36
- 37
- 38
- 39
- 40
- 41
模型推理
在推理时,建议使用 generate() 方法进行自回归生成,类似于 NLP 模型。
预测的过程会从测试实例采样器中获得数据。采样器会将数据集的每个时间序列的最后 context_length 那么长时间的数据采样出来,然后输入模型。请注意,这里需要把提前已知的 future_time_features 传递给解码器。
该模型将从预测分布中自回归采样一定数量的值,并将它们传回解码器最终得到预测输出:
model.eval()

forecasts = []

for batch in test_dataloader:
    outputs = model.generate(
        static_categorical_features=batch["static_categorical_features"].to(device)
        if config.num_static_categorical_features > 0
        else None,
        static_real_features=batch["static_real_features"].to(device)
        if config.num_static_real_features > 0
        else None,
        past_time_features=batch["past_time_features"].to(device),
        past_values=batch["past_values"].to(device),
        future_time_features=batch["future_time_features"].to(device),
        past_observed_mask=batch["past_observed_mask"].to(device),
    )
    forecasts.append(outputs.sequences.cpu().numpy())
- 1
- 2
- 3
- 4
- 5
- 6
- 7
- 8
- 9
- 10
- 11
- 12
- 13
- 14
- 15
- 16
- 17
- 18
该模型输出一个表示结构的张量 (batch_size, number of samples, prediction length)。
下面的输出说明: 对于大小为 64 的批次中的每个示例,我们将获得接下来 24 个月内的 100 个可能的值:
forecasts[0].shape

>>> (64, 100, 24)
- 1
- 2
- 3
我们将垂直堆叠它们,以获得测试数据集中所有时间序列的预测:
forecasts = np.vstack(forecasts)
print(forecasts.shape)

>>> (366, 100, 24)
- 1
- 2
- 3
- 4
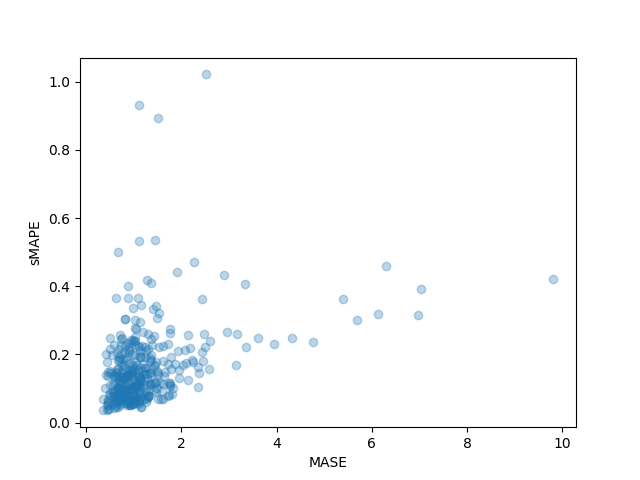
我们可以根据测试集中存在的样本值,根据真实情况评估生成的预测。这里我们使用数据集中的每个时间序列的 MASE 和 sMAPE 指标 (metrics) 来评估:
from evaluate import load
from gluonts.time_feature import get_seasonality

mase_metric = load("evaluate-metric/mase")
smape_metric = load("evaluate-metric/smape")

forecast_median = np.median(forecasts, 1)

mase_metrics = []
smape_metrics = []
for item_id, ts in enumerate(test_dataset):
    training_data = ts["target"][:-prediction_length]
    ground_truth = ts["target"][-prediction_length:]
    mase = mase_metric.compute(
        predictions=forecast_median[item_id],
        references=np.array(ground_truth),
        training=np.array(training_data),
        periodicity=get_seasonality(freq))
    mase_metrics.append(mase["mase"])

    smape = smape_metric.compute(
        predictions=forecast_median[item_id],
        references=np.array(ground_truth),
    )
    smape_metrics.append(smape["smape"])
- 1
- 2
- 3
- 4
- 5
- 6
- 7
- 8
- 9
- 10
- 11
- 12
- 13
- 14
- 15
- 16
- 17
- 18
- 19
- 20
- 21
- 22
- 23
- 24
- 25
print(f"MASE: {np.mean(mase_metrics)}")

>>> MASE: 1.2564196892177717

print(f"sMAPE: {np.mean(smape_metrics)}")

>>> sMAPE: 0.1609541520852549
- 1
- 2
- 3
- 4
- 5
- 6
- 7
我们还可以单独绘制数据集中每个时间序列的结果指标,并观察到其中少数时间序列对最终测试指标的影响很大:
plt.scatter(mase_metrics, smape_metrics, alpha=0.3)
plt.xlabel("MASE")
plt.ylabel("sMAPE")
plt.show()
- 1
- 2
- 3
- 4

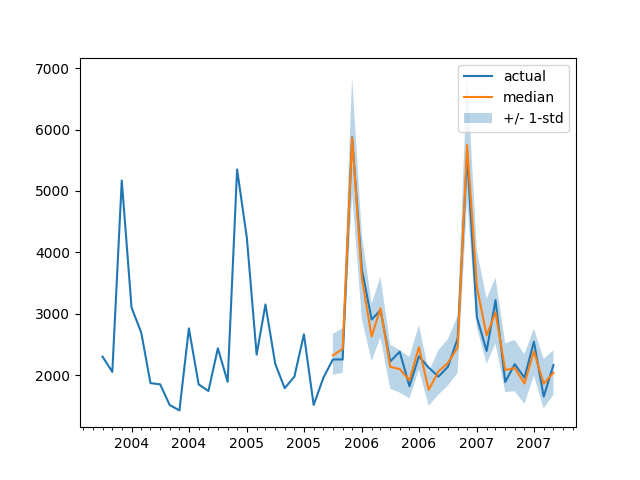
为了根据基本事实测试数据绘制任何时间序列的预测,我们定义了以下辅助绘图函数:
import matplotlib.dates as mdates

def plot(ts_index):
    fig, ax = plt.subplots()

    index = pd.period_range(
        start=test_dataset[ts_index][FieldName.START],
        periods=len(test_dataset[ts_index][FieldName.TARGET]),
        freq=freq,
    ).to_timestamp()

    # Major ticks every half year, minor ticks every month,
    ax.xaxis.set_major_locator(mdates.MonthLocator(bymonth=(1, 7)))
    ax.xaxis.set_minor_locator(mdates.MonthLocator())

    ax.plot(
        index[-2*prediction_length:],
        test_dataset[ts_index]["target"][-2*prediction_length:],
        label="actual",
    )

    plt.plot(
        index[-prediction_length:],
        np.median(forecasts[ts_index], axis=0),
        label="median",
    )

    plt.fill_between(
        index[-prediction_length:],
        forecasts[ts_index].mean(0) - forecasts[ts_index].std(axis=0),
        forecasts[ts_index].mean(0) + forecasts[ts_index].std(axis=0),
        alpha=0.3,
        interpolate=True,
        label="+/- 1-std",
    )
    plt.legend()
    plt.show()
- 1
- 2
- 3
- 4
- 5
- 6
- 7
- 8
- 9
- 10
- 11
- 12
- 13
- 14
- 15
- 16
- 17
- 18
- 19
- 20
- 21
- 22
- 23
- 24
- 25
- 26
- 27
- 28
- 29
- 30
- 31
- 32
- 33
- 34
- 35
- 36
- 37

总结
正如时间序列研究人员所知,人们对“将基于 Transformer 的模型应用于时间序列”问题很感兴趣。传统 vanilla Transformer 只是众多基于注意力 (Attention) 的模型之一,因此需要向库中补充更多模型。
目前没有什么能妨碍我们继续探索对多变量时间序列进行建模,但是为此需要使用多变量分布头来实例化模型。目前已经支持了对角独立分布,后续会增加其他多元分布支持。请继续关注未来的博客文章以及其中的教程。
最后,NLP/CV 领域从 大型预训练模型 中获益匪浅,但据我们所知,时间序列领域并非如此。基于 Transformer 的模型似乎是这一研究方向的必然之选,我们迫不及待地想看看研究人员和从业者会发现哪些突破!


