热门标签
热门文章
- 1RabbitMQ 服务异步通信 -- 初识MQ(同步通信和异步通信、MQ、几种常见MQ的对比)、RabbitMQ安装和介绍_mqui
- 2一文快速了解代理https和sock5协议的区别_mtproto和socks5选哪个
- 3Fortinet安全专家问答实录|如何防护暴力破解、撞库攻击_zoho和fortinet漏洞 防护策略
- 4java分页计算_java分页算法
- 5【git】消失的代码 git bug引起合并代码异常丢失(大部分人碰不到的BUG)_git合并文件丢失
- 6深度学习中提升准确率常见的优化方式
- 7Cocos2d,一个能实现梦想的 Python 库
- 8python 自动化测试工具集_pywinauto 前置
- 9ZTree节点单击展开_树控件 双击expand节点改为单机能expand
- 10基于简单的BP神经网络实现中文分词_神经网络分词模型
当前位置: article > 正文
前端开发实战项目:实时天气预报应用_前端天气预报插件
作者:黑客灵魂 | 2024-07-31 02:23:03
赞
踩
前端天气预报插件
引言
在本实战项目中,我们将开发一个实时天气预报应用。这个项目将帮助你掌握前端开发的核心技能,包括HTML、CSS、JavaScript,以及如何使用API来获取实时数据。通过这个项目,你将学会如何构建用户界面、处理用户交互、以及与第三方服务进行数据交互。
项目概述
实时天气预报应用将包括以下功能:
- 用户输入城市名称
- 显示该城市的当前天气状况
- 显示未来几天的天气预报
- 优雅的用户界面设计
技术栈
- HTML:构建应用的基本结构
- CSS:美化用户界面
- JavaScript:实现应用逻辑和与API的交互
- OpenWeatherMap API:获取实时天气数据
项目结构
weather-app/
│
├── index.html
├── style.css
└── script.js
- 1
- 2
- 3
- 4
- 5
获取免费 API Key
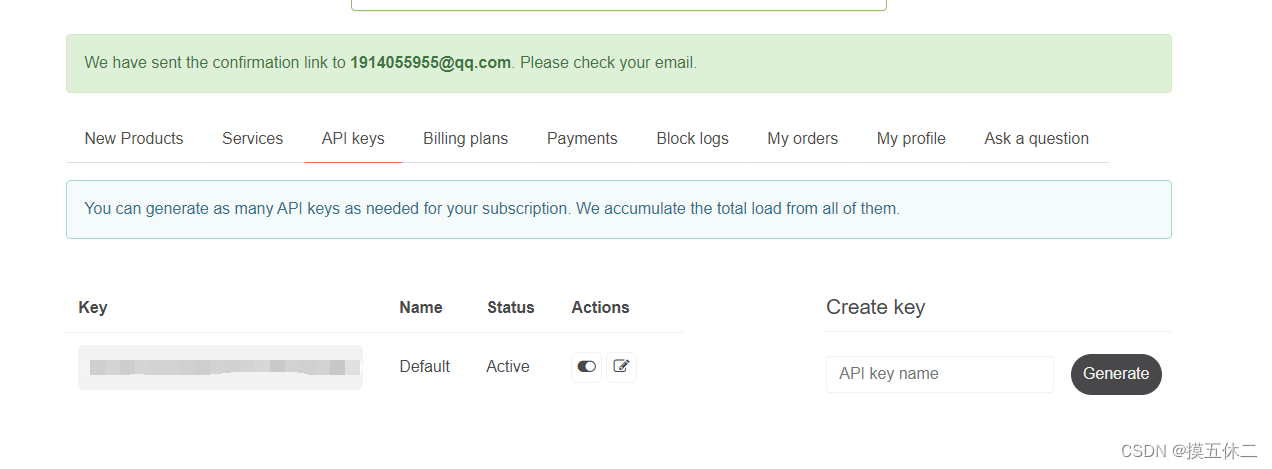
在开始项目之前,我们需要从 OpenWeatherMap 获取一个免费的 API Key。以下是获取 API Key 的步骤:
- 注册账号:访问 OpenWeatherMap 网站,点击右上角的“Sign Up”按钮进行注册。如果你已经有账号,可以直接登录。
- 生成 API Key:
- 登录后,进入你的账户页面。
- 点击“API keys”选项。
- 点击“Create Key”按钮,为你的应用创建一个新的 API Key。
- 给你的 API Key 取一个名称(例如“weather-app”),然后点击“Generate”按钮。
- 复制生成的 API Key,我们将在项目中使用它。

第一步:HTML 构建
首先,我们需要创建 index.html 文件,并添加基本的HTML结构。
<!DOCTYPE html>
<html lang="en">
<head>
    <meta charset="UTF-8">
    <meta name="viewport" content="width=device-width, initial-scale=1.0">
    <title>实时天气预报应用</title>
    <link rel="stylesheet" href="style.css">
</head>
<body>
    <div class="container">
        <h1>实时天气预报</h1>
        <div class="search">
            <input type="text" id="city-input" placeholder="输入城市名称">
            <button id="search-btn">搜索</button>
        </div>
        <div class="weather">
            <h2 id="city-name">城市名</h2>
            <div id="weather-info">
                <p id="temperature">温度: --℃</p>
                <p id="description">天气状况: --</p>
                <p id="humidity">湿度: --%</p>
                <p id="wind-speed">风速: -- m/s</p>
            </div>
            <div id="forecast">
                <!-- 未来天气预报 -->
            </div>
        </div>
    </div>
    <script src="script.js"></script>
</body>
</html>
- 1
- 2
- 3
- 4
- 5
- 6
- 7
- 8
- 9
- 10
- 11
- 12
- 13
- 14
- 15
- 16
- 17
- 18
- 19
- 20
- 21
- 22
- 23
- 24
- 25
- 26
- 27
- 28
- 29
- 30
- 31
第二步:CSS 美化
接下来,我们创建 style.css 文件,为应用添加样式。
body {
    font-family: Arial, sans-serif;
    background-color: #f0f0f0;
    color: #333;
    display: flex;
    justify-content: center;
    align-items: center;
    height: 100vh;
    margin: 0;
}

.container {
    background-color: #fff;
    padding: 20px;
    border-radius: 8px;
    box-shadow: 0 0 10px rgba(0, 0, 0, 0.1);
    text-align: center;
    width: 300px;
}

h1 {
    margin-bottom: 20px;
}

.search {
    margin-bottom: 20px;
}

#city-input {
    width: 70%;
    padding: 8px;
    margin-right: 8px;
    border: 1px solid #ccc;
    border-radius: 4px;
}

#search-btn {
    padding: 8px 16px;
    border: none;
    background-color: #007bff;
    color: #fff;
    border-radius: 4px;
    cursor: pointer;
}

#search-btn:hover {
    background-color: #0056b3;
}

.weather {
    margin-top: 20px;
}

#weather-info {
    margin-bottom: 20px;
}

#forecast {
    display: flex;
    justify-content: space-around;
}
- 1
- 2
- 3
- 4
- 5
- 6
- 7
- 8
- 9
- 10
- 11
- 12
- 13
- 14
- 15
- 16
- 17
- 18
- 19
- 20
- 21
- 22
- 23
- 24
- 25
- 26
- 27
- 28
- 29
- 30
- 31
- 32
- 33
- 34
- 35
- 36
- 37
- 38
- 39
- 40
- 41
- 42
- 43
- 44
- 45
- 46
- 47
- 48
- 49
- 50
- 51
- 52
- 53
- 54
- 55
- 56
- 57
- 58
- 59
- 60
- 61
第三步:JavaScript 实现功能
最后,我们创建 script.js 文件,编写JavaScript代码来实现应用逻辑。
const apiKey = 'YOUR_API_KEY'; // 使用你自己的 API Key
const apiUrl = 'https://api.openweathermap.org/data/2.5/weather?q=';

document.getElementById('search-btn').addEventListener('click', () => {
    const city = document.getElementById('city-input').value;
    getWeather(city);
});

async function getWeather(city) {
    try {
        const response = await fetch(`${apiUrl}${city}&appid=${apiKey}&units=metric`);
        const data = await response.json();

        if (data.cod === '404') {
            alert('城市未找到');
            return;
        }

        displayWeather(data);
    } catch (error) {
        console.error('Error fetching weather data:', error);
        alert('获取天气数据失败');
    }
}

function displayWeather(data) {
    document.getElementById('city-name').innerText = data.name;
    document.getElementById('temperature').innerText = `温度: ${data.main.temp}℃`;
    document.getElementById('description').innerText = `天气状况: ${data.weather[0].description}`;
    document.getElementById('humidity').innerText = `湿度: ${data.main.humidity}%`;
    document.getElementById('wind-speed').innerText = `风速: ${data.wind.speed} m/s`;
}
- 1
- 2
- 3
- 4
- 5
- 6
- 7
- 8
- 9
- 10
- 11
- 12
- 13
- 14
- 15
- 16
- 17
- 18
- 19
- 20
- 21
- 22
- 23
- 24
- 25
- 26
- 27
- 28
- 29
- 30
- 31
- 32
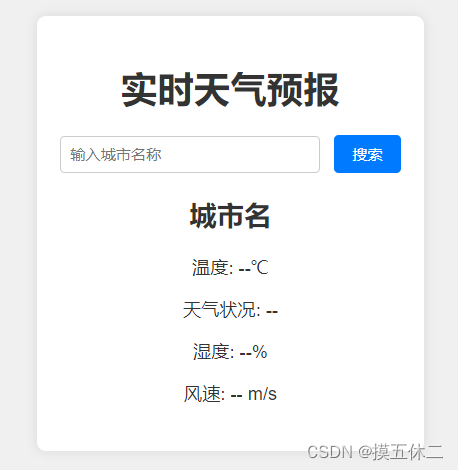
运行效果
当用户输入城市名称并点击“搜索”按钮后,应用将显示该城市的当前天气状况,包括温度、天气描述、湿度和风速。以下是应用的预期效果截图:

扩展功能
为了使应用更加完善,可以考虑添加以下功能:
- 显示未来几天的天气预报
- 提供不同语言的支持
- 使用本地存储保存用户的搜索历史
- 添加地图显示城市位置
结论
通过这个项目,你可以全面掌握前端开发的基础知识,并学会如何将这些知识应用于实际项目中。希望这篇实战指南能够帮助你更好地理解前端开发的核心概念,并激发你进一步探索和学习的兴趣。
声明:本文内容由网友自发贡献,不代表【wpsshop博客】立场,版权归原作者所有,本站不承担相应法律责任。如您发现有侵权的内容,请联系我们。转载请注明出处:https://www.wpsshop.cn/w/黑客灵魂/article/detail/906556
推荐阅读
相关标签


