- 1pyhanlp 停用词与用户自定义词典
- 2python错题集(1)_在python中,以下语句错误的是()。出+b=b. b=ac. b/=b+1ib+=1
- 3一文读懂:MongoDB Atlas怎样在AWS和Google Cloud上进行私有端点配置?
- 4共享库报错“error while loading shared libraries: lib**.so.**”_error while loading shared libraries: libcjson.so.
- 5特征值和特征向量及其在机器学习中的应用
- 6假期练习——两个整数的几种运算_本题目要求读入2个整数a和b和+,-,* 中的一个符号,计算加减乘的值。输入格式:
- 7【matlab】matlab随机函数
- 8qml中ListModel使用方法
- 9miniUI改变行的背景色,设置行的颜色_addrowcls
- 10matlab快速入门(25):匿名函数+主函数子函数_matlab主函数和子函数的位置
长短期记忆网络LSTM识别验证码、车牌识别
赞
踩
长短期记忆网络LSTM、验证码识别、车牌识别
关于LSTM的介绍和认识,可以参考这篇文章
长短期记忆网络LSTM:https://blog.csdn.net/eagleuniversityeye/article/details/91345671
数据处理:

…entry原图 ———————— reshape展开 —————— permute换轴 ———————— 输入LSTM

当我们传入车牌时,会将车牌展开为 C H W 形状,然后转为(C*H) W 形状,如下图一样,依次将1、2、3、4……传入RNN模型进行识别,RNN的特点就是可以保留输入的序列信息,所以当第3次输入以后,模型输出的就是包含“川”字的信息,当第5次输入以后,模型输出会包含“川A”的信息,以此类推。但是普通RNN有个致命的缺点:只能解决短期依赖,就是如果序列过长,很难保留下靠前的输入。因此,一个变种的RNN——LSTM解决了这个问题,他在RNN里面加入3个门来决定对前面的信息应该保留和丢弃哪些信息,所以这里我们也是选用的LSTM网络模型。

从上图我们可以看出,只有1列1列的信息组合起来,才能在几次输入以后得到某个字符的完整信息(比如1、2、3次输入以后可以得到川字的完整信息),如果1行1行输入,很难保留单个字符的完整信息,而要将数据1列1列的切出来传入模型,又会有点麻烦,所以我们在将上图做一次变换,做permute换轴操作,得到如下图的形状。

现在将图片一行一行循环索引,就能很好的得到单个字符的信息了。
一、LSTM识别验证码——一个模型
使用LSTM结合Seq2Seq结构实现验证码识别
验证码样式如下图:

代码生成42000张验证码(train:40000, test:2000),验证码有清晰的,有低度模糊的,也有中度模糊的,位置也随机。
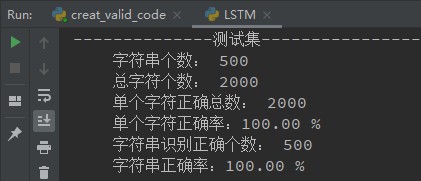
验证码和标签采用DataLoader加载,标签采用4*10的one-hot编码,网络输出每个图片也是4*10,训练20轮即达到了正确率100%,效果不错。

下面是模型部分代码,其他部分的代码就不贴了,损失函数MSELoss,优化器Adam。
import torch
from torch import nn


class Lstm(nn.Module):
	def __init__(self):
		super().__init__()
		self.fc1 = nn.Sequential(
			nn.Linear(180, 128),
			nn.BatchNorm1d(128),
			nn.LeakyReLU(),
		)
		self.lstm1 = nn.LSTM(128, 256, 2, batch_first=True)
		self.lstm2 = nn.LSTM(256, 128, 2, batch_first=True)
		self.fc2 = nn.Sequential(
			nn.Linear(128, 10),
		)

	def forward(self, entry):							# N C H W		N * 3 * 60 * 120
		entry = entry.reshape(-1, 3*60, 120)			# N V S			N * 180 * 120
		entry = entry.permute(0, 2, 1)					# N S V			N * 120 * 180
		entry = entry.reshape(-1, 180)					# N V			120N * 180
		fc1_out = self.fc1(entry)						# N V			120N * 128
		fc1_out = fc1_out.reshape(-1, 120, 128)			# N S V			N * 120 * 128
		lstm1_out, _ = self.lstm1(fc1_out)				# N S V			N * 120 * 256网络会输出S次
		lstm1_out = lstm1_out[:, -1, :]					# N V 			N * 256只保留最后一次输出
		lstm1_out = lstm1_out.reshape(-1, 1, 256)		# N 1 V			N * 1 * 256
		# 下行代码:N 4 V		广播为N * 4 * 256,后面对每个256提取特征输出做损失,后面的优化使得每个V保留一个字符的特征
		lstm1_out = lstm1_out.expand(lstm1_out.shape[0], 4, 256)
		lstm2_out, _ = self.lstm2(lstm1_out)			# N 4 V			N * 4 * 128
		lstm2_out = lstm2_out.reshape(-1, 128)			# 4N, V			4N * 128
		fc2_out = self.fc2(lstm2_out)					# 4N, V			4N * 10
		fc2_out = fc2_out.reshape(-1, 4, 10)			# N S V			N * 4 * 10

		return fc2_out
- 1
- 2
- 3
- 4
- 5
- 6
- 7
- 8
- 9
- 10
- 11
- 12
- 13
- 14
- 15
- 16
- 17
- 18
- 19
- 20
- 21
- 22
- 23
- 24
- 25
- 26
- 27
- 28
- 29
- 30
- 31
- 32
- 33
- 34
- 35
二、编码器和解码器分离
import torch
from torch import nn


class Encoder(nn.Module):
	def __init__(self):
		super().__init__()
		self.fc = nn.Sequential(
			nn.Linear(180, 128),
			nn.BatchNorm1d(128),
			nn.LeakyReLU(),
		)
		self.lstm = nn.LSTM(128, 256, 2, batch_first=True)			# V h num_layer

	def forward(self, x):							# N C H W		N 3 60 120
		x = x.reshape(-1, 180, 120)					# N V S			N 180 120
		x = x.permute(0, 2, 1)						# N S V			N 120 180
		x = x.reshape(-1, 180)						# N V			120N 180
		fc_out = self.fc(x)							# N V			120N 128
		fc_out = fc_out.reshape(-1, 120, 128)		# N S V			N 120 128
		lstm_out, _ = self.lstm(fc_out)				# N S V			N 120 256
		lstm_out = lstm_out[:, -1, :]				# N V			N 256
		lstm_out = lstm_out.reshape(-1, 1, 256)		# N 1 V			N 1 256
		lstm_out = lstm_out.expand(lstm_out.shape[0], 4, 256)		# N 4 256
		return lstm_out


class Decoder(nn.Module):
	def __init__(self):
		super().__init__()
		self.lstm = nn.LSTM(256, 128, 2, batch_first=True)
		self.fc = nn.Sequential(
			nn.Linear(128, 10),
		)

	def forward(self, x):
		lstm_out, _ = self.lstm(x)						# N S V			N 4 128
		lstm_out = lstm_out.reshape(-1, 128)			# N V			4N 128
		fc_out = self.fc(lstm_out)						# N V			4N 10
		fc_out = fc_out.reshape(-1, 4, 10)				# N S V			N 4 10
		return fc_out


class Net(nn.Module):
	def __init__(self):
		super().__init__()
		self.encoder = Encoder()
		self.decoder = Decoder()

	def forward(self, x):
		encoder = self.encoder(x)
		decoder = self.decoder(encoder)

		return decoder


# 直接实例化Net()即可,优化也是直接优化Net()的权重即可
# self.net = Net().to(self.device)
# self.opt = torch.optim.Adam(self.net.parameters())
- 1
- 2
- 3
- 4
- 5
- 6
- 7
- 8
- 9
- 10
- 11
- 12
- 13
- 14
- 15
- 16
- 17
- 18
- 19
- 20
- 21
- 22
- 23
- 24
- 25
- 26
- 27
- 28
- 29
- 30
- 31
- 32
- 33
- 34
- 35
- 36
- 37
- 38
- 39
- 40
- 41
- 42
- 43
- 44
- 45
- 46
- 47
- 48
- 49
- 50
- 51
- 52
- 53
- 54
- 55
- 56
- 57
- 58
- 59
- 60
可以修改LSTM参数以改变模型识别率,代价是计算量的增减。
三、车牌识别
车牌识别的原理和验证码识别相似,不过车牌识别最后将第一个汉字和后面6个字符分开输出单独做损失(当然也可以一起输出做损失),汉字为29个省及直辖市简称,相当于做29分类,字符为24个字母(车牌中没有字母I、O)+10个数字,相当于后6个字符做34分类

3.1训练效果
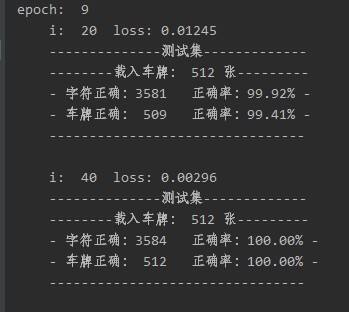
17万张车牌数据集进行训练,训练了8个epoch,第9个epoch在与训练集无重复的验证集上就达到了100%正确的精度。
(车牌是标准尺度、标准角度、标准光线,是用代码生成的数据集)如下所示


损失图(每个epoch保存17个数据,11个epoch得到的损失和正确率曲线图),蓝色:损失;橙色:当个字符识别正确率;绿色:车牌上7个字符都识别正确率

3.2 模型
输入为N C H W (N * 3 * 40 * 150)
输出为N V 和 N S V(N * 29, N * 6 * 34)
29为汉字29分类,6*34为6个(字符+数字34分类)
class Lstm(nn.Module):
	def __init__(self):
		super().__init__()
		self.fc1 = nn.Sequential(
			nn.Linear(120, 256),
			nn.BatchNorm1d(256),
			nn.LeakyReLU(),
		)
		self.lstm1 = nn.LSTM(256, 512, 2, batch_first=True)
		self.lstm2 = nn.LSTM(512, 256, 2, batch_first=True)
		self.fc_pai1 = nn.Sequential(
			nn.Linear(256, 29)
		)
		self.fc_pai6 = nn.Sequential(
			nn.Linear(256, 34)
		)

	def forward(self, entry):							# N C H W		N * 3 * 40 * 150
		entry = entry.reshape(-1, 3*40, 150)			# N V S			N * 120 * 150
		entry = entry.permute(0, 2, 1)					# N S V			N * 150 * 120
		entry = entry.reshape(-1, 120)					# N V			150N * 120
		fc1_out = self.fc1(entry)						# N V			150N * 256
		fc1_out = fc1_out.reshape(-1, 150, 256)			# N S V			N * 150 * 256
		lstm1_out, _ = self.lstm1(fc1_out)				# N S V			N * 150 * 512网络会输出S次
		lstm1_out = lstm1_out[:, -1, :]					# N V 			N * 512只保留最后一次输出
		lstm1_out = lstm1_out.reshape(-1, 1, 512)		# N 1 V			N * 1 * 512

		# 下行代码:N 7 V		广播为N * 7 * 512,后面对每个256提取特征输出做损失,后面的优化使得每个
		# V保留一个字符的特征
		lstm1_out = lstm1_out.expand(lstm1_out.shape[0], 7, 512)
		lstm2_out, _ = self.lstm2(lstm1_out)			# N 7 V			N * 7 * 256
		pai1 = lstm2_out[:, 0, :]						# 切出第一位,汉字
		pai6 = lstm2_out[:, 1:, :]						# 切出后6位字符
		pai1_out = self.fc_pai1(pai1)					# N, V			N * 29
		pai6 = pai6.reshape(-1, 256)					# 6N, V			6N * 256
		pai6_out = self.fc_pai6(pai6)					# 6N, V			6N * 34
		pai6_out = pai6_out.reshape(-1, 6, 34)			# N S V			N * 6 * 34

		return pai1_out, pai6_out
- 1
- 2
- 3
- 4
- 5
- 6
- 7
- 8
- 9
- 10
- 11
- 12
- 13
- 14
- 15
- 16
- 17
- 18
- 19
- 20
- 21
- 22
- 23
- 24
- 25
- 26
- 27
- 28
- 29
- 30
- 31
- 32
- 33
- 34
- 35
- 36
- 37
- 38
- 39
print('The End !')
- 1


